フューチャー技術ブログ

Great ExpectationsでBigQueryのデータ品質を監視する

1. はじめに

こんにちは、フューチャーでアルバイトをしている板野です。

Great Expectationsというツールを使って、表形式データの品質をバリデーションする流れをご紹介します。

MLOpsを推進するにあたりMLモデルの監視が必要となってきています。その中でも、MLモデルに入出力されるデータ品質をバリデーションすることは重要な監視事項の一つです。

ML監視についての概要や意義については、こちらの記事で詳しく述べられているのでぜひご覧ください。

2. Great Expectationsの概要

公式サイトロゴ

Great Expectations(GX)はデータ品質監視ツールの1つで、表形式データの品質監視ができます。GXはOSSであり、Pythonライブラリとして提供されています。

予めデータに対し、Expectationと呼ばれる「データのあるべき姿」を定義しておき、監視対象のデータがこれに逸脱していないかをチェック(バリデーション)します。Expectationは例えば「この列の最大値は100,最小値は50」といったものがあり、GXではExpectationを複数定義することが一般的です。Expectationを複数定義したものをExpectation Suiteと呼びます。

GXでは「監視対象データ、Expectation Suite、バリデーションを実施した後の行動」の3点をまとめたものをCheckpointと呼び、定期的にCheckpointを実行することが、GXにおけるデータ品質監視の一般的な流れとなります。

3. 利用の流れ

3.1. 事前準備

必要な環境

  • Python環境
  • JupyterNotebook環境(必須ではないですが初期設定ではあった方が楽です)

使用するデータ

Bike Sharing Datasetを利用し、1時間毎のシェアバイク利用者数が記録されているテーブルを使います。

以下のような内容になっています。

例えば、hr(時間)の列は0から23までの値しか入らないはずです。もしも、hrが27のような不正値をとる行が入ってきた場合、検知するというのがGXの使いどころです。

今回はhrに27という不正値を故意に入れてみて、これをGXで検知するまでの流れを実践し、以下に説明していきます。

3.2. GXのインストール

pip install great-expectationsコマンドでGXをインストールします。

執筆当時のバージョンは0.16.8です。

$ pip install great-expectations
$ pip freeze | grep great # バージョン確認
great-expectations==0.16.8

3.3. プロジェクトの作成

great_expectations initコマンドでGXプロジェクトを作成します。

コマンドを実行したディレクトリにgreat_expectationsディレクトリが自動生成されます。

$ great_expectations init

___ _ ___ _ _ _
/ __|_ _ ___ __ _| |_ | __|_ ___ __ ___ __| |_ __ _| |_(_)___ _ _ ___
| (_ | '_/ -_) _` | _| | _|\ \ / '_ \/ -_) _| _/ _` | _| / _ \ ' \(_-<
\___|_| \___\__,_|\__| |___/_\_\ .__/\___\__|\__\__,_|\__|_\___/_||_/__/
|_|
~ Always know what to expect from your data ~

Let's create a new Data Context to hold your project configuration.

Great Expectations will create a new directory with the following structure:

great_expectations
|-- great_expectations.yml
|-- expectations
|-- checkpoints
|-- plugins
|-- .gitignore
|-- uncommitted
|-- config_variables.yml
|-- data_docs
|-- validations

OK to proceed? [Y/n]: Y

================================================================================

Congratulations! You are now ready to customize your Great Expectations configuration.

You can customize your configuration in many ways. Here are some examples:

Use the CLI to:
- Run `great_expectations datasource new` to connect to your data.
- Run `great_expectations checkpoint new <checkpoint_name>` to bundle data with Expectation Suite(s) in a Checkpoint for later re-validation.
- Run `great_expectations suite --help` to create, edit, list, profile Expectation Suites.
- Run `great_expectations docs --help` to build and manage Data Docs sites.

Edit your configuration in great_expectations.yml to:
- Move Stores to the cloud
- Add Slack notifications, PagerDuty alerts, etc.
- Customize your Data Docs

Please see our documentation for more configuration options!

自動生成されたディレクトリの構成を簡潔に説明すると、以下の通りになります。

great_expectations  # GXのルートとなるディレクトリ
|-- great_expectations.yml # プロジェクト全体の設定ファイル
|-- expectations # Expectationsを定義したJSONファイルが格納されるディレクトリ
|-- checkpoints # Checkpointを定義したyamlファイルが格納されるディレクトリ
|-- plugins # プラグイン用のディレクトリ(本記事では扱わない)
|-- .gitignore # uncommittedディレクトリをGitにコミットしないように書かれたgitignoreファイル
|-- uncommitted # Gitで管理する際にコミットされないディレクトリ
|-- config_variables.yml # 公開したくないキーや設定が書かれたファイル
|-- data_docs # バリデーション結果がHTML等のドキュメントの形式で入ったディレクトリ
|-- validations # バリデーション結果のメタデータ(JSON)が入ったディレクトリ

3.4. データソースの登録

次に、監視対象データの場所(データソース)を定義する必要があります。

GXでは、Pandasで扱えるファイルや、SQLベースのクエリで取得できるデータなどに対応しています。今回はBigQueryのテーブルをデータソースとして登録します。

great_expectations datasource newコマンドを実行すると、最初にデータソースの種類の選択が促され、自動的にNotebookが起動します。このタイミングでNotebookを起動させたく無ければ--no-jupyterオプションを末尾に付けます。

$ great_expectations datasource new --no-jupyter

What data would you like Great Expectations to connect to?
1. Files on a filesystem (for processing with Pandas or Spark)
2. Relational database (SQL)
: 2

Which database backend are you using?
1. MySQL
2. Postgres
3. Redshift
4. Snowflake
5. BigQuery
6. Trino
7. Athena
8. other - Do you have a working SQLAlchemy connection string?
: 5
Please install the optional dependency 'black' to enable linting. Returning input with no changes.
To continue editing this Datasource, run jupyter notebook <現在のディレクトリ>/great_expectations/uncommitted/datasource_new.ipynb

コマンドでの対話を進めると、Notebookファイルgreat_expectations/uncommitted/datasource_new.ipynbが自動的に生成されます。

GXはこのNotebookを実行して、CLIでは設定しずらい詳細な設定を適用していく仕様です。Notebookを使わない場合は直接yamlファイルを編集することになります(補足参照)。

以下の画像はNotebookの冒頭です。

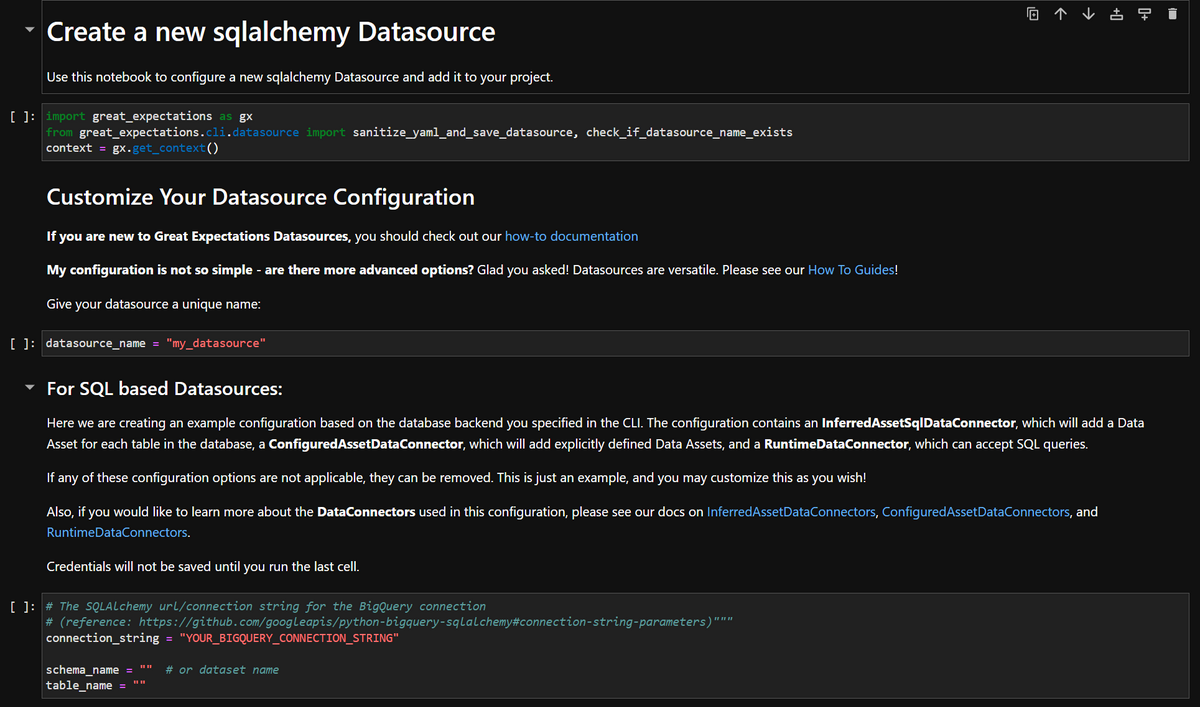
Notebook上の以下の変数を自身のプロジェクトに合うように変更する必要があります。

datasource_name = "<設定したいデータソース名>" #好みの名前に設定可能

connection_string = "bigquery://<GCPのプロジェクト名>/<BigQueryのデータセット名>"

schema_name = "" # 入力不要
table_name = "<BigQueryのテーブル名>" # 監視対象データのテーブル

上記の変数を変更した後、Notebookのセルを全て実行するとデータソースの設定は完了です。

補足

datasource_new.ipynbでは、GX全体の設定ファイルであるgreat_expectations.ymlのデータソースを定義する部分を編集しているだけで、Notebookはこれを編集するための分かりやすいインターフェースに過ぎません。

従って、Notebookを使わずにgreat_expectations.ymlのデータソース定義部分を直接編集するだけで設定が可能です。

例えばBigQueryなら、以下のようにデータソースを定義します。(公式Docs参考

name: my_datasource
class_name: Datasource
execution_engine:
class_name: SqlAlchemyExecutionEngine
connection_string: bigquery://<GCPのプロジェクト名>/<BigQueryのデータセット名>
data_connectors:
default_runtime_data_connector_name:
class_name: RuntimeDataConnector
batch_identifiers:
- default_identifier_name
default_inferred_data_connector_name:
class_name: InferredAssetSqlDataConnector
include_schema_name: true

3.5. Expectation Suiteの作成

続いて、Expectation Suiteを作成します。

Expectation Suiteは複数のExpectationの集まりのことを指します。一つ一つ手作業でExpectationを定義・バリデーションしていくのは非効率なため、Expectation Suiteを定義してまとめて行うのです。

great_expectations suite newコマンドを実行すると、先程と似た流れでCLIとNotebookを使ってセットアップを行います。最初の「How would you like to create your Expectation Suite?」という質問に「3」と回答するとExpectation Suiteを自動で生成してくれます。

今回はExpectation Suiteを自動生成してもらいます。

$ great_expectations suite new --no-jupyter

How would you like to create your Expectation Suite?
1. Manually, without interacting with a sample Batch of data (default)
2. Interactively, with a sample Batch of data
3. Automatically, using a Data Assistant
: 3

A batch of data is required to edit the suite - let's help you to specify it.

Select data_connector
1. default_runtime_data_connector_name
2. default_inferred_data_connector_name
3. default_configured_data_connector_name
: 3

Which data asset (accessible by data connector "default_configured_data_connector_name") would you like to use?
1. <テーブル名>

Type [n] to see the next page or [p] for the previous. When you're ready to select an asset, enter the index.
: 1

Name the new Expectation Suite [<テーブル名>.warning]: exp_suite_test

Great Expectations will create a notebook, containing code cells that select from available columns in your dataset and
generate expectations about them to demonstrate some examples of assertions you can make about your data.

When you run this notebook, Great Expectations will store these expectations in a new Expectation Suite "exp_suite_test" here:

file:///<現在のディレクトリ>/great_expectations/expectations/exp_suite_test.json

Would you like to proceed? [Y/n]: Y

# 中略

To continue editing this suite, run jupyter notebook <現在のディレクトリ>/great_expectations/uncommitted/edit_exp_suite_test.ipynb

コマンドの実行が完了すると、Expectation Suiteを設定するためのNotebookファイルgreat_expectations/uncommitted/edit_exp_suite_test.ipynbが自動生成されます。

以下の画像はNotebookの冒頭です。

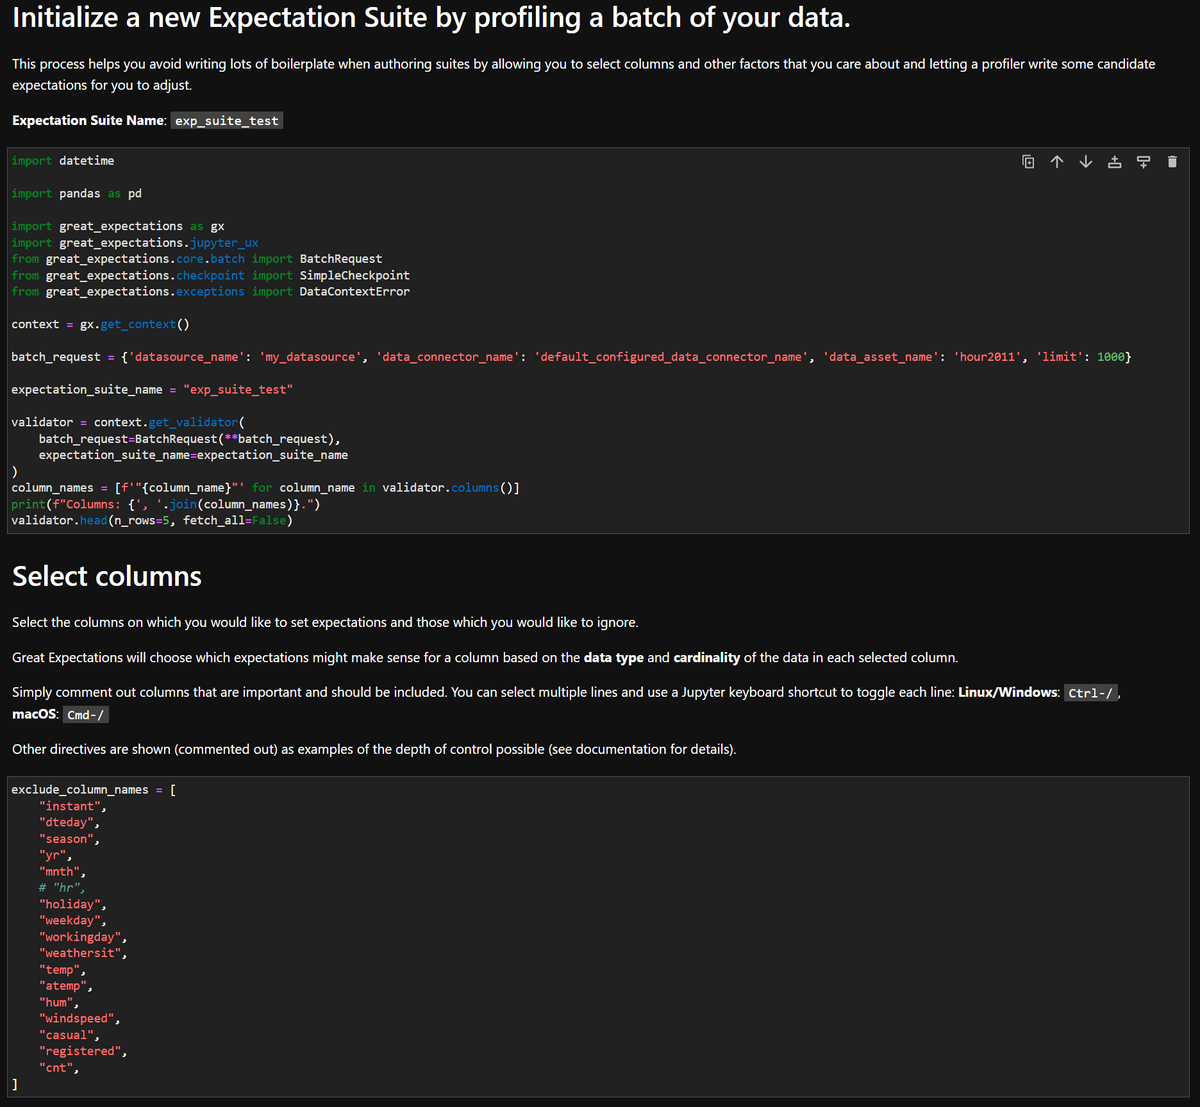
Notebookにて、必要に応じて変更すべき変数は以下の2つです。

  • batch_request
    • ‘limit’ の数はデフォルトで1000となっていますが、必要に応じて変更します
    • この値は一度のバリデーションでBigQueryのテーブルデータを何件読み込んでくるかの数値です
    • ‘limit’ の数値が大きすぎると処理が重くなる可能性があります
  • exclude_column_names
    • バリデーションしたい列をコメントアウトします
    • 初期状態のままでは全てがexcludeされている状態なので、どの列もバリデーションしないというおかしな設定になってしまいます
    • 今回はhr列だけバリデーションしたいのでここだけコメントアウトしています

Notebookのセルを全て実行すると、自動でExpectation Suiteが作成され、そのExpectation Suiteが定義されたJSONファイルがgreat_expectations/expectations/配下に保存されます。

以下はそのJSONファイルを一部展開して表示した画像です。

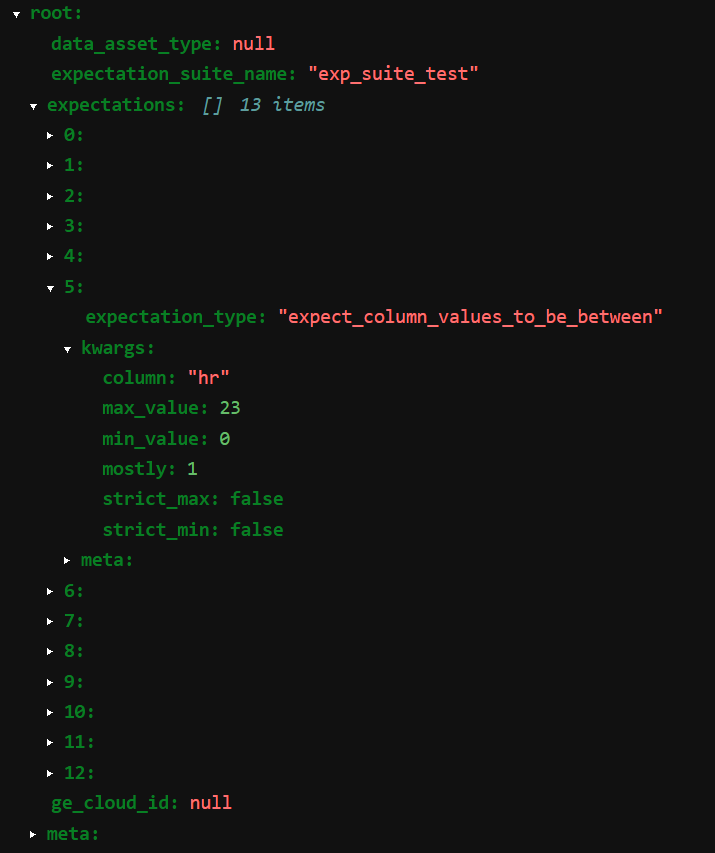
expectationは計13個自動生成されたようです。

その中の一つはexpect_column_values_to_be_betweenというもので、「hr列は0から23までの値をとるはずである」という内容のexpectationです。

またこの時点で、Expectation Suiteの生成と同時に、データのバリデーションまで行われています。

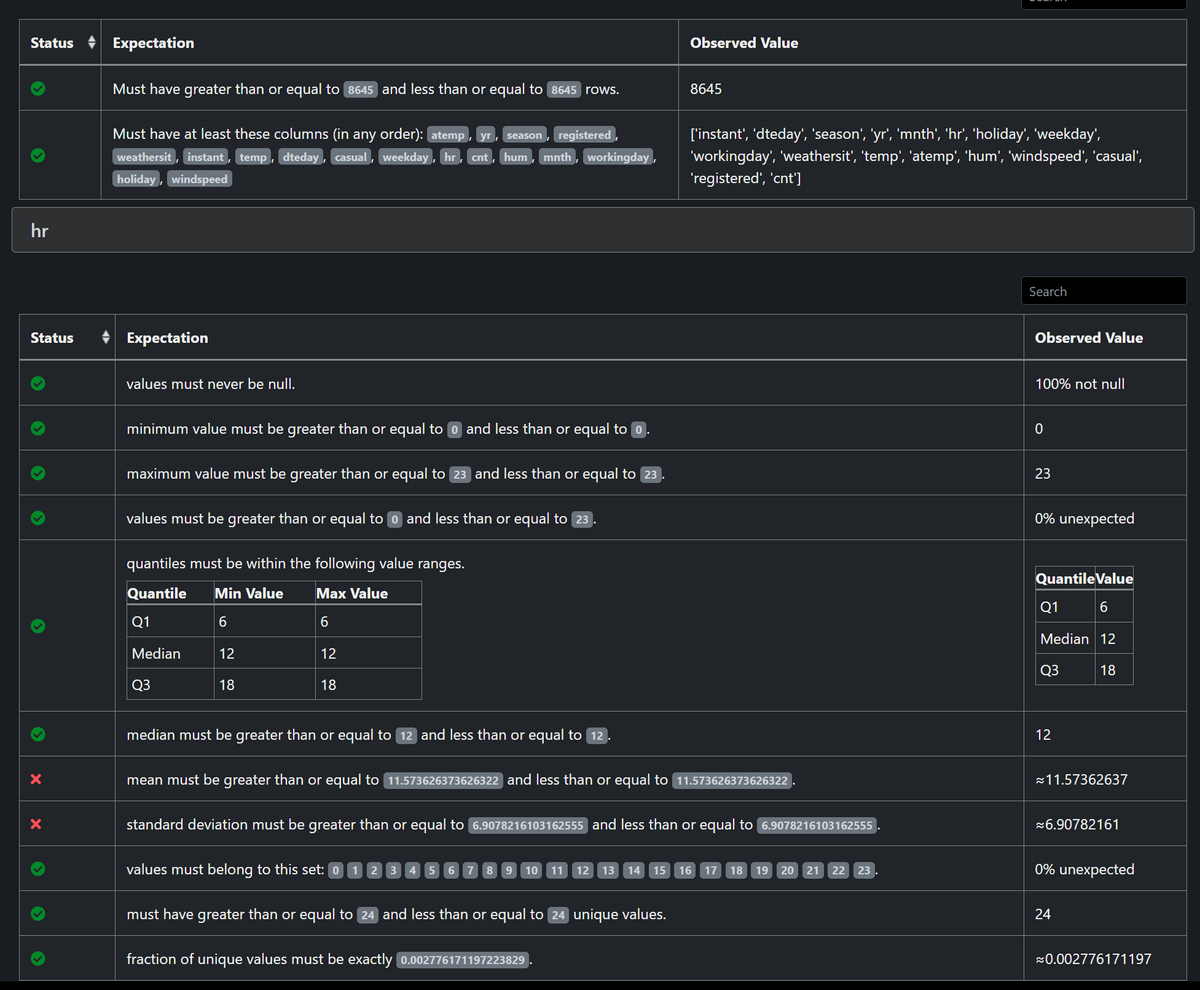
great_expectations/uncommitted/data_docs/local_site/index.htmlを開くと以下のような画面があり、1度バリデーションが行われていることが分かります。

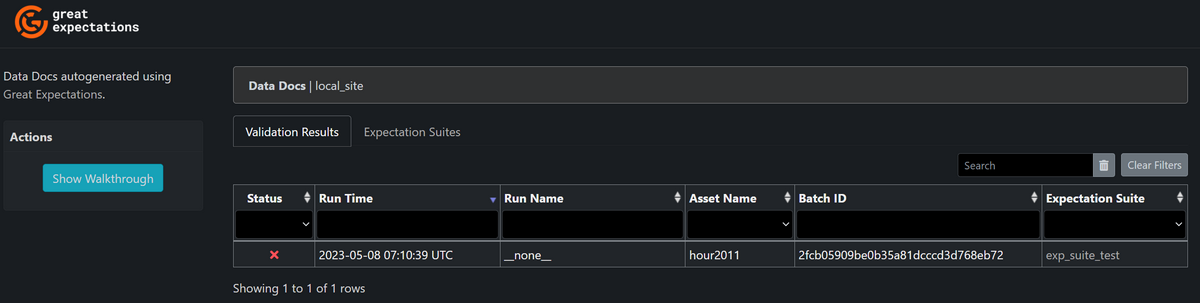
クリックして詳細を見てみると、2つのExpectationに不合格となっているようです。
自動生成のExpectationが何個も定義されているので、多少は変なExpectationが生成されることもあるのでしょう。

3.6. Checkpointの作成・実行

最後に、Checkpointを作成する必要があります。

Checkpointとは「監視対象データ(データソース)、Expectation Suite、バリデーションを実施した後の行動」の3点をまとめたものであり、Checkpointを実行することで、Expectation Suiteをまとめてバリデーションすることができます。

バリデーションを実施した後の行動として、結果をメールやSlackでの通知する等が挙げられますが、Pythonでプログラミングできるものなら何でも可能となっており、自由度が高いです。(公式Docs参考
※今回はバリデーションを実施した後の行動の設定までは扱いません

great_expectations checkpoint new <設定したいcheckpoint名>コマンドを実行すると、great_expectations/uncommitted/edit_checkpoint_~~.ipynbにNotebookファイルが自動生成されます。

$ great_expectations checkpoint new --no-jupyter checkpoint_test

Please install the optional dependency 'black' to enable linting. Returning input with no changes.

# 中略

To continue editing this Checkpoint, run jupyter notebook <現在のディレクトリ>/great_expectations/uncommitted/edit_checkpoint_checkpoint_test.ipynb

生成されたNotebookファイルで変更する必要がある部分は次の通りです。

初期状態ではdata_asset_nameの行がBigQuery上の適当なテーブルになっているので、監視対象にしたいデータセット名、テーブル名に書き換えます。

my_checkpoint_name = "checkpoint_test" # This was populated from your CLI command.

yaml_config = f"""
name: {my_checkpoint_name}
config_version: 1.0
class_name: SimpleCheckpoint
run_name_template: "%Y%m%d-%H%M%S-my-run-name-template"
validations:
- batch_request:
datasource_name: my_datasource
data_connector_name: default_inferred_data_connector_name
data_asset_name: <監視したいデータセット名>.<監視したいテーブル名> #★ここを変更する
data_connector_query:
index: -1
expectation_suite_name: my_exp_suite
"""
print(yaml_config)

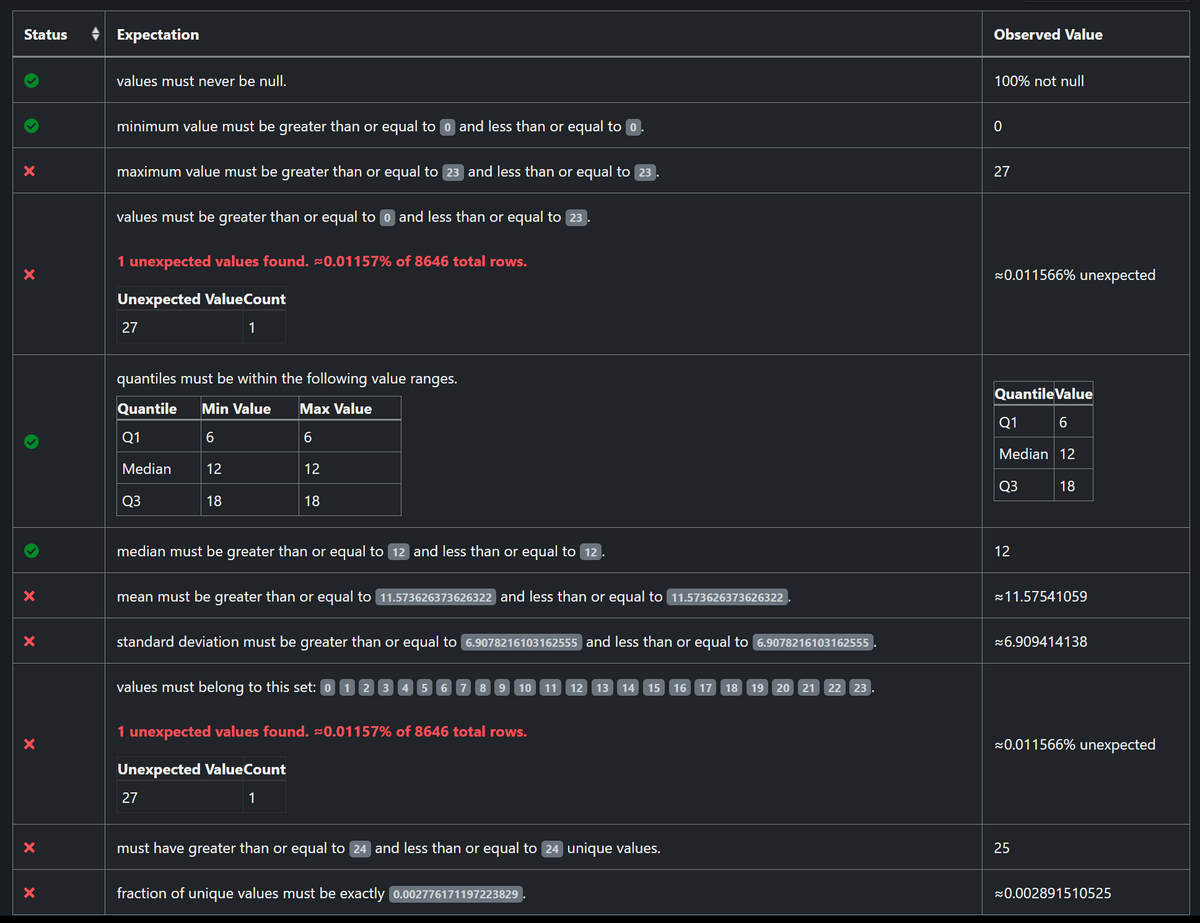
今回はExpectation Suiteの自動生成に用いたテーブルに「hr(時間)の列の値を27に変更した不正な行」を追加したテーブルを監視対象としてCheckpointを作成しました。

Notebookの全てのセルを実行し、末尾のセルのコメントアウトを外して実行すると、Checkpointが実行されます。Checkpointの実行結果は先程同様にgreat_expectations/uncommitted/data_docs/local_site/index.htmlを開いて閲覧できます。

以下のように、不正な行を1行追加しただけで不合格の項目が増えていることが確認できます。

このようにしてデータの不正・品質劣化を監視することができます。

以上でCheckpointを実行するまでの流れは終了です。

上記(3.1.~3.5.)の手順を実行しておけば、今後はCheckpointを実行するだけでバリデーションできます。

Checkpointの定義はyamlファイルとして保存されており、PythonまたはCLIからAPIを呼び出すだけで何度でも実行することができます。

4. Tips

以下はGXの調査検証を進めていくにあたり生じた疑問とその答えをまとめたものです。

GXの利用を検討しているさいはご参考ください。

Expectation Suiteを編集したいときは?

great_expectations suite edit <編集したいExpectation Suite名>コマンドにより編集できます。

CLIコマンドによる対話形式で「2. Interactively, with a sample batch of data」の選択肢を選ぶと、Notebook形式のインターフェースでExpectationを一つ一つ編集できます。

$ great_expectations suite edit exp_suite_test --no-jupyter

How would you like to edit your Expectation Suite?
1. Manually, without interacting with a sample batch of data (default)
2. Interactively, with a sample batch of data
: 2

A batch of data is required to edit the suite - let's help you to specify it.

Select data_connector
1. default_runtime_data_connector_name
2. default_inferred_data_connector_name
3. default_configured_data_connector_name
: 3

Which data asset (accessible by data connector "default_configured_data_connector_name") would you like to use?
1. <テーブル名>

Type [n] to see the next page or [p] for the previous. When you're ready to select an asset, enter the index.
: 1

# 中略

To continue editing this suite, run jupyter notebook <現在のディレクトリ>/great_expectations/uncommitted/edit_exp_suite_test.ipynb

JSONファイルを直接編集することもできますが、複雑なため、Notebook形式やPythonのAPI経由で編集することをお勧めします。(公式Docs参考

GCPにおける構成例は?

公式Docsによると、GCPを利用する場合、以下のような構成で動かす一例が挙げられています。\

設定のための初回実行はローカル環境で行い、定期実行する際はCloud Composerを利用します。

また、メタデータやバリデーション結果のドキュメント等はGCSに保存しておきます。

バリデーション結果のドキュメントはHTML形式なのでGCSのエンドポイントにアクセスして閲覧できる設定をすれば便利そうです。
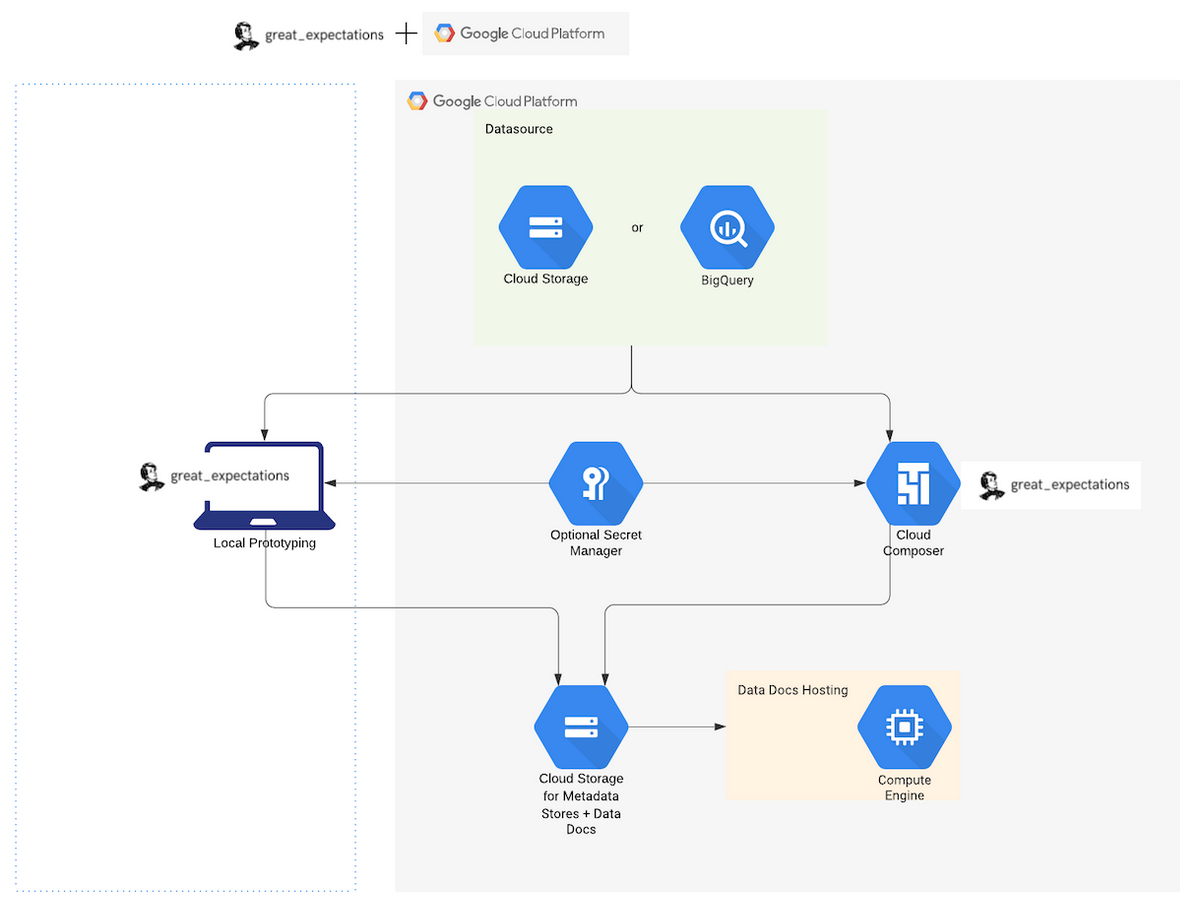
Great Expectations 公式Docsより画像引用

Expectationにはどんな種類があるか?

多すぎて把握出来ていませんが、公式コミュニティに既存のExpectationsが300個以上あります。

Expectationを自作することも可能であり、カスタマイズ性は非常に高いです。(公式Docs参考

5. おわりに

今回は、Great Expectations(GX)を利用してBigQueryのデータ品質を監視する簡単な流れを紹介をしました。

GXには様々な機能や拡張性を備えており、様々なユースケースにカスタマイズすることができます。

本記事が読者の皆様のご参考になれば幸いです。