フューチャー技術ブログ

WSLで始めるサーバーサイドSwift 入門 ~Hummingbird~

image.png

はじめに

こんにちは。HealthCare Innovation Group(HIG)1所属の清水です。
春の入門連載2024、6本目の記事です。

SwiftにおけるWebフレームワークを取り上げます。Swift7はiOSアプリ開発のイメージが強いと思いますが、iOSアプリ開発以外でも利用できることを紹介します。
(macOS以外でもSwiftが動かせたら楽しいなというモチベーションで記事を執筆しております。)

Swift における Web フレームワーク

そもそもSwiftにおけるWebフレームワークは、何があるでしょうか?

Swift.org8Swift on Server内で紹介されているWeb フレームワークは以下2つです。

GitHub Star 数を比較した図を以下に示します。

先発のフレームワークであるVaporの方が人気で、検索すると日本語記事もいくつかヒットします。Swift.org内のWebフレームワークチュートリアル2として取り上げられていることからも、Vaporが主流となっていることが伺えます。Vaporについては記事になっているものも多いため、後発のHummingbirdを試します。

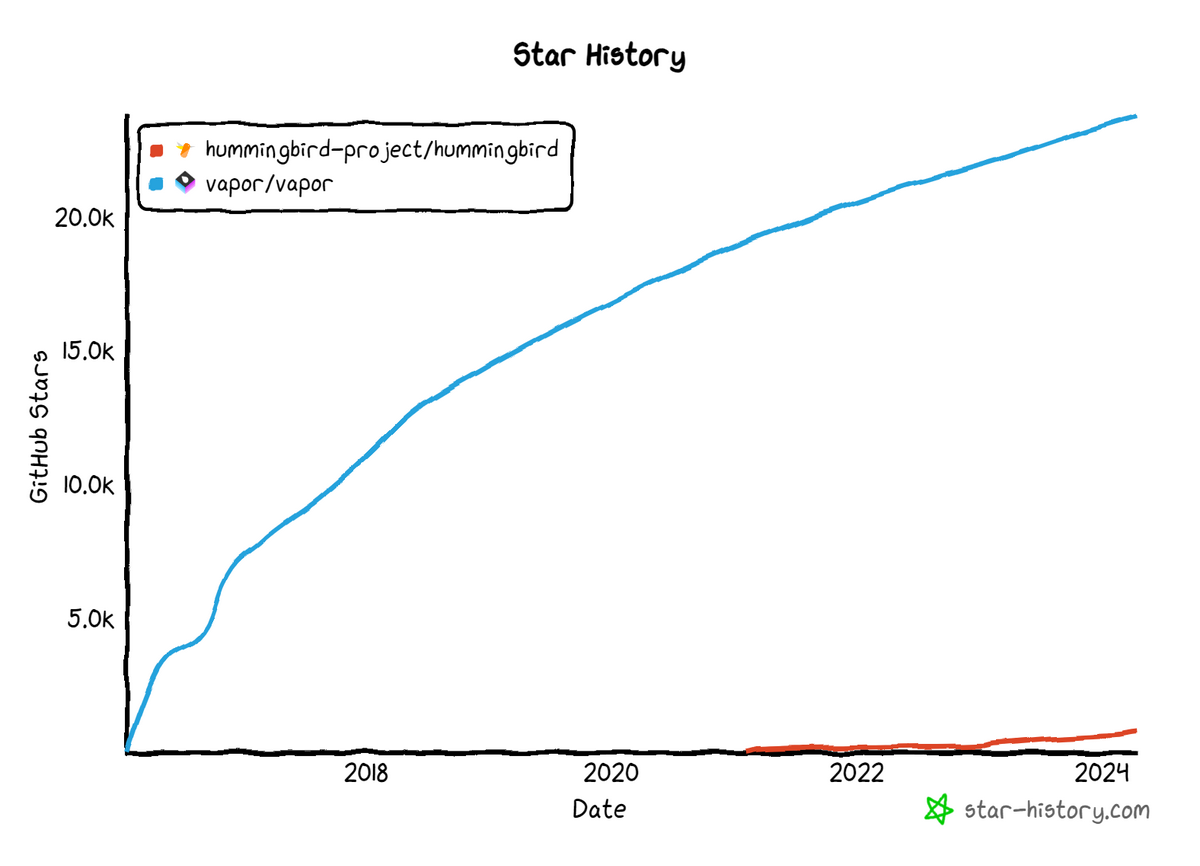
(参考:https://star-history.com/#hummingbird-project/hummingbird&vapor/vapor&Date)

Hummingbird とは

軽量で依存関係が少ないことを売りとしているフレームワークの一つです。

Hummingbird の README にも以下の記載があります。

Lightweight, flexible, modern server framework written in Swift.

Hummingbird は、最小限のコアフレームワークのみを提供して、個別で拡張していくことができるようになっています。前述の Vapor の方が機能自体は豊富だと思いますが、サクッと使いたい場合は Hummingbird なのかなと認識しています。

また、公式ドキュメントがAppleのDeveloper向けのドキュメント10そっくりなので、ぜひ覗いてみてほしいです。

https://docs.hummingbird.codes/2.0/documentation/hummingbird/

セットアップ

環境情報

本記事は、以下の環境で実施を確認しています。

  • Windows Subsystem for Linux (以下、WSL)に関するバージョン情報
    cmd.exe
    >wsl -v
    WSL バージョン: 2.1.5.0
    カーネル バージョン: 5.15.146.1-2
    WSLg バージョン: 1.0.60
    MSRDC バージョン: 1.2.5105
    Direct3D バージョン: 1.611.1-81528511
    DXCore バージョン: 10.0.25131.1002-220531-1700.rs-onecore-base2-hyp
    Windows バージョン: 10.0.19045.4170
  • Ubuntu のバージョン: 22.04.4 LTS
  • Swift のバージョン: 5.10

Swift のインストール

まずは、SwiftをUbuntu上にインストールします。
Hummingbirdの公式ドキュメントにはSwift自体のインストールに関する記載はなかったため、Vaporの公式ドキュメントを参考にSwiftly3を用いてインストールしました。
Swiftly は、Swift Server Workgroup9 が提供するCLIツールで異なるバージョンのSwiftを使い分けることができます。
記載の手順通り、実行していきます。

# swiftly のインストール
> curl -L https://swift-server.github.io/swiftly/swiftly-install.sh | bash
~~~
Select one of the following:
1) Proceed with the installation (default)
2) Customize the installation
3) Cancel
> 1
~~~
# `swiftly` を有効化するため、PATH へ追加
> . $HOME/.local/share/swiftly/env.sh

# 最新バージョンの Swift をインストール
> swiftly install latest
~~~
Set the active toolchain to Swift 5.10.0
Swift 5.10.0 installed successfully!

# Swift がインストールされていることを確認する
> swift --version
Swift version 5.10 (swift-5.10-RELEASE)
Target: x86_64-unknown-linux-gnu

Hummingbird を用いたToDoアプリの構築(公式チュートリアル)

ここから先は、Hummingbird 公式ドキュメント記載のチュートリアルを元に Hummingbird のセットアップからToDoアプリの構築までのハンズオンを試してみます。

https://docs.hummingbird.codes/2.0/tutorials/todos/

Hummingbird のセットアップ

# プロジェクトDirectoryの作成
> mkdir Todos
> cd Todos
# パッケージに必要なテンプレートで初期化
> swift package init --type tool
# ディレクトリ構成の確認
> tree
.
├── Package.resolved # パッケージの依存関係解決を記録
├── Package.swift # 依存パッケージを記載
└── Sources
└── Todos.swift # 本体
--type tool について

--type tool は、コマンドライン引数をデフォルトで利用できるテンプレートみたいです。
Package.swift に、 https://github.com/apple/swift-argument-parser.git が含まれるか否かと置き換えても問題ないと思います。

--type executable の場合
> swift package init --type executable
Creating executable package: Sample
Creating Package.swift
Creating .gitignore
Creating Sources/
Creating Sources/main.swift
Package.swift
// swift-tools-version: 5.10
// The swift-tools-version declares the minimum version of Swift required to build this package.
import PackageDescription

let package = Package(
name: "Sample",
targets: [
// Targets are the basic building blocks of a package, defining a module or a test suite.
// Targets can depend on other targets in this package and products from dependencies.
.executableTarget(
name: "Sample"),
]
)

Hummingbird を利用するため、Package.swift に必要な情報を追加します。

Package.swift
// swift-tools-version: 5.10
// The swift-tools-version declares the minimum version of Swift required to build this package.
import PackageDescription

let package = Package(
name: "Todos",
++ // macOS 上で動かさないため、コメントアウトしているが問題なく動作した。
++ // platforms: [.macOS(.v14)],
dependencies: [
.package(url: "https://github.com/apple/swift-argument-parser.git", from: "1.2.0"),
++ .package(url: "https://github.com/hummingbird-project/hummingbird.git", from: "2.0.0-alpha.1"),
],
targets: [
.executableTarget(
name: "Todos",
dependencies: [
.product(name: "ArgumentParser", package: "swift-argument-parser"),
++ .product(name: "Hummingbird", package: "hummingbird"),
]
),
]
)

GET リクエストを叩いた際に”Hello”を返すように以下のように Todos.swift を書き換えます。

Todos.swift
import ArgumentParser
import Hummingbird

@main
struct Todos: AsyncParsableCommand {
func run() async throws {
// create router
let router = Router()
// add hello route
router.get("/") { request, context in
"Hello\n"
}
// create application
let app = Application(router: router)
// run application
try await app.runService()
}
}

一連の修正が完了すると、アプリケーションが正常に動くことを確認できます。

> swift run
Building for debugging...
[8/8] Linking Todos
Build complete! (6.58s)
2024-04-16T15:18:49+0900 info Hummingbird : [HummingbirdCore] Server started and listening on 127.0.0.1:8080

# 別タブで動作確認
> curl localhost:8080
Hello

簡単ですね🎉

ToDoアプリの構築

ここでは、Hummingbird を利用してToDoをDBに登録するところまで試してみます。
PostgresNIO4 というPostgreSQL用のSwiftクライアントを利用することで、ToDoをPostgreSQLに登録します。

Hummingbird 同様に、PostgresNIO を Package.swift に追加します。

Package.swift
// swift-tools-version: 5.10
// The swift-tools-version declares the minimum version of Swift required to build this package.
import PackageDescription

let package = Package(
name: "Todos",
// macOS 上で動かさないため、コメントアウトしているが問題なく動作した。
// platforms: [.macOS(.v14)],
dependencies: [
.package(url: "https://github.com/apple/swift-argument-parser.git", from: "1.2.0"),
.package(url: "https://github.com/hummingbird-project/hummingbird.git", from: "2.0.0-alpha.1"),
++ .package(url: "https://github.com/vapor/postgres-nio.git", from: "1.21.0"),
],
targets: [
.executableTarget(
name: "Todos",
dependencies: [
.product(name: "ArgumentParser", package: "swift-argument-parser"),
.product(name: "Hummingbird", package: "hummingbird"),
++ .product(name: "PostgresNIO", package: "postgres-nio"),
]
),
]
)

PostgreSQL をインストールします。
チュートリアルでは(おそらくmacOS前提で) brew 経由でインストールしていたのですが、今回は apt 経由でインストールします。

Linux 上でも Homebrew インストールできるみたいなので、Homebrew 経由でインストールでも良いかもしれません。
https://docs.brew.sh/Homebrew-on-Linux

> sudo apt update
> sudo apt install postgresql postgresql-contrib
> psql --version
psql (PostgreSQL) 14.11 (Ubuntu 14.11-0ubuntu0.22.04.1)

インストールが完了したので、チュートリアルの続きを実施します。

> psql postgres
psql: error: connection to server on socket "/var/run/postgresql/.s.PGSQL.5432" failed: No such file or directory
Is the server running locally and accepting connections on that socket?

エラーで進めません。
エラーについて調べると .conf ファイルを確認しよう5、などとありますが、そもそも.confファイルを含んだディレクトリ(/etc/postgresql/14/main/)がないことに気が付きました。

> ls -la /etc/postgresql/
total 8
drwxr-xr-x 2 postgres postgres 4096 Feb 10 2022 .
drwxr-xr-x 84 root root 4096 Apr 17 06:54 ..

別の記事6を参考に、PostgreSQL のクラスタを追加します。

> sudo pg_createcluster --start 14 main
> ls -la /etc/postgresql/14/main/
conf.d/ pg_ctl.conf pg_ident.conf start.conf
environment pg_hba.conf postgresql.conf

動くようになったので、チュートリアルの続きに戻ります。
まずは、データベースを準備します。

> postgres psql
psql (14.11 (Ubuntu 14.11-0ubuntu0.22.04.1))
Type "help" for help.

postgres=# create database hummingbird;
CREATE DATABASE
postgres=# \c hummingbird
You are now connected to database "hummingbird" as user "postgres".
hummingbird=# create role todos createrole login password 'todos';
CREATE ROLE
hummingbird=# \q

次に、ToDoアプリの実装です。
チュートリアルの通りに実装していきます。完成形は、公式のサンプルがあるため、そちらをご確認ください。

https://github.com/hummingbird-project/hummingbird-examples/tree/main/todos-postgres-tutorial

動作確認

これまで構築したものの動作確認を行います。

> swift run

# 別タブで動作確認
# TODO を登録
> curl -i -X POST localhost:8080/todos -d'{"title": "Wash my hair"}'
HTTP/1.1 201 Created
Content-Type: application/json; charset=utf-8
Content-Length: 145
Date: Tue, 16 Apr 2024 23:54:54 GMT

{"id":"A4672369-753C-49AD-A41C-849AE5A7CF1E","url":"http:\/\/localhost:8080\/todos\/A4672369-753C-49AD-A41C-849AE5A7CF1E","title":"Wash my hair"}
> curl -i -X POST localhost:8080/todos -d'{"title": "Brush my teeth"}'
HTTP/1.1 201 Created
Content-Type: application/json; charset=utf-8
Content-Length: 147
Date: Tue, 16 Apr 2024 23:55:03 GMT

{"url":"http:\/\/localhost:8080\/todos\/435A9B4F-BD4A-42E2-8EA9-5A5560378BBA","id":"435A9B4F-BD4A-42E2-8EA9-5A5560378BBA","title":"Brush my teeth"}

# DB の登録状態を確認
> psql hummingbird
psql (14.11 (Ubuntu 14.11-0ubuntu0.22.04.1))
Type "help" for help.

hummingbird=# select * from todos;
id | title | order | completed | url
--------------------------------------+----------------+-------+-----------+------------------------------------------------------------------
a4672369-753c-49ad-a41c-849ae5a7cf1e | Wash my hair | | | http://localhost:8080/todos/A4672369-753C-49AD-A41C-849AE5A7CF1E
435a9b4f-bd4a-42e2-8ea9-5a5560378bba | Brush my teeth | | | http://localhost:8080/todos/435A9B4F-BD4A-42E2-8EA9-5A5560378BBA
(2 rows)

POSTしたToDoが、DB側に登録されていることを確認できました🎉

さいごに

Swift の Web フレームワークの一つである、Hummingbird をセットアップから紹介しました。

個人的には、macOS以外でもSwiftが書けて、かつ、サーバーアプリ開発に利用できることが知れて楽しかったです。WSL 上でセットアップしたので手順が多めだったのですが、普段SwiftでiOSアプリ開発している方がサーバサイドの開発を試したいときに便利だと思いました。

今回は試せませんでしたが、Xcode のシミュレータとバックエンドの接続までをどこかで試してみたいと考えています。


  1. 1.医療・ヘルスケア分野での案件や新規ビジネス創出を担う、2020年に誕生した事業部です。 設立エピソードは、以下記事をご覧ください。 "新規事業の立ち上げ フューチャーの知られざる医療・ヘルスケアへの挑戦"
  2. 2.Swift.org内のチュートリアル記事 https://www.swift.org/getting-started/vapor-web-server/
  3. 3.swiftly https://github.com/swift-server/swiftly
  4. 4.Postgres-NIO https://github.com/vapor/postgres-nio
  5. 5.psql: error: connection to server on socket "/var/run/postgresql/.s.PGSQL.5432" failed: FATAL: Peer authentication failed for user "postgres" (Ubuntu) https://stackoverflow.com/questions/69676009/psql-error-connection-to-server-on-socket-var-run-postgresql-s-pgsql-5432
  6. 6.【Ubuntu+PostgreSQL】postgres以外のユーザでクラスタを作成して起動する https://qiita.com/shin4488/items/175151e59a043c724b38
  7. 7.https://www.apple.com/jp/swift/
  8. 8.https://www.swift.org/
  9. 9.Swift によるサーバーアプリケーション開発を促進するワークグループ https://www.swift.org/sswg/
  10. 10.AppleのDeveloper向けのドキュメント https://developer.apple.com/documentation/Swift