はじめに こんにちは、TIG/DXユニット所属の宮永です。
本記事で作成するデモアプリは以下のGitHubリポジトリに格納しています。ご参考にしてください。
https://github.com/orangekame3/pipenv-lambda
【本記事で伝えたいこと】
本記事で最も伝えたいことはデプロイパッケージと開発パッケージの分離です。
Pipenvを使用することでzipの容量を節約しながらLambdaをデプロイすることができます。
やや長い記事となっていますので、「LocalStackへのデプロイ」の章だけでも見ていただけると幸いです。
Pipenvとは Pipenvはパッケージ管理ツールです。似たようなツールにPoetry等があります。澁川さんの記事 がとても参考になりますのでぜひご覧ください。
開発環境 開発に取り組む前に筆者の開発環境を記載します。記事中Linuxコマンドを使用している箇所があります。Windowsで開発される方はWSLを使用することをおすすめいたします。
OS Ubuntu 20.04
Python(pyenv) 3.9
Pipenv
Docker
docker compose v2
AWS CLI v2
プロジェクトの作成 まずはPipenvをダウンロードしましょう。
次にプロジェクトを作成します。Lambda ランタイム
~/git/src/pipenv-lambda main
❯❯❯ pipenv --python 3.9                                                                  ✘ 1
Creating a virtualenv for this project...
Pipfile: /home/orangekame3/git/src/pipenv-lambda/Pipfile
Using /home/orangekame3/.anyenv/envs/pyenv/versions/3.9.4/bin/python3.9 (3.9.4) to create virtualenv...
⠹ Creating virtual environment...created virtual environment CPython3.9.4.final.0-64 in 136ms
  creator CPython3Posix(dest=/home/orangekame3/.local/share/virtualenvs/pipenv-lambda-LX4n91M6, clear=False, no_vcs_ignore=False, global=False)
  seeder FromAppData(download=False, pip=bundle, setuptools=bundle, wheel=bundle, via=copy, app_data_dir=/home/orangekame3/.local/share/virtualenv)
    added seed packages: pip==21.3.1, setuptools==60.2.0, wheel==0.37.1
  activators BashActivator,CShellActivator,FishActivator,NushellActivator,PowerShellActivator,PythonActivator

✔ Successfully created virtual environment!
Virtualenv location: /home/orangekame3/.local/share/virtualenvs/pipenv-lambda-LX4n91M6
Creating a Pipfile for this project...
プロジェクトの作成ができました 🎉Pipfileが作成されていることを確認できます。
~/git/src/pipenv-lambda main*
❯❯❯ tree
.
├── Pipfile
└── README.md

0 directories, 2 files
PipfileにプロジェクトのPythonのバージョンや使用するパッケージ等が記載されています。catコマンドで中身を確認します。
~/git/src/pipenv-lambda main* ❯❯❯ cat Pipfile [[source ]] url = "https://pypi.org/simple" verify_ssl = true name = "pypi" [packages] [dev-packages] [requires] python_version = "3.9
Pipenvでパッケージをインストールする際はpipenv installコマンドを使用します。pipenv installでインストールしたパッケージは[packages]で管理されます。--devオプションをつけてインストールした際は[dev-packages]でパッケージ管理されます。
開発パッケージのインストール 続いてテスト環境を構築します。以下のコマンドでpytestをインストールします。
~/git/src/pipenv-lambda main* 10s ❯❯❯ pipenv install pytest --dev Installing pytest... Adding pytest to Pipfile's [dev-packages]... ✔ Installation Succeeded Pipfile.lock (8eec78) out of date, updating to (7c060a)... Locking [dev-packages] dependencies... Building requirements... Resolving dependencies... ✔ Success! Locking [packages] dependencies... Building requirements... Resolving dependencies... ✔ Success! Updated Pipfile.lock (7c060a)! Installing dependencies from Pipfile.lock (7c060a)... 🐍 ▉▉▉▉▉▉▉▉▉▉▉▉▉▉▉▉▉▉▉▉▉▉▉▉▉▉▉▉▉▉▉▉ 0/0 — 00:00:00 To activate this project' s virtualenv, run pipenv shell.Alternatively, run a command inside the virtualenv with pipenv run.
同様にして静的型チェックツールであるmypyもインストールします。
pipenv install mypy --dev
デプロイパッケージのインストール Pythonの標準パッケージ以外にも使用したいパッケージはあると思います。--devオプションは付けずにインストールします。
pipenv install pandas xlwt xlsxwriter
ここまででPythonプロジェクトの準備は一旦完了です。
LocalStackの準備 LocalStackを使用して、Lambdaのデプロイと動作検証を行います。
docker-compose.ymlの作成 以下のようなdocker-compose.ymlを用意してください。
docker-compose.yml version: "3.8" services: localstack: container_name: "${LOCALSTACK_DOCKER_NAME-localstack_pipenv}" image: localstack/localstack network_mode: bridge ports: - "127.0.0.1:4566:4566" environment: - DATA_DIR=/tmp/localstack/data - SERVICES=lambda,s3 - HOST_TMP_FOLDER=${TMPDIR:-/tmp/}localstack - DOCKER_HOST=unix:///var/run/docker.sock volumes: - "${TMPDIR:-/tmp}/localstack:/tmp/localstack" - "/var/run/docker.sock:/var/run/docker.sock"
docker-compose.ymlの準備ができたらビルドします。
docker compose up --build
起動が確認できたらLocalStackの準備も完了です。
AWS CLIの設定 AWS CLIでは認証情報などをプロファイルとして保存できます。.awsの隠しファルダがあります。(エクスプローラーなどで確認する場合は隠しフォルダを表示するように設定してください。).awsフォルダ配下には.configと.credentials2つのファイルがありますのでそれぞれ以下のように設定してください。
参考:名前付きプロファイル
今回は以下のようにlocalというプロファイルを作成しました。
config [local] region = ap-northeast-1 output = json
credentials [local] aws_access_key_id = testaws_secret_access_key = test
デモアプリの実装 最終的なディレクトリ構成 以降、複数のファイルを作成します。最終的なディレクトリ構成を記載しますので、適宜参考にしてください。
.
├── Makefile
├── Pipfile
├── Pipfile.lock
├── README.md
├── bin
│   └── lambda.zip
├── deploy-packages
├── docker-compose.yml
├── lambda.py
├── model.py
├── requirements.txt
├── result
│   └── test.xlsx
├── result.log
├── setup.cfg
├── tests
│   ├── __init__.py
│   └── test_model.py
└── utils
    ├── data
    │   └── sample_data.json
    └── utils.py
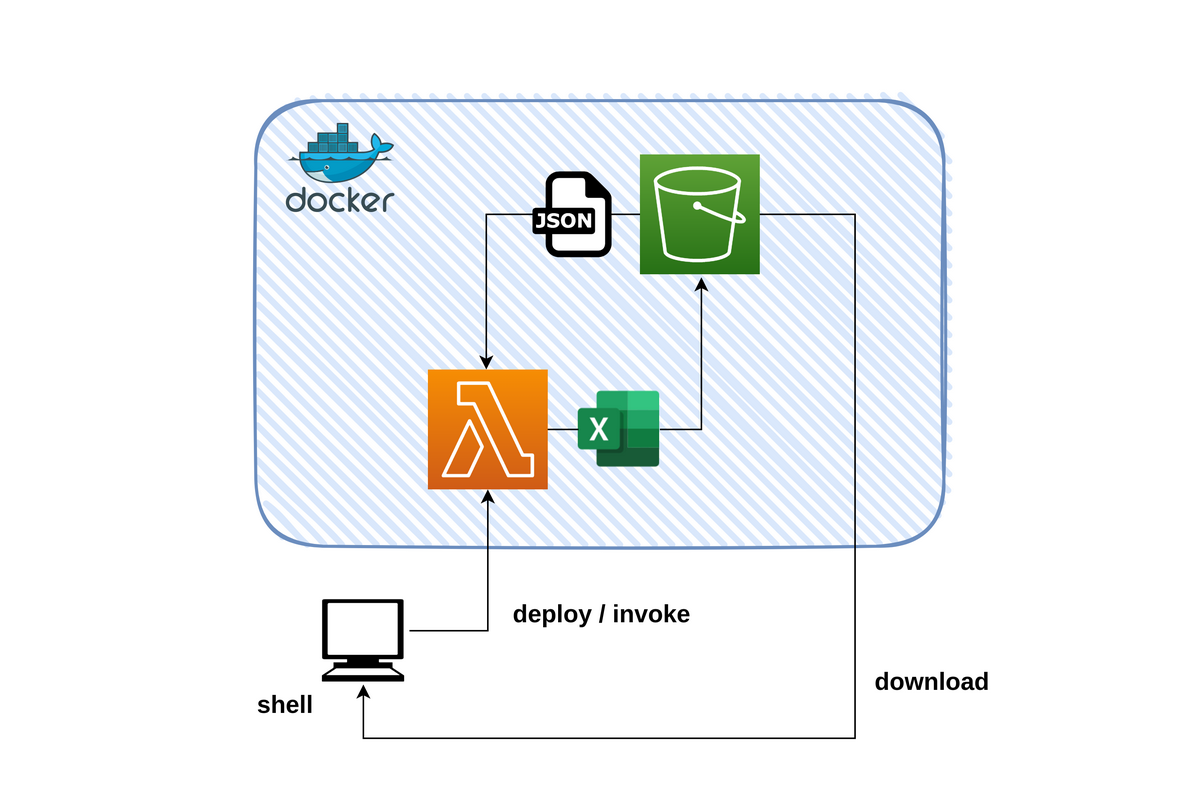
全体構成 今回作成するのはS3バケットからJSONファイルを取得し、ETL処理後にExcelファイルとして再度S3バケットに格納するアプリです。
アプリ機能詳細 JSON→ExcelのETL処理について以下記載します。
JSON→Excelへの変換
「ボーナスポイント」カラムの追加
「ボーナスポイント」は以下の条件で決定します。
【条件】
会員ランクが「4,5」の会員には「ポイント」×1.25倍のボーナスポイントを、会員ランク「1,2,3」の会員には「ポイント」と同等のボーナスポイントを付与することします。
[ { "会員番号" : "000" , "名前" : "長野原 ひろし" , "会員ランク" : 4 , "ポイント" : 58 , "タイムスタンプ" : "2021-05-16" } , { "会員番号" : "001" , "名前" : "般若 竜門" , "会員ランク" : 2 , "ポイント" : 75 , "タイムスタンプ" : "2021-07-19" } , { "会員番号" : "002" , "名前" : "十河 アンナ" , "会員ランク" : 2 , "ポイント" : 57 , "タイムスタンプ" : "2021-09-06" } ]
例えば上記のようなJSONファイルを取り込んだ場合、Lambdaは以下のExelファイルを出力することとします。
ハンドラの実装 それではアプリ本体を実装します。lambda.pyとmodel.pyの2つで構成します。model.pyに記述し、lambda.pyではハンドラを呼び出すのみにします。lambda.pyです。
lambda.py from model import Handlerimport boto3import osif os.getenv("LOCALSTACK_HOSTNAME" ) is None : s3 = boto3.client("s3" , "ap-northeast-1" ) else : endpoint = f"http://{os.environ['LOCALSTACK_HOSTNAME' ]} :4566" s3 = boto3.client( service_name="s3" , endpoint_url=endpoint, aws_access_key_id="test" , aws_secret_access_key="test" , ) def lambda_handler (event, context ) -> str : handler = Handler(event, context, s3) return handler.main()
次にmodel.pyです。
model.py import loggingimport pandas as pdimport tempfileimport jsonfrom typing import List logger = logging.getLogger() logger.setLevel(logging.INFO) class Handler (object ): def __init__ (self, event, context, s3 ): self.event = event self.context = context self.s3 = s3 def main (self ) -> str : try : bucket = "test-bucket" send = "test.xlsx" data_path = self.event["input_obj" ] dict_data: List [dict ] = self.get_s3_data(bucket, data_path) df = self.make_df(dict_data) df_processed = self.process(df) send = self.send_excel(df_processed, bucket, send) return "completed : {0}" .format (send) except Exception as e: logger.exception(e) raise e def get_s3_data (self, bucket: str , key: str ) -> List [dict ]: resp = self.s3.get_object(Bucket=bucket, Key=key) body = resp["Body" ].read().decode("utf-8" ) json_dict: List [dict ] = json.loads(body) return json_dict def make_df (self, data: list ) -> pd.DataFrame: df = pd.DataFrame.from_dict(data) return df def calc (self, row ): if row["会員ランク" ] > 3 : return row["ポイント" ] * 1.25 else : return row["ポイント" ] def process (self, data: pd.DataFrame ) -> pd.DataFrame: data["ボーナスポイント" ] = data.apply(self.calc, axis=1 ) return data def send_excel (self, df: pd.DataFrame, bucket: str , send: str ) -> str : with tempfile.TemporaryFile() as fp: writer = pd.ExcelWriter(fp, engine="xlsxwriter" ) df.to_excel(writer, sheet_name="Sheet1" , index=False ) writer.save() fp.seek(0 ) self.s3.put_object( Body=fp.read(), Bucket=bucket, Key=send, ) return send
実装では型アノテーションを付けています。Pipfileに以下を追記します。
Pipfile [scripts] mypy = "mypy model.py lambda.py"
Pipfileへ追記したら以下コマンドを実行します。
型付けに問題がなければ以下の結果を得られるはずです。
Success: no issues found in 2 source files
次にテストコードを実装します。
テストコードの実装 テストにはpytestを使用します。プロジェクトルートにtestsフォルダを作成し、model.pyをテストするtest_model.pyを実装します。
以下testsディレクトリのファイル構成です。
. ├── __init__.py └── test_model.py 0 directories, 2 files
__init__.pyファイルがないとテストに失敗するので忘れずに作成してください。
pytestを使用すれば簡単にテーブルドリブンテストを実装できます。
fixtureを使用することでhandlerの初期値を入力でき、各メソッドテストで使い回しが可能です。今回pandasを使用したテストを行うため、assert部にはpandasのDataFrame比較メソッドであるtesting.assert_frame_equalを使用しました。
以下はボーナスポイント付与のメソッドであるprocessをテストしたtest_processの例です。
test_model.py import pytestfrom model import Handlerimport pandas as pd@pytest.fixture def handler (): return Handler( event={}, context={}, s3="" , ) @pytest.mark.parametrize( "input_dict,expected_dict" , [ ( [ { "会員番号" : "000" , "名前" : "椎名 米子" , "会員ランク" : 1 , "ポイント" : 45 , "タイムスタンプ" : "2021-07-14" , }, { "会員番号" : "001" , "名前" : "広島 たくみ" , "会員ランク" : 4 , "ポイント" : 39 , "タイムスタンプ" : "2021-12-17" , }, { "会員番号" : "002" , "名前" : "大嶺 順子" , "会員ランク" : 2 , "ポイント" : 27 , "タイムスタンプ" : "2021-09-23" , }, ], [ { "会員番号" : "000" , "名前" : "椎名 米子" , "会員ランク" : 1 , "ポイント" : 45 , "タイムスタンプ" : "2021-07-14" , "ボーナスポイント" : 45 , }, { "会員番号" : "001" , "名前" : "広島 たくみ" , "会員ランク" : 4 , "ポイント" : 39 , "タイムスタンプ" : "2021-12-17" , "ボーナスポイント" : 48.75 , }, { "会員番号" : "002" , "名前" : "大嶺 順子" , "会員ランク" : 2 , "ポイント" : 27 , "タイムスタンプ" : "2021-09-23" , "ボーナスポイント" : 27 , }, ], ), ], def test_process (handler, input_dict, expected_dict ): json_dict = pd.DataFrame.from_dict(input_dict) got = handler.process(json_dict).sort_index(axis=1 , ascending=False ) expected = pd.DataFrame.from_dict(expected_dict).sort_index(axis=1 , ascending=False ) pd.testing.assert_frame_equal(got, expected)
テストもPipfileでコマンド化できます。以下をPipfileに追記してください。
[scripts] mypy = "mypy model.py lambda.py" pytest = "pytest -vv"
ファイルへの追記が完了したら、テストを実行します。
❯❯❯ pipenv run pytest
==================================== test session starts =====================================
platform linux -- Python 3.9.4, pytest-6.2.5, py-1.11.0, pluggy-1.0.0 -- /home/orangekame3/.local/share/virtualenvs/pipenv-lambda-LX4n91M6/bin/python
cachedir: .pytest_cache
rootdir: /home/orangekame3/git/src/pipenv-lambda
collected 1 item

tests/test_model.py::test_process[input_dict0-expected_dict0] PASSED                   [100%]

===================================== 1 passed in 0.17s ======================================
無事テストを通過しました🎉
LocalStackへのデプロイ Lambdaのzip化やLocalStackへのデプロイはMakefileで管理します。
MakefileはPipfileに追加したコマンドやAWS CLIコマンドで構成されています。筆者の環境はAWS CLI v2なのでinvokeコマンドでpayloadを指定時に--cli-binary-format raw-in-base64-outオプションを付与しています。
参考:破壊的変更 - AWS CLI バージョン 1 からバージョン 2 への移行
Makefile全貌 以下作成したMakefileです。
Makefile .PHONY : clean zip delete create update invoke log test bucket download jsonPROJECT_DIR=$(shell pwd) DEPLOY_PACKAGES_DIR=deploy-packages clean: rm -rf ./bin/* zip:clean pipenv run mypy pipenv run pytest pipenv lock -r >requirements.txt pipenv run pip install -r requirements.txt --target $(DEPLOY_PACKAGES_DIR) @echo "Project Location: $(PROJECT_DIR) " @echo "Library Location: $(DEPLOY_PACKAGES_DIR) " cd $(DEPLOY_PACKAGES_DIR) && rm -rf __pycache__ && zip -r $(PROJECT_DIR) /bin/lambda.zip * cd $(PROJECT_DIR) && zip -g ./bin/lambda.zip lambda.py model.py find ./bin/lambda.zip cd $(DEPLOY_PACKAGES_DIR) && rm -r * delete: aws --endpoint-url=http://localhost:4566 \ --region ap-northeast-1 --profile local lambda delete-function \ --function-name=pipenv-lambda create: aws lambda create-function \ --function-name=pipenv-lambda \ --runtime=python3.9 \ --role=DummyRole \ --handler=lambda.lambda_handler \ --zip-file fileb://./bin/lambda.zip \ --region ap-northeast-1 \ --endpoint-url=http://localhost:4566 update: aws lambda update-function-code \ --function-name=pipenv-lambda \ --zip-file fileb://./bin/lambda.zip \ --region ap-northeast-1 \ --endpoint-url=http://localhost:4566 invoke: aws lambda --endpoint-url=http://localhost:4566 invoke \ --function-name pipenv-lambda \ --region ap-northeast-1 \ --payload '{ "input_obj" : "test.json" }' \ --cli-binary-format raw-in-base64-out \ --profile local result.log log: cat result.log test: pipenv shell "pytest -vv && exit" bucket: aws s3 mb s3://test-bucket \ --endpoint-url=http://localhost:4566 \ --profile local download: aws s3 --endpoint-url=http://localhost:4566 \ cp s3://test-bucket/ ./result --exclude "*" \ --include "*.xlsx" --recursive json: python utils/utils.py 100
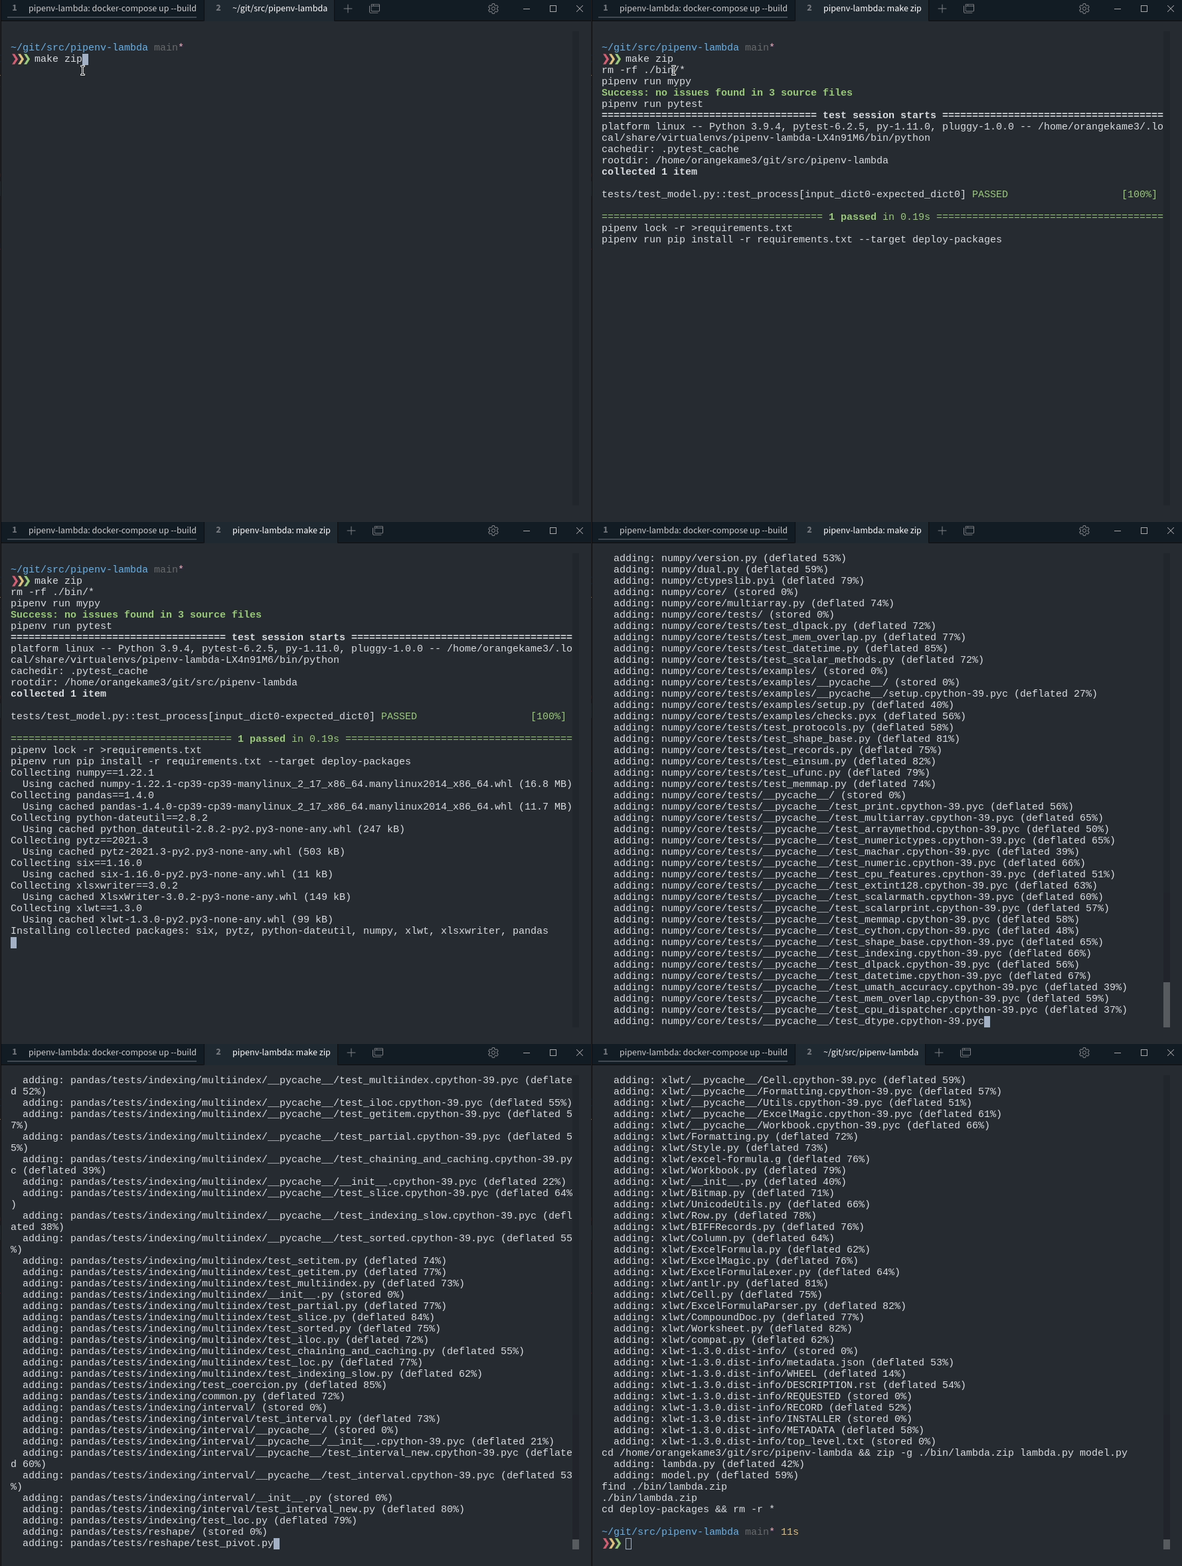
デプロイパッケージのzip化 ポイントはzipコマンド部です。
zip:clean pipenv run mypy pipenv run pytest pipenv lock -r >requirements.txt pipenv run pip install -r requirements.txt --target $(DEPLOY_PACKAGES_DIR) @echo "Project Location: $(PROJECT_DIR) " @echo "Library Location: $(DEPLOY_PACKAGES_DIR) " cd $(DEPLOY_PACKAGES_DIR) && rm -rf __pycache__ && zip -r $(PROJECT_DIR) /bin/lambda.zip * cd $(PROJECT_DIR) && zip -g ./bin/lambda.zip lambda.py model.py find ./bin/lambda.zip cd $(DEPLOY_PACKAGES_DIR) && rm -r *
前提として、Lambda上でPythonの外部パッケージを使用する際は外部パッケージを含んだzipファイルを作成する必要があります。直接CLI等からアップロードする場合は50MBの上限が存在します。
今回開発環境の補助ツールとしてpytestとmypyを、デプロイ時に必要なパッケージとしてpandasとxlwt、xlsxwriterをインストールしました。
開発に使用するpytestとmypyはLambdaの機能として不要です。そこでまずはPipfileからrequirements.txtを作成します。
pipenv lock -r -> requirements.txt
requirements.txtには–devオプションでインストールしたパッケージは含まれません。開発パッケージとデプロイパッケージを分離できました。
次にrequirements.txtを元にdeploy-packagesというフォルダを作成します。事前にmkdirコマンドでdeploy-packagesを作成しておきます。pipコマンドは--targetオプションを付与することでインストール先を指定できます。
コマンド冒頭でpipenv runを付与することで、プロジェクトの仮想環境上で実行できます。
pipenv run pip install -r requirements.txt --target $(DEPLOY_PACKAGES_DIR)
あとはzipコマンドを使用して実装したlambda.pyとmodel.pyを追加するだけです。
なお、このzipコマンドを作成する際に以下の記事とhttps://pyteyon.hatenablog.com/entry/2019/08/04/204704
pipenv公式の以下のIssuehttps://github.com/pypa/pipenv/issues/746
を参考にさせていただきました。
zipコマンドを実行します。
正常に動作していればルートディレクトリのbinフォルダにlambda.zipが生成されます。
続いてLocalStackが起動していることを確認した上でS3上に新規バケットを作成します。
バケットの作成が完了したらLocalStackにアプリをデプロイします。
Lambdaのデプロイに成功していれば以下のレスポンスが返ってきます。
{ "FunctionName" : "pipenv-lambda" , "FunctionArn" : "arn:aws:lambda:ap-northeast-1:000000000000:function:pipenv-lambda" , "Runtime" : "python3.9" , "Role" : "DummyRole" , "Handler" : "lambda.lambda_handler" , "CodeSize" : 38937088 , "Description" : "" , "Timeout" : 3 , "LastModified" : "2022-01-29T11:52:04.798+0000" , "CodeSha256" : "cr93AW1EjYHkErTkS6dGRKGCsTrtBEedwcuO9N4LSj0=" , "Version" : "$LATEST" , "VpcConfig" : { } , "TracingConfig" : { "Mode" : "PassThrough" } , "RevisionId" : "35bfafab-da87-4f25-8014-16c7b35caa9e" , "State" : "Active" , "LastUpdateStatus" : "Successful" , "PackageType" : "Zip" , "Architectures" : [ "x86_64" ] }
LocalStackへのLambdaデプロイに成功しました🎉
動作検証 テストデータの作成 まずはETL処理元のテストデータを作成します。utils/utils.pyを作成し、以下のコードを実装します。
utils.py import datetimeimport jsonfrom random import randintimport boto3from fire import Firefrom mimesis import Personfrom mimesis.locales import Localeperson = Person(Locale.JA) def dummy_data (num: int ) -> dict : id = str (num).zfill(3 ) date = datetime.date(2021 , randint(1 , 12 ), randint(1 , 28 )).strftime("%Y-%m-%d" ) dummy_dict = { "会員番号" : id , "名前" : person.full_name(reverse=True ), "会員ランク" : randint(1 , 5 ), "ポイント" : randint(50 , 100 ), "タイムスタンプ" : date, } return dummy_dict def send_json (s3, sample_data: list , bucket: str , send: str ) -> str : with open ("utils/data/sample_data.json" , mode="wt" , encoding="utf-8" ) as f: json.dump(sample_data, f, ensure_ascii=False , indent=4 ) s3.put_object( Body=json.dumps(sample_data, ensure_ascii=False , indent=4 ), Bucket=bucket, Key=send, ) return send def make_dummy_data (k ) -> list : sample_data = [] for i in range (k): sample_data.append(dummy_data(i)) return sample_data def main (iterate_num: int ) -> str : endpoint = f"http://localhost:4566" s3 = boto3.client( service_name="s3" , endpoint_url=endpoint, aws_access_key_id="test" , aws_secret_access_key="test" , ) bucket = "test-bucket" send = "test.json" sample_data = make_dummy_data(iterate_num) send = send_json(s3, sample_data, bucket, send) return send if __name__ == "__main__" : Fire(main)
テストデータを作成するにあたってmimesisとfireの2つの外部パッケージを使用しました。
mimesisはダミーデータを作成するパッケージ、fireはPythonスクリプトにコマンドライン引数を渡すパッケージです。fireは社内チャットで話題になっていたので今回使用してみました。非常に便利でした。皆さんぜひ、使ってみてください。utils直下で以下コマンドを実行することで先程作成したtest-bucketにtest.jsonを任意のデータ量で格納できます。
今回は100行のダミーデータを作成しました。
Lambdaの実行 それではデプロイしたLambdaを呼び出します。AWS CLIのinvoke実行時に--payload '{ "input_obj": "test.json" }'を付与することでLambdaにtest.jsonの場所を渡します。
Lambdaの実行が完了していれば次のレスポンスが返ってきます。
{ "StatusCode" : 200, "LogResult" : "" , "ExecutedVersion" : "$LATEST " }
それではS3からLambdaの実行により生成されたExcelファイルをダウンロードします。
以下の画像はETL処理元のJSONファイルとETL処理後のExcelファイルを比較したものです。
本記事で使用したソースコードは以下のGitHubリポジトリにまとめています。
https://github.com/orangekame3/pipenv-lambda
さいごに 今回はPipenvとLocalStackを使用してLambdaの開発環境を構築しました。
普段はGo言語を使用してLambdaを作成しており、外部パッケージの依存を気にすることがありませんでした。今回Pythonを使用するにあたり、公式で紹介されているデプロイ方法 をもう少しスマートに行いたいと考えて試行錯誤しました。ひとつ自分として満足の行く形にたどり着けて良かったと思っています。
調べて見るとLambdaの開発環境としてはServerless Application Model やServerless Famework などのテンプレートがあるようです。こうしたフレームワークも今後触ってみて自分なりのベストな開発環境を模索していきたいです。
最後までお付き合いいただきありがとうございました。


