勉強会に登壇しました こんにちは。
2022年2月17日(木)に、Terraform stateをテーマにした勉強会「Future Tech Night #20 Terraform State縛りの勉強会 」が開かれました。私は後半パートでクラウドリソース自体をdestroy/createdせずに、Terraformリソース定義の記述場所を変更する方法 について話しました。
登壇に向けた宣伝文がいい感じに背景を説明しているため、以下に全文を記載します。
クラウドサービス上で稼働するリソースには一切手を付けずに、Terraformの定義記載場所だけを変更する方法を話します。
Terraformを利用していると「このディレクトリ配置じゃダメだ。配置変えしたいのだけれど、リソースの再作成はできない。次にインフラ設計するときは、〇〇に注意しよう」という運用ナレッジが貯まると思います。スタート時点で完璧なTerraformディレクトリ設計ができれば御の字ですが、それが不可能なことは、この分野でベストプラクティスが確立されていないことにより証明されています。
本パートでは「Terraformのディレクトリ配置には定石がないのだから、運用状況に合わせて柔軟に配置換えすべき」という観点から、「動作中リソースに影響なく、Terraform定義箇所を移植する方法」について話します。
こういった前提のもと、terraform state mv pull push を利用した、Terraformリソースのディレクトリ移動方法を発表しました。
簡単に内容を説明すると
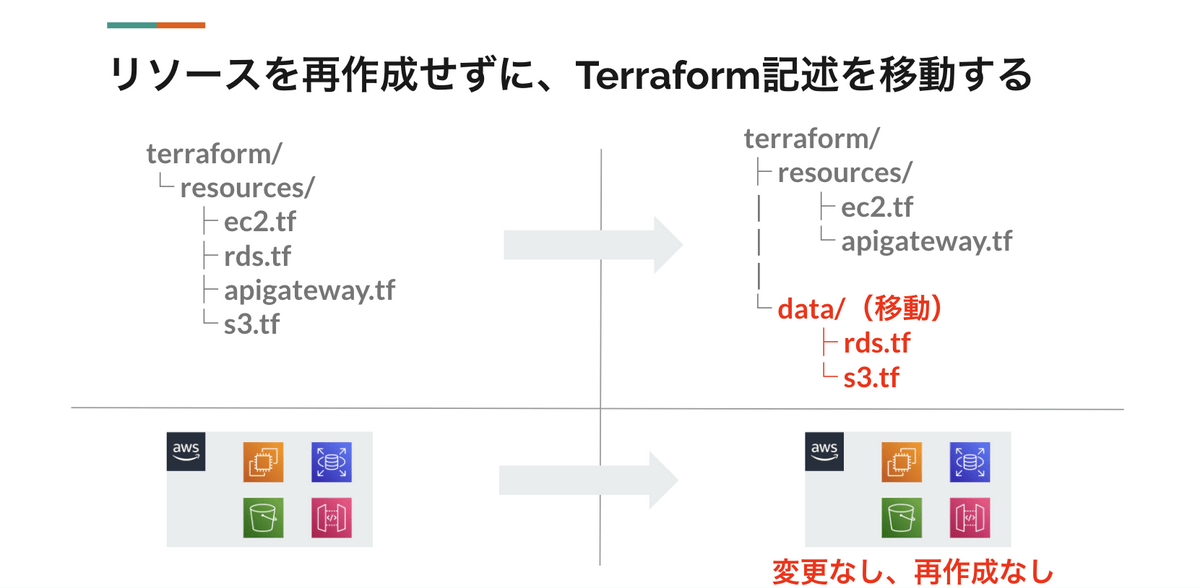
(1)Terraformを運用していると、↓画像のように「.tfファイルの場所を移動」したくなることがあります。何も考えずに移動すると、リソースはdestroy/createdされてしまうのですが、データベースや24/365の稼働要件があるリソースはdestroyすべきではありません。
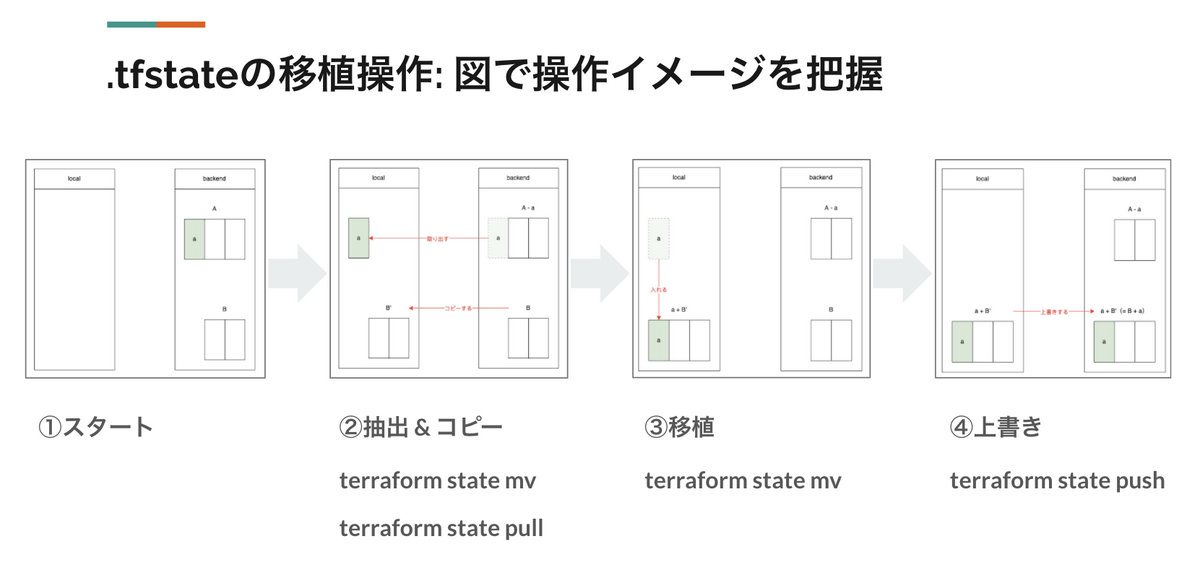
(2)そんな時は、terraform stateコマンドを活用することで、実リソースに手をつけることなく定義場所のディレクトリ移動ができます。さらに、↓画像のモデルをベースとすれば、リソース操作状況を視覚的にイメージしながら作業ができます。
という内容でした。
「state操作を図で表現する」というのが推しポイントだったのですが、勉強会後のツイートで Terraformの「moved block」という方法を教えて頂きました。実際に使ってみたことろ、terraform mvと同様の操作を、私が勉強会で説明した方法よりも安全に実行できると感じたため、この方法について以下で説明します。
moved blockを試す 事前準備 まずは、こちらの記事「LocalStackに向けてTerraformを実行する 」に沿って環境構築を進めて、ローカル環境でTerraformが操作できるようにします。
moved blockは v1.1.0 により追加された機能のため、Terraformは最新バージョンを入れます。
私は tfenv を利用し、v1.1.7 を入れました。
$ tfenv install 1.1.7 Installing Terraform v1.1.7 Downloading release tarball from https://releases.hashicorp.com/terraform/1.1.7/terraform_1.1.7_darwin_amd64.zip Downloading SHA hash file from https://releases.hashicorp.com/terraform/1.1.7/terraform_1.1.7_SHA256SUMS No keybase install found, skipping OpenPGP signature verification Archive: /var/folders/0r/3y_v9zrd75n9dgv2f0cy6qq40000gn/T/tfenv_download.XXXXXX.qdVCVbhE/terraform_1.1.7_darwin_amd64.zip inflating: /Users/tanai3022/.anyenv/envs/tfenv/versions/1.1.7/terraform Installation of terraform v1.1.7 successful. To make this your default version, run 'tfenv use 1.1.7' $ tfenv use 1.1.7 Switching default version to v1.1.7 Switching completed $ terraform version Terraform v1.1.7 on darwin_amd64
作業用ディレクトリを用意し、以下のようにファイルを配置します。
$ tree
.
├── docker-compose.yml
└── main.tf

0 directories, 2 files
今回の動作検証には、Terraform の null_resource を利用します。
main.tf resource "null_resource" "resource_A" {} resource "null_resource" "resource_B" {} resource "null_resource" "resource_C" {}
作業ディレクトリで terraform init / plan / apply を実行して、null_resource を作成します。terraform.tfstate) が作成されます。
$ tree
.
├── docker-compose.yml
├── main.tf
└── terraform.tfstate

0 directories, 3 files
stateファイルを直接覗いて見ると、
$ cat terraform.tfstate { "version" : 4 , "terraform_version" : "1.1.7" , "serial" : 1 , "lineage" : "ea534414-b327-eee0-bd9c-b6374db37db2" , "outputs" : { } , "resources" : [ { "mode" : "managed" , "type" : "null_resource" , "name" : "resource_A" , "provider" : "provider[\"registry.terraform.io/hashicorp/null\"]" , "instances" : [ { "schema_version" : 0 , "attributes" : { "id" : "592263413744525319" , "triggers" : null } , "sensitive_attributes" : [ ] , "private" : "bnVsbA==" } ] } , { "mode" : "managed" , "type" : "null_resource" , "name" : "resource_B" , "provider" : "provider[\"registry.terraform.io/hashicorp/null\"]" , "instances" : [ { "schema_version" : 0 , "attributes" : { "id" : "5369048601034101090" , "triggers" : null } , "sensitive_attributes" : [ ] , "private" : "bnVsbA==" } ] } , { "mode" : "managed" , "type" : "null_resource" , "name" : "resource_C" , "provider" : "provider[\"registry.terraform.io/hashicorp/null\"]" , "instances" : [ { "schema_version" : 0 , "attributes" : { "id" : "3453046184153615927" , "triggers" : null } , "sensitive_attributes" : [ ] , "private" : "bnVsbA==" } ] } ] }
terraform state list でも、リソース名を確認できます。
$ terraform state list
null_resource.resource_A
null_resource.resource_B
null_resource.resource_C
以上で準備は完了です。
moved blockでリソースを改名する さっそく、moved block を利用して、terraform mv と同様に「リソース名の変更」を実施してみましょう。
まずは、同一ディレクトリに moved.tf を追加します。
moved.tf moved { from = null_resource.resource_A to = null_resource.resource_X }
このタイミングで、すぐに terraform plan してみると…
$ terraform plan null_resource.resource_X: Refreshing state... [id =592263413744525319] null_resource.resource_B: Refreshing state... [id =5369048601034101090] null_resource.resource_C: Refreshing state... [id =3453046184153615927] ╷ │ Error: Moved object still exists │ │ on moved.tf line 1: │ 1: moved { │ │ This statement declares a move from null_resource.resource_A, but that resource is still declared at main.tf:1,1. │ │ Change your configuration so that this resource will be declared as null_resource.resource_X instead. ╵
「null_resource.resource_Xに改名しようとしていますが、main.tf にはnull_resource.resource_Aのままで残っていますよ。Terraform の定義を変更してください」
と、丁寧なエラー文で通知してくれます。
main.tf を正しく書き換えて、再度 plan してみます。
main.tf resource "null_resource" "resource_X" {} resource "null_resource" "resource_B" {} resource "null_resource" "resource_C" {}
$ terraform plan null_resource.resource_B: Refreshing state... [id =5369048601034101090] null_resource.resource_C: Refreshing state... [id =3453046184153615927] null_resource.resource_X: Refreshing state... [id =592263413744525319] Terraform will perform the following actions: resource "null_resource" "resource_X" { id = "592263413744525319" } Plan: 0 to add, 0 to change, 0 to destroy. ─────────────────────────────────────────────────────────────────────────────────────────────────────────────────────────────────────────────────────────────────────────────────────────────────────────────────── Note: You didn't use the -out option to save this plan, so Terraform can' t guarantee to take exactly these actions if you run "terraform apply" now.
# null_resource.resource_A has moved to null_resource.resource_X
というメッセージで、「どこが変わるのか」が分かりますね。
$ terraform apply null_resource.resource_X: Refreshing state... [id =592263413744525319] null_resource.resource_B: Refreshing state... [id =5369048601034101090] null_resource.resource_C: Refreshing state... [id =3453046184153615927] Terraform will perform the following actions: resource "null_resource" "resource_X" { id = "592263413744525319" } Plan: 0 to add, 0 to change, 0 to destroy. Do you want to perform these actions? Terraform will perform the actions described above. Only 'yes' will be accepted to approve. Enter a value: yes Apply complete! Resources: 0 added, 0 changed, 0 destroyed. $ terraform state list null_resource.resource_B null_resource.resource_C null_resource.resource_X
リソース名が、resource_A から resource_X に変化しています。moved.tf ファイルは役目を果たしたので、削除しても以降の plan / apply には影響しません。
$ rm moved.tf $ terraform plan null_resource.resource_X: Refreshing state... [id =592263413744525319] null_resource.resource_C: Refreshing state... [id =3453046184153615927] null_resource.resource_B: Refreshing state... [id =5369048601034101090] No changes. Your infrastructure matches the configuration. Terraform has compared your real infrastructure against your configuration and found no differences, so no changes are needed.
以上で、moved block を利用したTerraformリソースの改名作業は終了です。
Terraformのリファクタリングには「(1)stateファイルの操作」と「(2)Terraformコード自体の操作」の2つが必要であり、(1)に集中することで(2)を忘れてしまうことがありますが、moved block を利用すればそれを防げそうです。
私の中では、Terraform stateファイルの操作には「terraform stateコマンドしかない」と思っていましたが、今回の勉強会に参加することで、結果的に新しい方法を知ることができました。改めて、継続的な技術インプット & 定期的なアウトプットが重要だなと実感した勉強会でした。