Go 1.19が8/2に早々にリリースされました。個人的にはGo 1.19よりも楽しみだったのが、サービス間通信とIDL(インタフェース記述言語)連載の中でご紹介したgRPCのGo実装の新星、Connect のアップデートでした。そしてそれはやってきました。
詳しい内容は↑の記事を見ていただくとして、Connectがその開発元ブログの紹介記事 で宣言していたのが次の2つのことでした。
Go 1.19が出たらconnect-goは1.0にして以後後方互換性を守るよ
connect-webを出すよ
前者はまだ0.3だったのですが、connect-webはリリースされました。歴史のあるフロントエンドのコードジェネレータはTypeScript対応が後付けだったりするのですが、TypeScriptがファーストシチズンかつ、ネイティブというコードジェネレータなので、開発はかなりやりやすくなることが期待されます。connect-webの公開は数日前でしたが、本家の紹介記事もちょうど今日、公開されました。
Connect-Web: It’s time for Protobuf and gRPC to be your first choice in the browser
本家のチュートリアルとかもまだない状態ですが、サンプルコードを見たら簡単そうだったので、connect-goとセットで試してみました。サンプルは以下のリポジトリにアップしています。
https://github.com/shibukawa/connect-test
元のエントリーではRuby, Python, PHPにも出していくよ宣言がありましたが、今回のconnect-webのブログには、Node.js、Android, iOSにも出すよ宣言がありました。あと、connect-webの中のソースコード を見ると、
fetch()がないってことは古いNode.js使っているのか?connect-nodeを待ってて!
とあるので、今でもfetch()のあるNode.js 18でクライアントなら動作しそうですね。
プロジェクトのフォルダ構成と初期化 フォルダ構造はこんな感じです。Goの標準的な構成(トップにgo.mod、cmdフォルダ以下にエントリポイント)にプラスして、frontendというフォルダにフロントエンドのプロジェクトフォルダを起きました。
connect-test ├── buf.gen.yaml ├── buf.yaml ├── cmd │ └── connect-test │ └── main.go ├── frontend │ ├── package.json │ └── src │ └── greet │ └── v1 │ ├── greet_connectweb.ts │ └── greet_pb.ts ├── release.go ├── gen │ └── greet │ └── v1 │ ├── greet.pb.go │ └── greetv1connect │ └── greet.connect.go ├── generate.go ├── go.mod ├── go.sum ├── greet │ └── v1 │ └── greet.proto └── server.go
プロジェクトのフォルダ(ここではconnect-test)を作り、次のようにプロジェクトを作りました。フロントエンドはSolid.jsを使ってます。
mkdir connect-testgo mod init connecttest npx degit solidjs/templates/ts frontend
必要なツール類を入れます。メインのbufとGo用のツールはGo製なのでgo installで入れます。フロントエンドの方はnpmで配布されているのでnpm installします。
go install github.com/bufbuild/buf/cmd/buf@latest go install google.golang.org/protobuf/cmd/protoc-gen-go@latest go install github.com/bufbuild/connect-go/cmd/protoc-gen-connect-go@latest cd frontendnpm install --save-dev bufbuild/protoc-gen-connect-web bufbuild/protoc-gen-es
gRPCの定義作成 ここでは、connect-goのサンプルをとりあえずそのまま利用しました。go_packageだけはgo modで設定したルートのパッケージ名はじまりになるように修正しています。
greet/v1/greet.proto syntax = "proto3" ; package greet.v1;option go_package = "connecttest/gen/greet/v1;greetv1" ;message GreetRequest { string name = 1 ; } message GreetResponse { string greeting = 1 ; } service GreetService { rpc Greet (GreetRequest) returns (GreetResponse) {} }
buf mod initを実行してbuf.yamlを生成したあとは、buf.gen.yamlを自分で作成します。上2つはGoコード生成のためのconnect-goのサンプルと同じですが、下にフロントエンド用のコード生成用の設定です。出力先はフロントエンドフォルダの中になるようにしています。
buf.gen.yaml version: v1 plugins: - name: go out: gen opt: paths=source_relative - name: connect-go out: gen opt: paths=source_relative - name: es path: ./frontend/node_modules/.bin/protoc-gen-es out: frontend/src opt: target=ts - name: connect-web path: ./frontend/node_modules/.bin/protoc-gen-connect-web out: frontend/src opt: target=ts
あとはbuf generateでサーバーとフロントのコードを生成します。
APIサーバーの中身の実装 中身はconnect-goのサンプルとほぼ同じで、リクエストできたnameパラメータを使って、レスポンスの文字列を作って返しているだけです。
server.go package connecttestimport ( "context" "fmt" greetv1 "connecttest/gen/greet/v1" "github.com/bufbuild/connect-go" ) type GreetServer struct {}func (s *GreetServer) ctx context.Context, req *connect.Request[greetv1.GreetRequest], ) (*connect.Response[greetv1.GreetResponse], error ) { res := connect.NewResponse(&greetv1.GreetResponse{ Greeting: fmt.Sprintf("Hello, %s!" , req.Msg.Name), }) return res, nil }
このサーバーをハンドラーとして登録してウェブサーバーを起動するエントリーポイントのコードは以下の通りです。
cmd/connect-test/main.go package mainimport ( "context" "fmt" "log" "net/http" "os" "os/signal" "time" "github.com/shibukawa/frontend-go" "golang.org/x/net/http2" "golang.org/x/net/http2/h2c" "connecttest" "connecttest/gen/greet/v1/greetv1connect" ) func main () ctx, stop := signal.NotifyContext(context.Background(), os.Interrupt) defer stop() greeter := &connecttest.GreetServer{} mux := http.NewServeMux() path, handler := greetv1connect.NewGreetServiceHandler(greeter) mux.Handle(path, handler) mux.Handle("/" , frontend.MustNewSPAHandler(ctx)) server := &http.Server{ Addr: ":8888" , Handler: h2c.NewHandler(mux, &http2.Server{}), } go func () <-ctx.Done() ctx, cancel := context.WithTimeout(context.Background(), 5 *time.Second) defer cancel() server.Shutdown(ctx) }() fmt.Println("start receiving at :8888" ) log.Fatal(server.ListenAndServe()) }
開発時には裏でfrontendフォルダでnpm run devして開発サーバーを起動してリバースプロキシ経由でSPAを表示して、リリース時にはgo embedで取り込んだ成果物のHTML/CSS/JSを使って表示してあげる(go:embed紹介記事でやっているのと同等 )パッケージのgithub.com/shibukawa/frontend-go というのをこの前作ったので、それを使っています。
ついでにそれの設定用のコードも作成しますが、リバプロいらないよ、ということであれば、このファイルと↑の🐙の行を消してください。
frontend.go package connecttestimport ( "embed" "github.com/shibukawa/frontend-go" ) var asset embed.FSfunc init () frontend.SetFrontAsset(asset, frontend.Opt{ FrameworkType: frontend.SolidJS, }) }
これでサーバーは完成です。
フロントエンドの作成 connect-webで作成したクライアントは、まずトランスポートを作成し、それを渡してクライアントを作成します。あとはクライアントのメソッドを呼べばサーバーにリクエストを送信できます。
import { createConnectTransport, createPromiseClient, } from "@bufbuild/connect-web" ; import { GreetService } from "./greet/v1/greet_connectweb" const transport = createConnectTransport ({ baseUrl : "/" , }); const client = createPromiseClient (GreetService , transport);const res = await client.greet ({name : "名前" });
この状態では、オリジナルのconnectプロトコルでの通信になります。なお、createConnectTransport()のオプションでテキスト形式、バイナリ形式が選べたり、インターセプターの設定ができたり、いろいろできます。なお、リバースプロキシを外した場合はbaseUrlはhttp://localhost:3000とかにしておく必要があると思います。
ソースを見るとcreateGrpcWebTransport()というトランスポート作成のファクトリー関数もあり、これを使うと純正のgRPC-Webプロトコルの通信になってくれるようです。
また、クライアントは、いまどき使うことはないと思いますが、コールバックスタイルのものを作成するcreateCallbackClient()もあります。
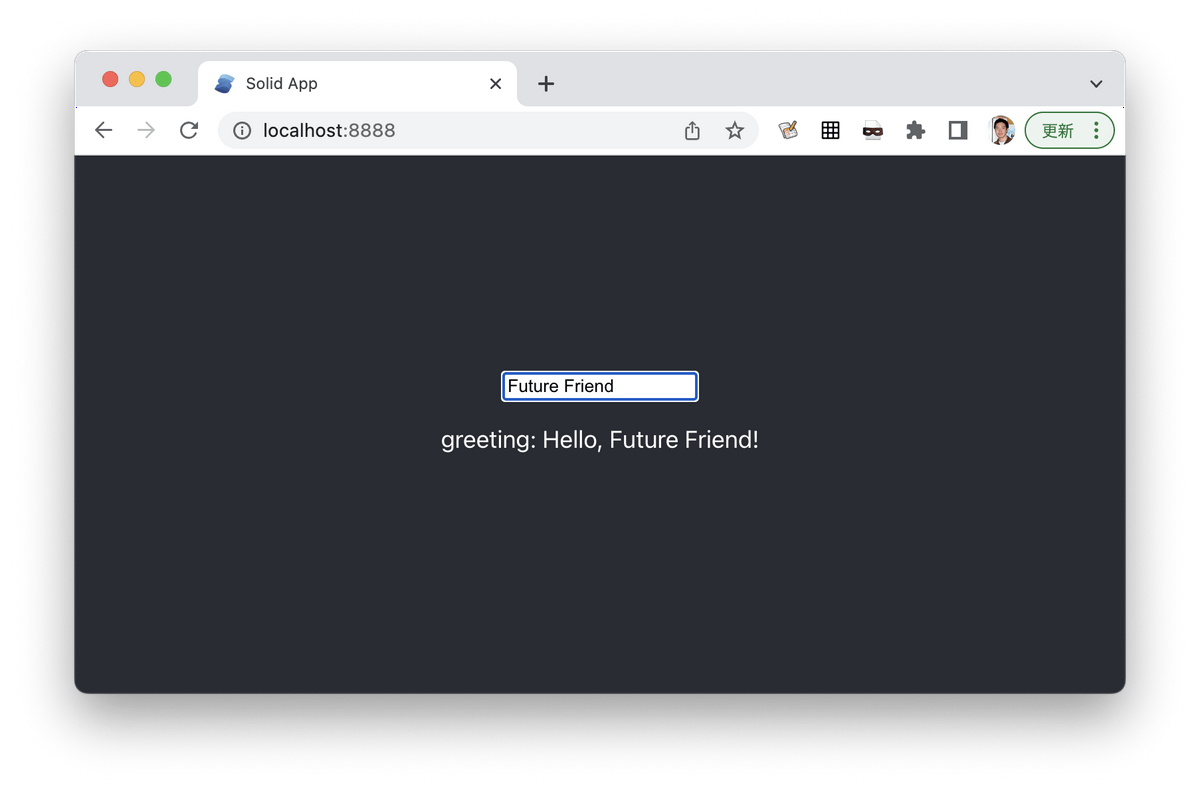
最終系は次のようになります。Solid.jsではサーバー通信はcreateResource()でラップして使いますが、この中ではasync関数を渡せば良いので、connect-webで生成したサービスはばっちり活用できます。
App.tsx import { createSignal, createResource, Component , } from 'solid-js' ; (ここに上記のコードを入れる) async function greeter (name : string return client.greet ({name}); } const App : Component = () => { const [name, setName] = createSignal ("bob" ); const [greet] = createResource (name, greeter); return ( <div class ={styles.App} > <header class ={styles.header} > <input placeholder ="名前を入れてね" onInput ={(e) => setName(e.currentTarget.value)} /> <p > greeting: {greet()?.greeting}</p > </header > </div > ); }; export default App ;
これだけで、名前を入れたらサーバーで挨拶文を生成して返し、それを表示するコードができました。
今回の例は使ってみたかったのでSolid.jsを使いましたが、ReactユーザーでuseSWR()を利用しているならたぶんこうすることになるかと思います。SWRは最初のパラメータ(文字列か文字列の配列)がキャッシュキーになります。そのため、fetcherの中では不要な(生成コードが持ってくれている)サービスのメソッドの名前をあえてuseSWR()の引数に入れています。
async function fetcher (key : string , name : string return client.greet ({name}); } const { data, error } = useSWR ([GreetService .methods .greet .name , name], fetcher)
まとめ connect-goのときもそうでしたが、生成されるコードの分量がかなり少なくて理解しやすいので、生成されたコードに責任を持ってリリースするのがやりやすそうでいいですね。また、gRPCはOpenAPIのyamlよりもコンパクトに書けるし、もちろん、フロントもサーバーも型チェックがばっちり効いていい感じです。これであれば、OpenAPIのときみたいに、コード生成のテンプレートをいじり出したり、というのも当面は不要な気がします。