初めに
こんにちは! 筋肉エンジニアのTIG渡邉です。最近ヘルニアになってしまい筋トレが思うようにできずくすぶっています。
Terraform連載 の4リソース目の記事になります!
さて、今回はプロジェクトでJenikisを利用する機会があり、初めてJenkinsfileでTerraformのCI/CD環境を構築する機会があったので記事に残そうと思います。クラウドを使っているとAWSではCodeBuild、Google CloudではCloudBuildのサービスをCI/CD環境として利用するのでyamlでのCI/CDスクリプトには慣れていましたが、今回はJenkinsでCI/CDを構築する要件でしたのでJenkinsfileでCI/CDスクリプトには苦戦しました。
以下、今回利用したクラウドやTerraform、Jenkinsのバージョンを記載しておきます。
- クラウド:Google Cloud
- Terraform : 1.4.0
- Jenkins : 2.375.3
構成
今回のアーキテクチャ図は以下の通りです。
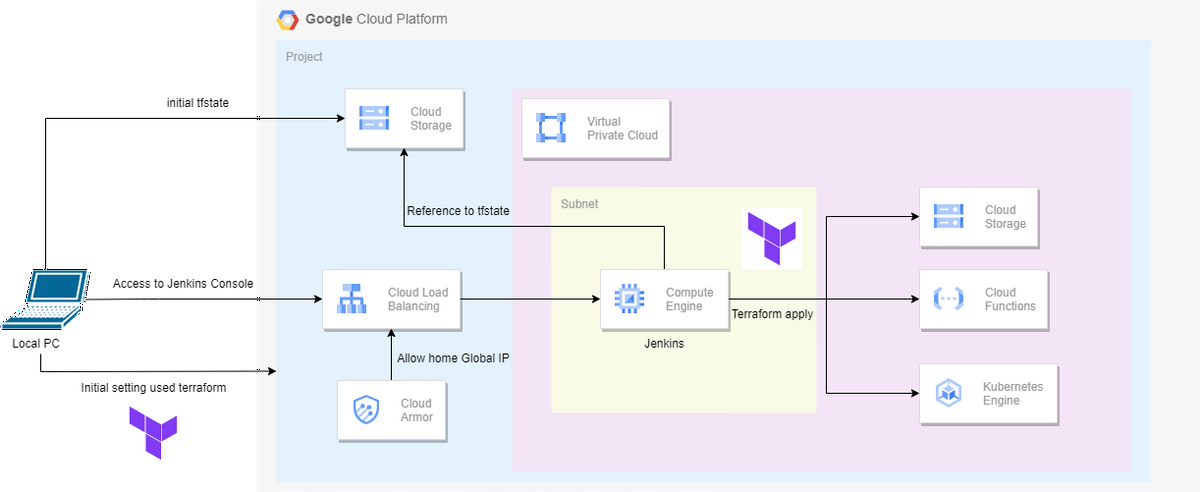
まず、JenkinsサーバやJenkinsサーバに付随するリソース(Cloud Load Balancing/Cloud Armorなど)はローカルPCからTerraformを実行して作成していきます。Jenkinsサーバを構築後、諸々Jenkinsの設定を終えたのちはJenkins Consoleからボタンポチポチでterraform planからterraform applyを実行してほかのGoogle Cloudのリソースたちを構築できるようになります。
Jenkinsサーバを構築するTerraformコード
ローカルPCからJenkinsサーバを構築するためのTerraformコードを記載します。
前提としてGoogle CloudのプロジェクトやVPC、Subnetなどのネットワークリソースはすでに構築されているものとします。
ディレクトリ構成
本ディレクトリ構成は以下の通りです。
├── backend.tf |
locals.tfの中身はGoogle Cloudのプロジェクト名や、自宅外部IPが含まれるので省略させていただきます。また、GCEのStartup Scriptを利用してGCEの構築時にJenkinsのインストールやGKEを操作するためのkubectlなどの諸々の設定も行っています(今回はGKEについては記載しませんがkubectlのインストールだけは一緒に行っています)。。
backend.tf
terraform { backend "gcs" { bucket = "xxxxxxxxxxxxx" prefix = "terraform/state" } } |
comute_engine.tf
resource "google_compute_instance" "jenkins" { name = local.jenkins.name machine_type = local.jenkins.machine_type zone = local.jenkins.zone tags = local.jenkins.tags metadata = { "enable-oslogin" = "TRUE" } boot_disk { initialize_params { image = "ubuntu-os-cloud/ubuntu-2204-lts" } } network_interface { subnetwork = data.google_compute_subnetwork.pri.self_link access_config { } } service_account { email = google_service_account.jenkins.email scopes = ["cloud-platform"] } metadata_startup_script = file("./startup-scripts/jenkins.sh") } resource "google_compute_instance_group" "jenkins" { name = local.jenkins.name description = local.jenkins.instance_group_description instances = [ google_compute_instance.jenkins.id ] named_port { name = local.jenkins.name port = local.jenkins.instance_group_port } zone = local.jenkins.zone } resource "google_compute_http_health_check" "jenkins" { name = local.jenkins.name request_path = "/login" port = 8080 } resource "google_compute_backend_service" "jenkins" { name = local.jenkins.name protocol = "HTTP" port_name = local.jenkins.name load_balancing_scheme = "EXTERNAL" timeout_sec = 10 health_checks = [google_compute_http_health_check.jenkins.id] security_policy = google_compute_security_policy.jenkins.id backend { group = google_compute_instance_group.jenkins.id balancing_mode = "UTILIZATION" max_utilization = 1.0 capacity_scaler = 1.0 } } resource "google_compute_url_map" "jenkins" { name = local.jenkins.name default_service = google_compute_backend_service.jenkins.id } resource "google_compute_target_https_proxy" "jenkins" { name = local.jenkins.name url_map = google_compute_url_map.jenkins.id ssl_certificates = [google_compute_managed_ssl_certificate.jenkins.id] } data "google_compute_global_address" "jenkins" { name = local.jenkins.name } resource "google_compute_global_forwarding_rule" "jenkins" { name = local.jenkins.name ip_protocol = "TCP" load_balancing_scheme = "EXTERNAL" port_range = "443" target = google_compute_target_https_proxy.jenkins.id ip_address = data.google_compute_global_address.jenkins.address } resource "google_compute_managed_ssl_certificate" "jenkins" { name = local.jenkins.name managed { domains = ["${data.google_compute_global_address.jenkins.address}.nip.io"] } } |
comute_firewall.tf
resource "google_compute_firewall" "jenkins_iap" { name = "allow-iap-jenkins-instance-ssh" network = data.google_compute_network.vpc.self_link allow { protocol = "tcp" ports = ["22"] } direction = "INGRESS" priority = 1000 target_tags = ["jenkins"] source_ranges = ["35.235.240.0/20"] } resource "google_compute_firewall" "jenkins_health" { name = "allow-jenkins-health-check" network = data.google_compute_network.vpc.self_link allow { protocol = "tcp" } direction = "INGRESS" priority = 1000 target_tags = ["jenkins"] source_ranges = ["35.191.0.0/16", "130.211.0.0/22"] } |
comute_network.tf
data "google_compute_network" "vpc" { |
project_iam_member.tf
resource "google_project_iam_member" "jenkins" { project = local.project.project_id for_each = toset([ "roles/owner", ]) role = each.value member = "serviceAccount:${google_service_account.jenkins.email}" } |
security_policy.tf
resource "google_compute_security_policy" "jenkins" { name = local.jenkins.name rule { action = "allow" priority = "10" match { versioned_expr = "SRC_IPS_V1" config { src_ip_ranges = [local.security_policy.home_ip] } } description = "allow home ip address" } rule { action = "deny(403)" priority = "2147483647" match { versioned_expr = "SRC_IPS_V1" config { src_ip_ranges = ["*"] } } description = "deny all ip address except home ip" } } |
service_account.tf
resource "google_service_account" "jenkins" { account_id = "tky-jenkins-sa" display_name = "tky-jenkins-sa" } |
versions.tf
terraform { required_version = "~> 1.4.0" required_providers { google = { version = "~> 4.47.0" } } } |
provider.tf
provider "google" { |
startup-scripts/jenkins.sh
#/bin/bash |
Jenkins初期設定
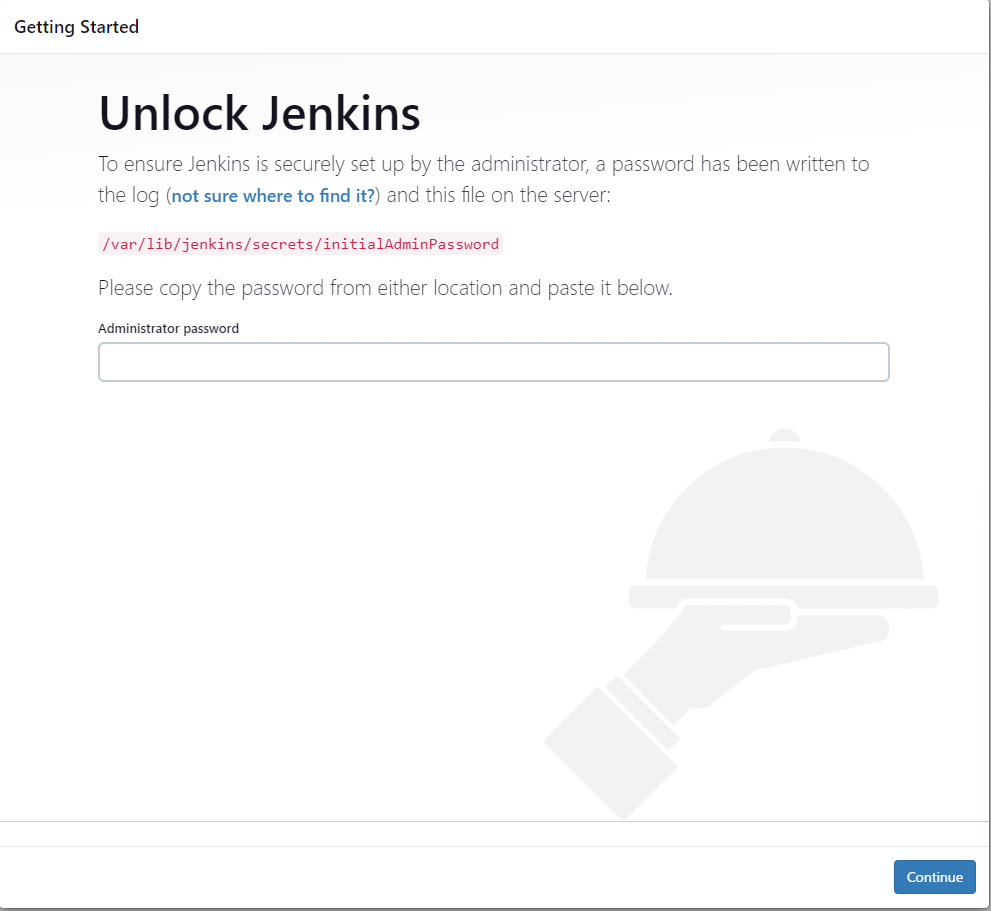
Jenkinsサーバが構築出来たら、ローカルPCからCloud Load Balancingに設定されたURLからJenkins Consoleにアクセスします。
初回アクセス時にAdministrator passwordを求められるのでJenkinsサーバにSSHで入り、以下のコマンドを実行してAdministrator passwardを確認して画面に入力します。
sudo cat /var/lib/jenkins/secrets/initialAdminPassword |
次にJenkins Pluginの設定を求められるので、Jenkinsが推奨している「Install suggested plugins」を選択します。
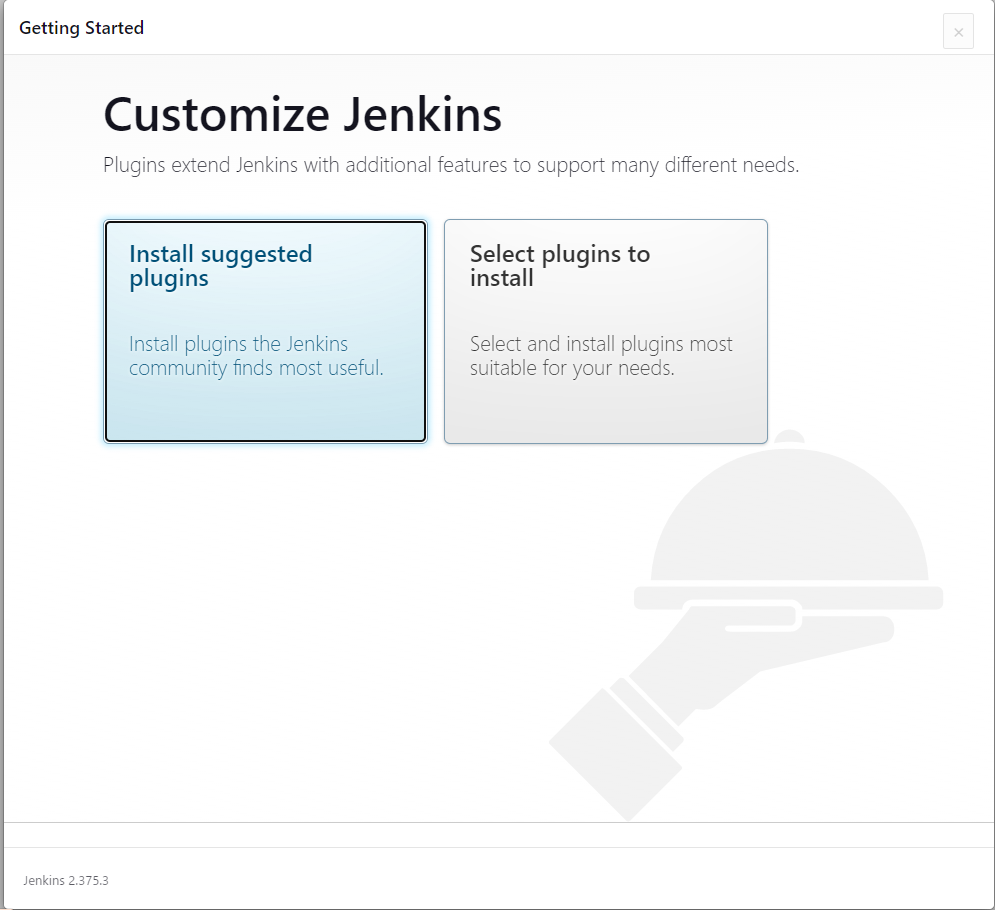
Jenkinsが推奨しているPluginをインストールされるまで待ちます。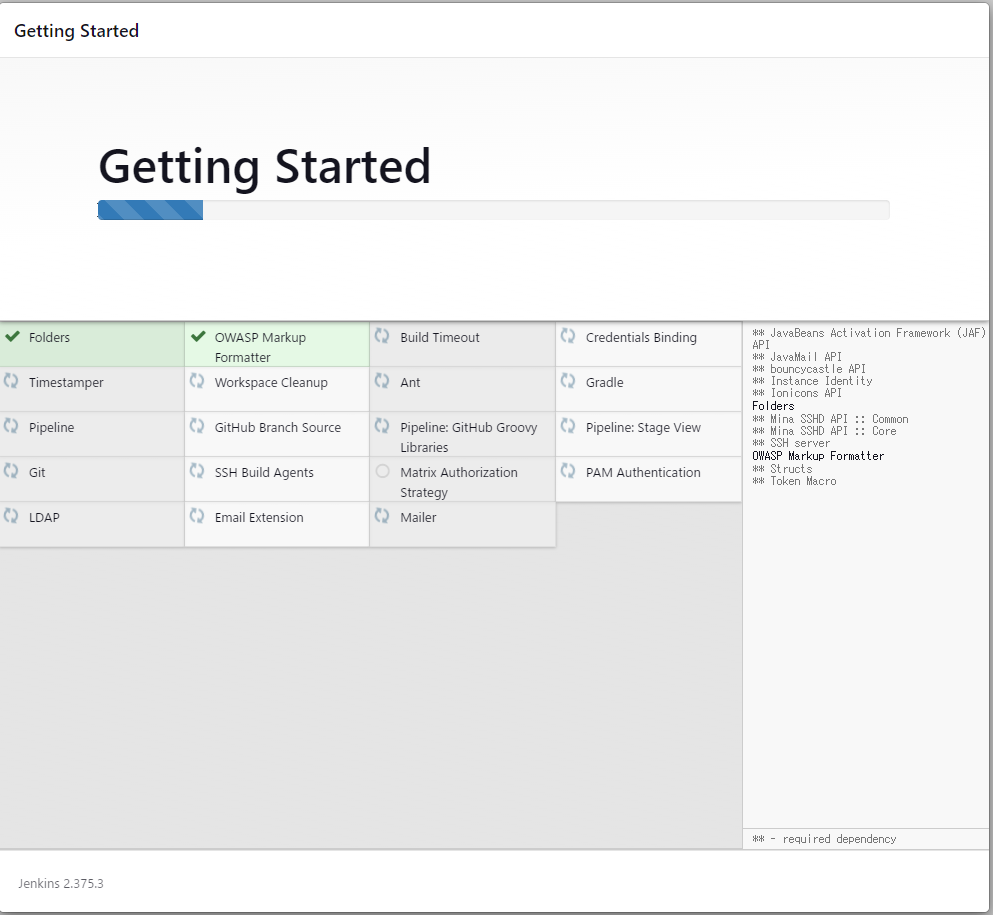
次に、Jenkins初期Admin Userの設定を求められるので
- ユーザ名
- パスワード
- パスワードの確認
- フルネーム
- メールアドレス
を入力して「Save and Continue」をクリックします。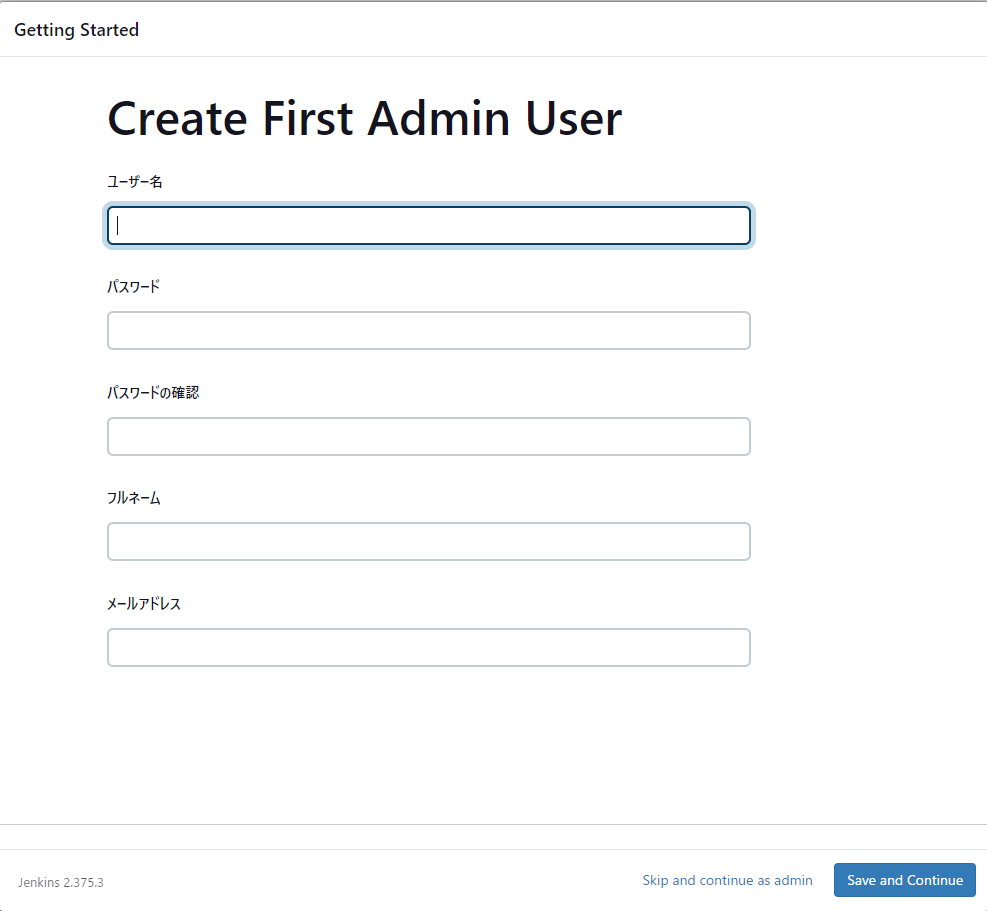
Jenkins ルートURLの確認が求められるので、変更がなければ「Save and Finish」をクリックします。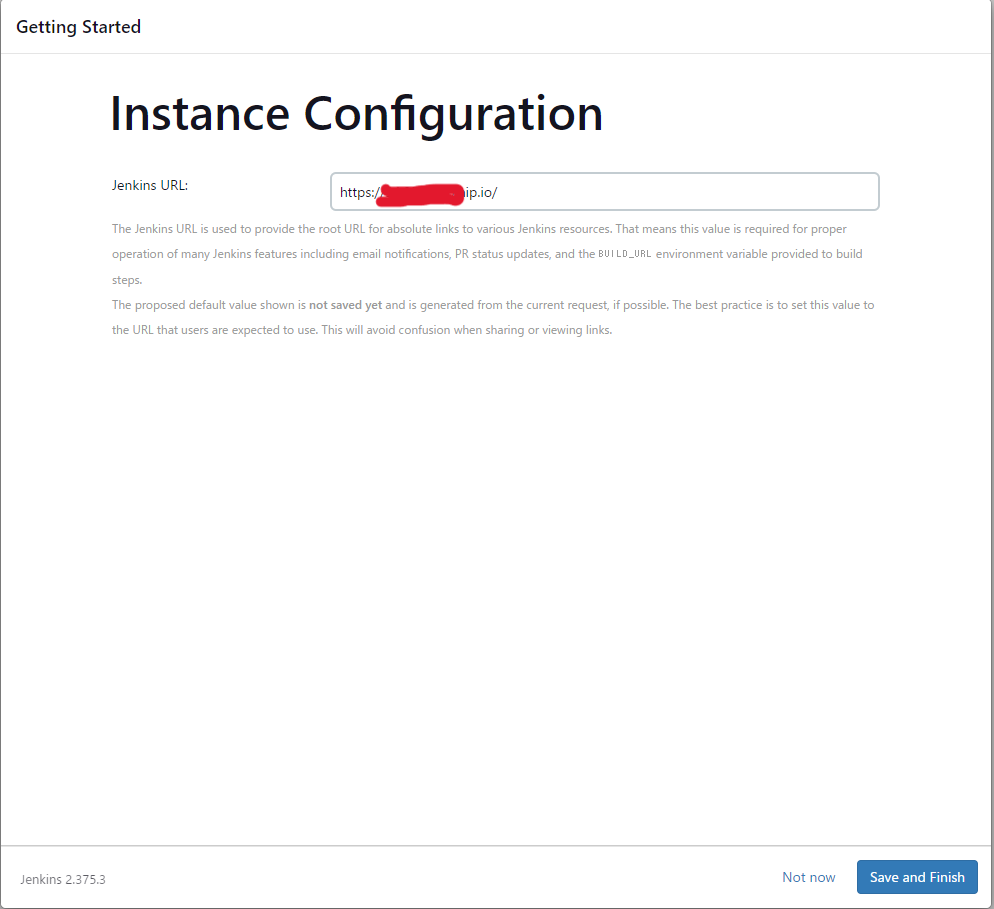
これでJenkinsの初期設定が完了したので、「Start using Jenkins」をクリックします。
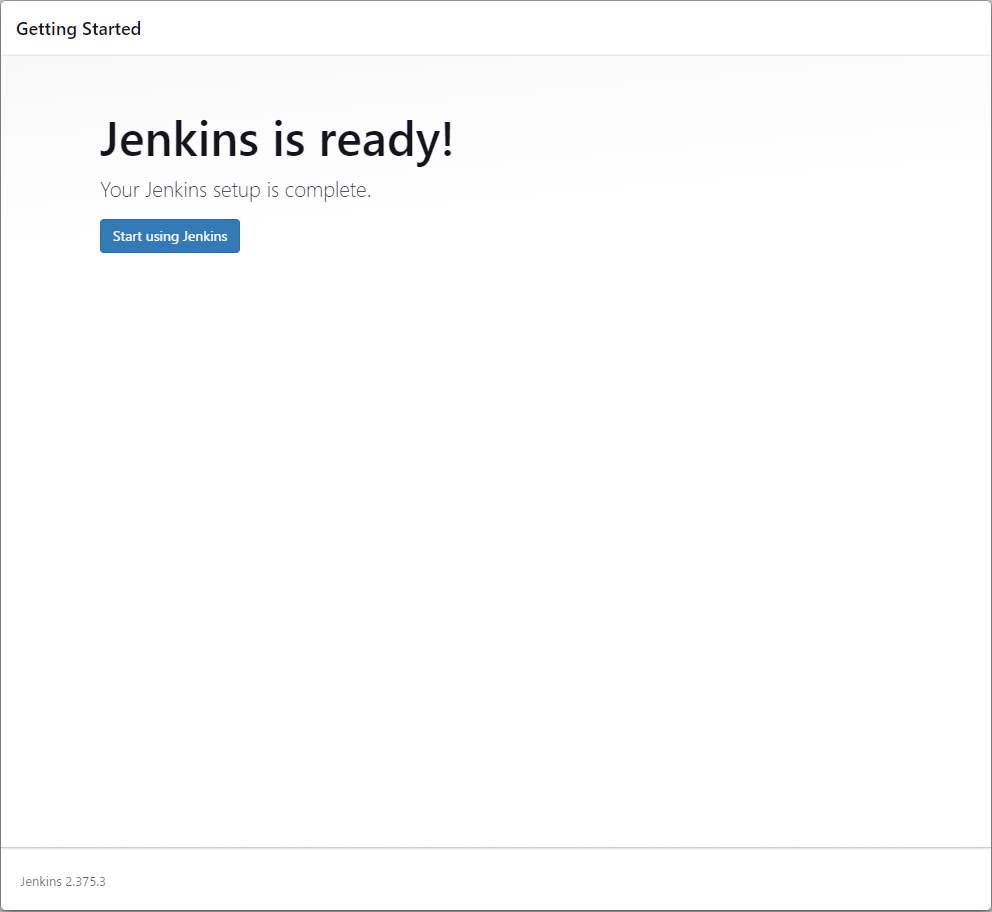
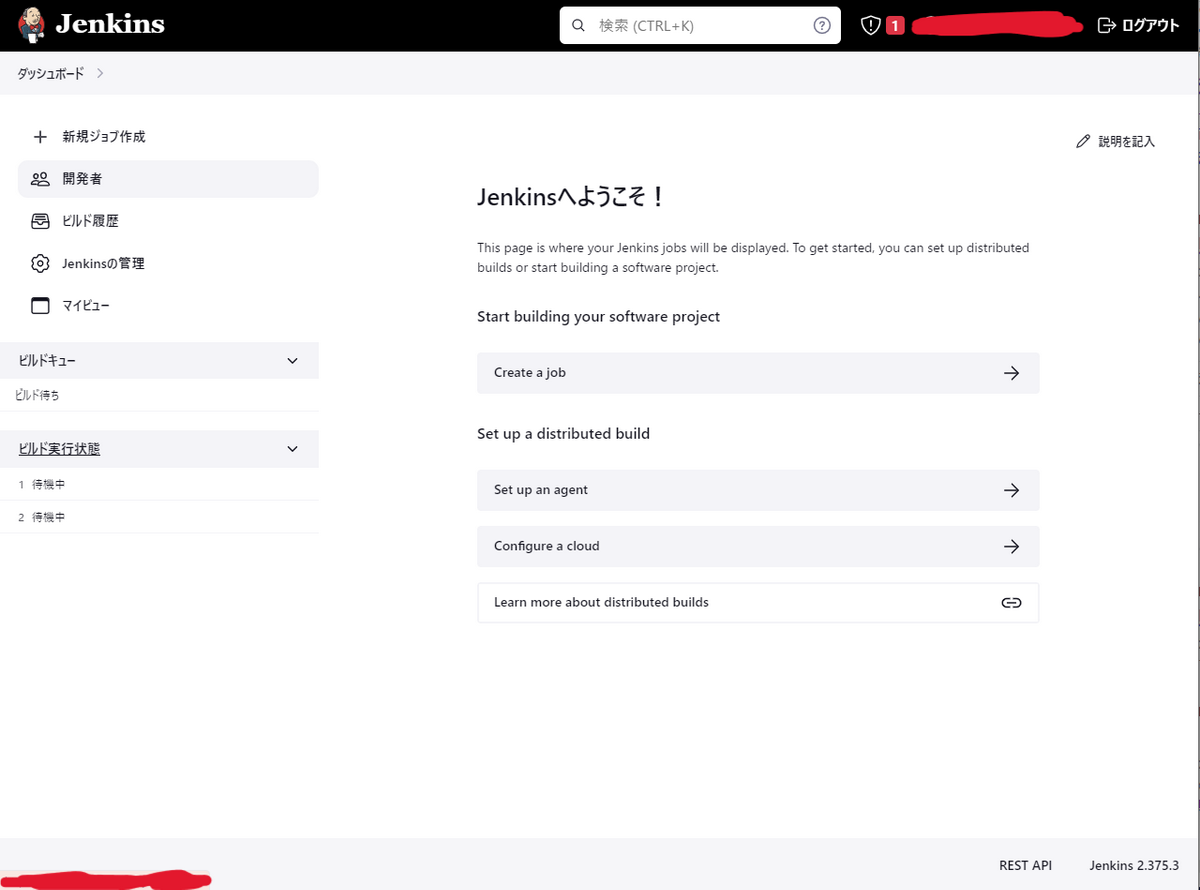
その後、Jenkins Consoleの画面にアクセスできるようになります。
Terraform/AnsiColor プラグインのインストール
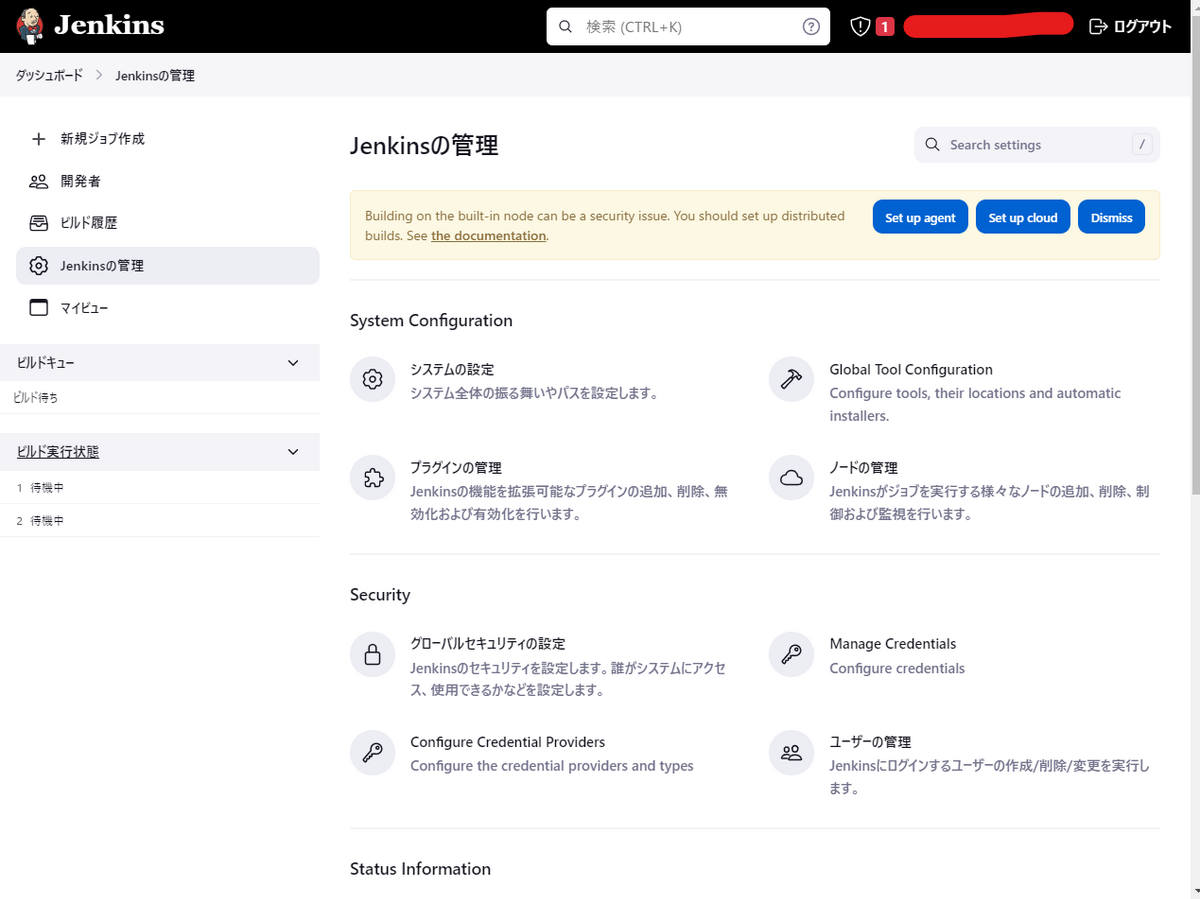
「Jenkinsの管理」をクリックし、「プライグインの管理」をクリックします。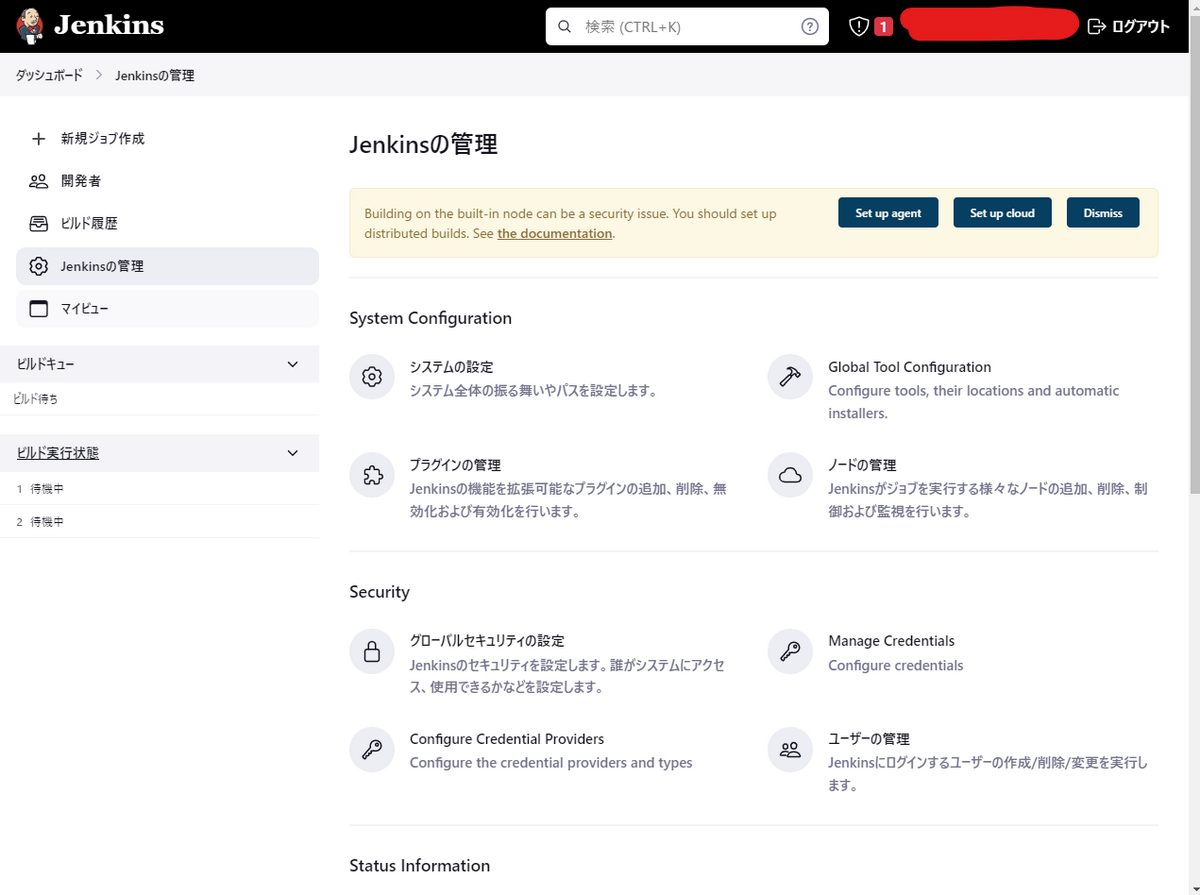
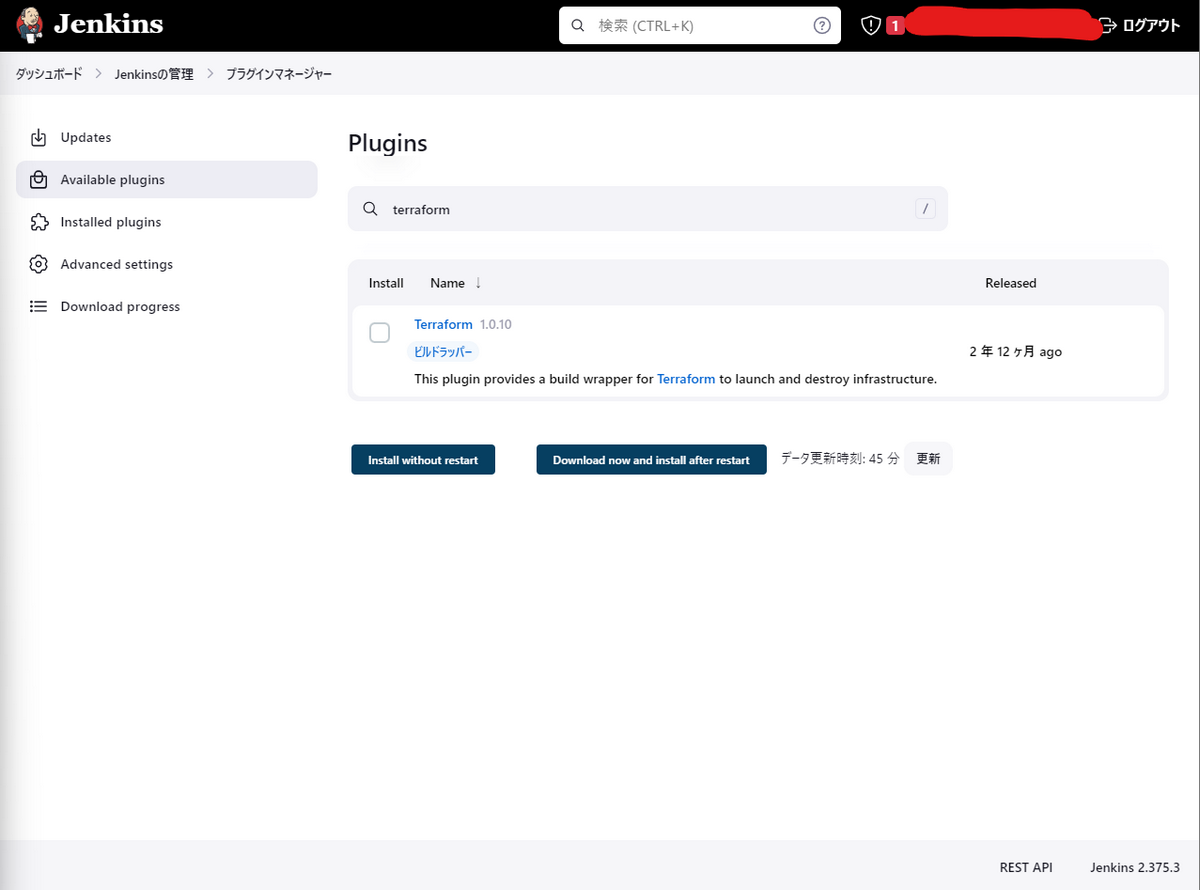
JenkinsからTerraformを実行するためにTerraformをインストールします。
「Availavle plugins」をクリックし、検索欄から「terraform」を入力、Installにチェックし、「Download now and install after restart」をクリックします。
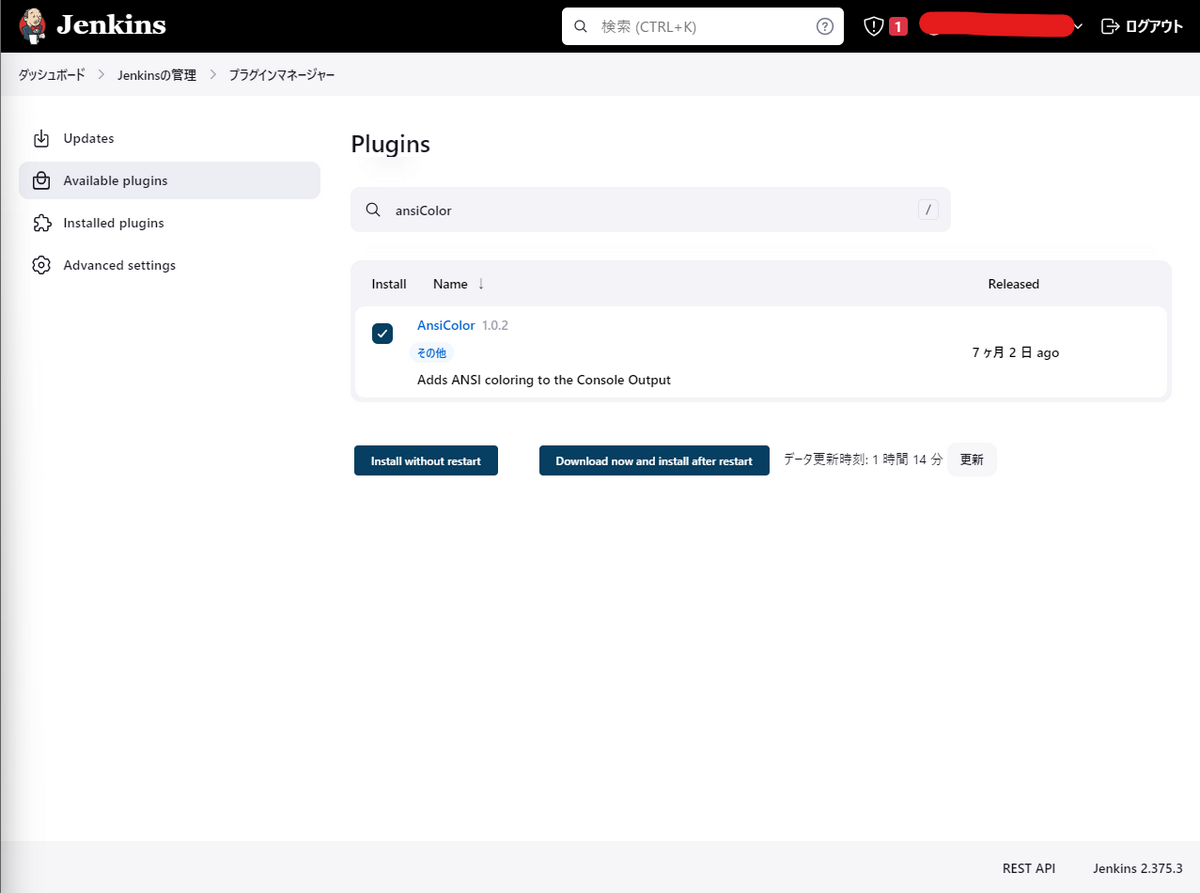
Jenkins実行ログに色を付けたいので、AnsiColorをインストールします。
「Availavle plugins」をクリックし、検索欄から「AnsiColor」を入力、Installにチェックし、「Download now and install after restart」をクリックします。
その後、「Installed plugins」をクリックし、「ジョブが実行中でなければ再起動」をクリックし、Jenkinsサーバを再起動します。
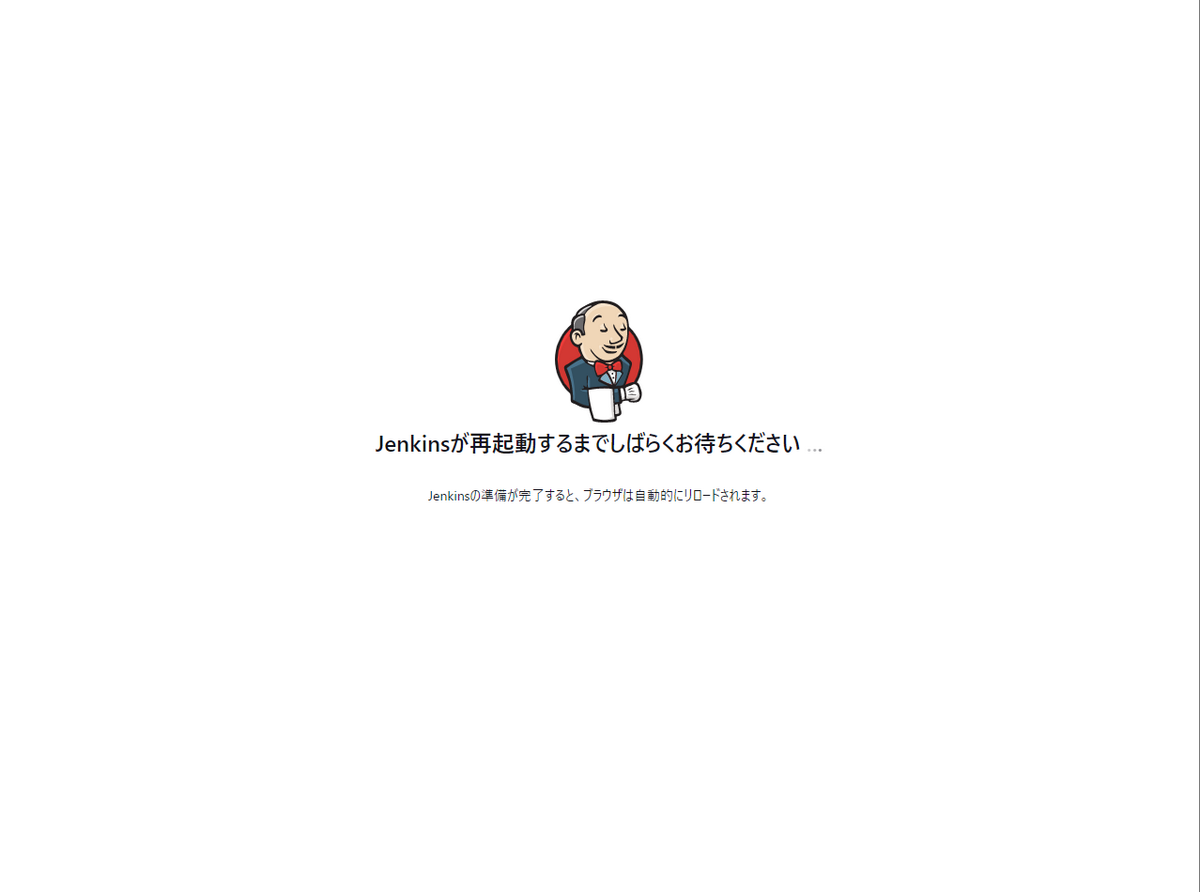
再起動すると、再度ログインが求められるのでログイン情報を入力し、ログインします。
Global Tool Configurationの設定
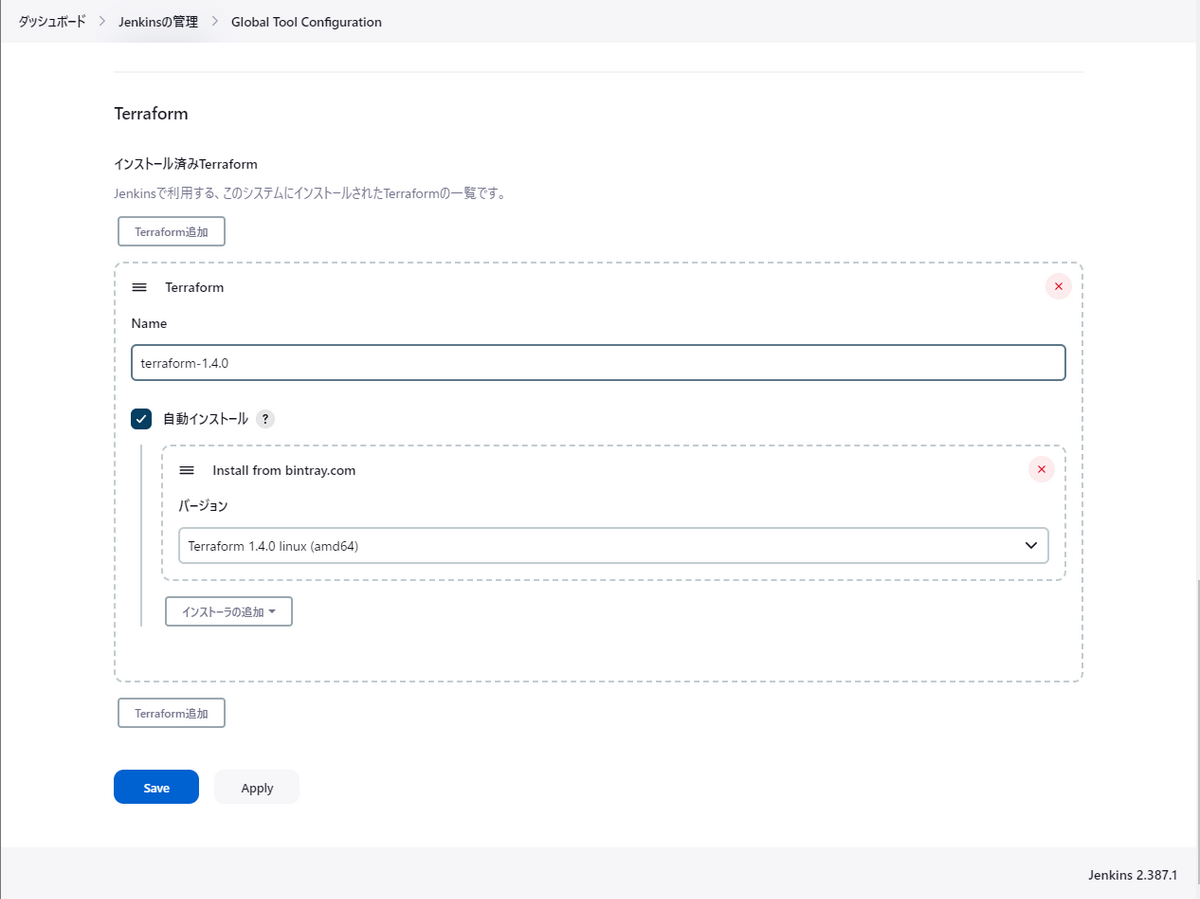
「Jenkinsの管理」をクリックし、「Global Tool Configuration」をクリックします。
Terraformプラグインをインストールしている状態だと、Global Tool ConfigurationにTerraformが表示されるので、設定します。
- Name : Terraform-1.4.0 (Jenkinsfileで使用するためこの名前にします)
- install from bintray.com:バージョン(Terraform 1.4.0 linux (amd64))
を設定し、「Save」をクリックします。
Terraform Plan/Applyジョブの作成
Terraformジョブ管理フォルダの作成
ここまでの設定で、Jenkins上でTerraformを実行する環境が整ったので、Terraform実行ジョブ管理フォルダの作成を行っていきます。
「新規ジョブ作成」をクリックします。
まず、Terraformジョブをまとめるフォルダを作成します。
ジョブ名「terraform」と入力し、「フォルダ」を選択し、「OK」を入力します。
ConfigurationでGeneralから
- 表示名:terraform
- 説明:terraform planジョブとterraform applyジョブを管理します
と入力し「保存」をクリックします。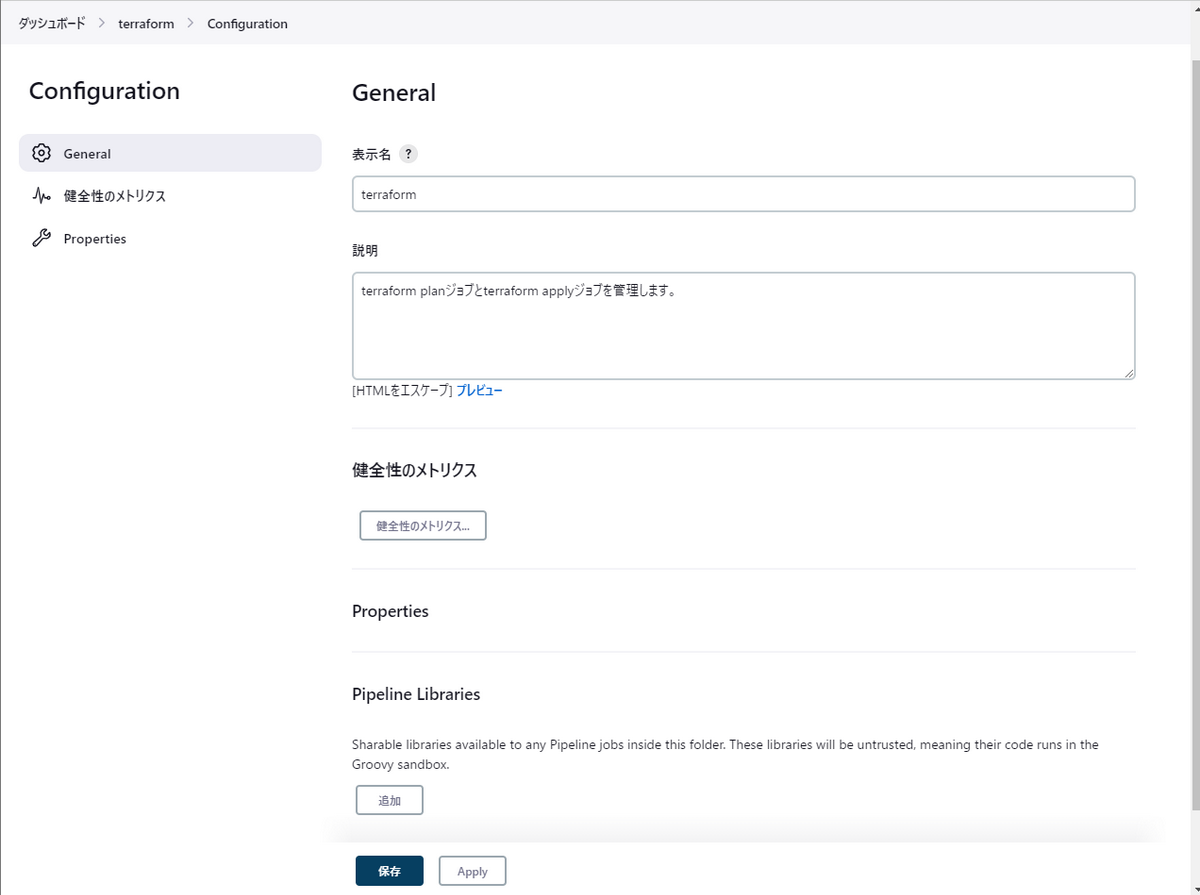
Terraform planジョブの作成
terraformフォルダが作成されたので、terraform planジョブの作成を行っていきます。
「新規アイテムの作成」をクリックします。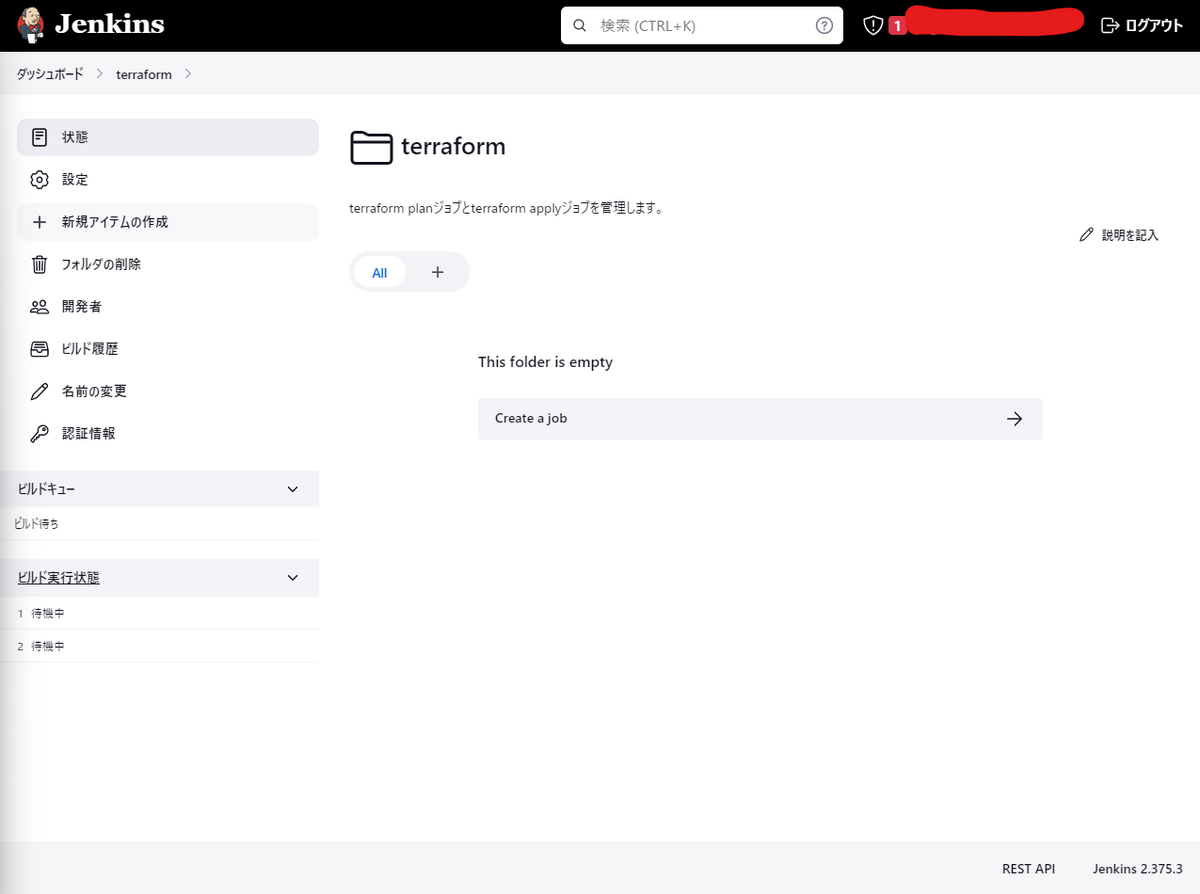
ジョブ名「terraform-plan」と入力し、「Multibranch Pipeline」を選択し、「OK」と入力します。
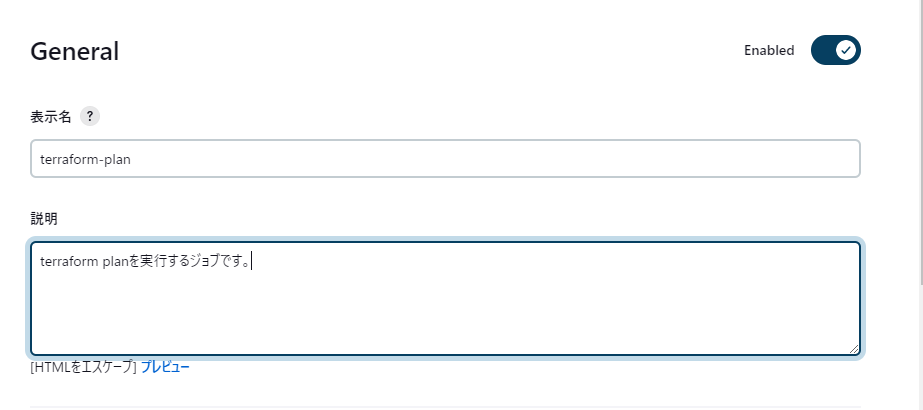
ConfigurationでGeneralから
- 表示名:terraform-plan
- 説明:terraform planを実行するジョブです。
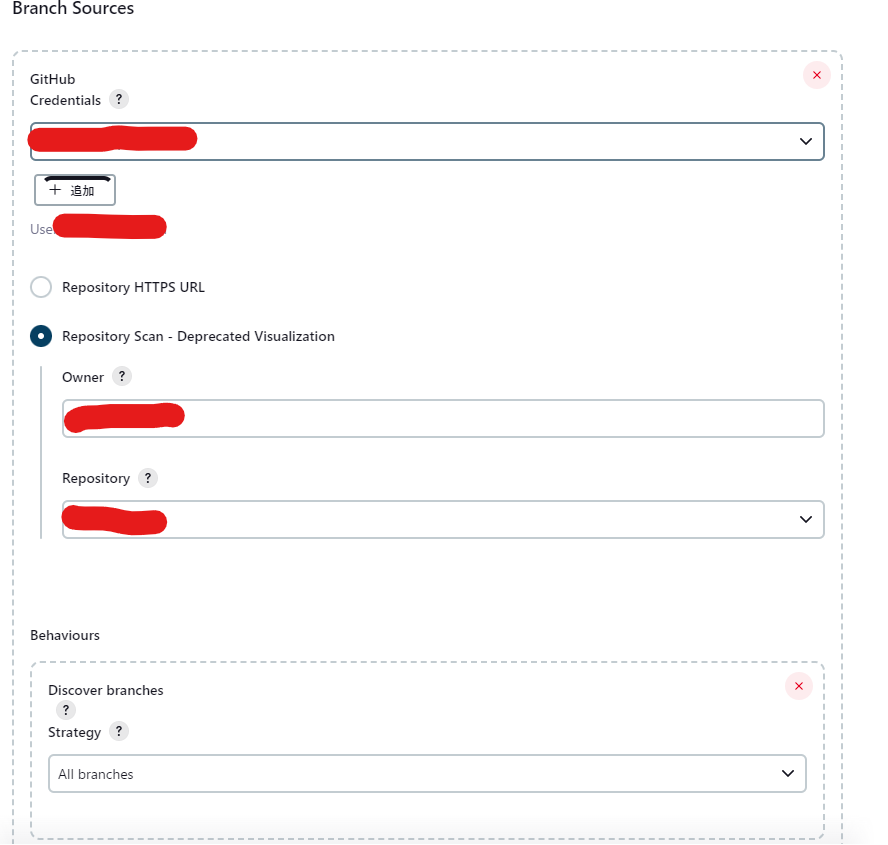
Branch SorucesでGitHubとの連携の設定を行っていきます。
Credentialsから「追加」をクリックし、GitHub認証情報の設定を行います。
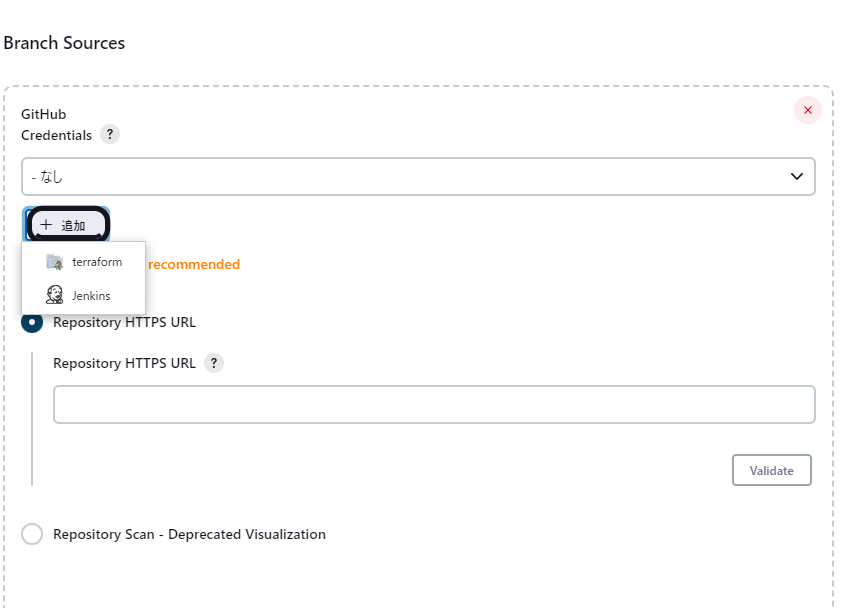
Folder Credentials Providerで
- Domain:グローバルドメイン
- 種類:ユーザ名とパスワード
- ユーザ名:GitHubのユーザ名
- パスワード:GitHubのPersonal Access Token
を入力します。
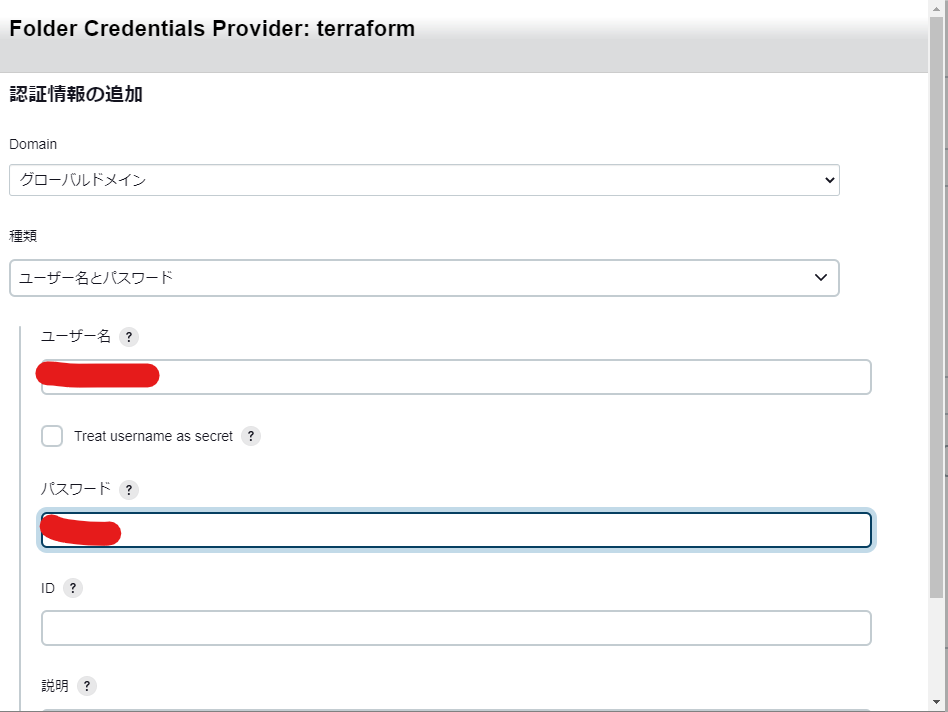
上記設定後、Credentialsに設定したCredentialが表示されるので選択します。
Repository Scan - Deprecated Visualization から
- Owner:Githubユーザ名
- Repository:対象リポジトリ
を選択します。
Behavioursは
- Strategy:All branches
を選択します。
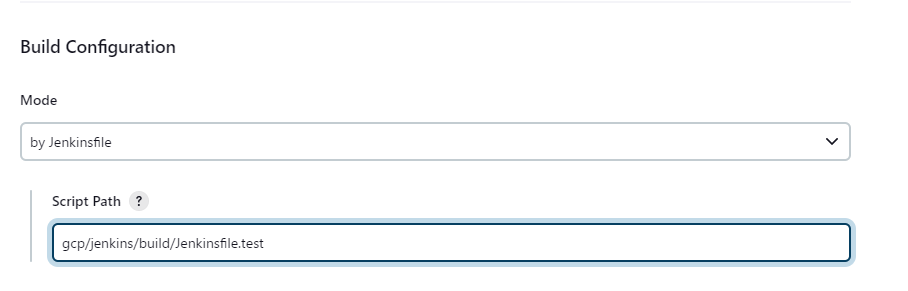
Build Configurationから
- Mode:by Jenkinsfile
- script Path:Jenkinsfileが存在するパス
を入力して「保存」をクリックします。
設定後、terraform-planジョブが作成されます。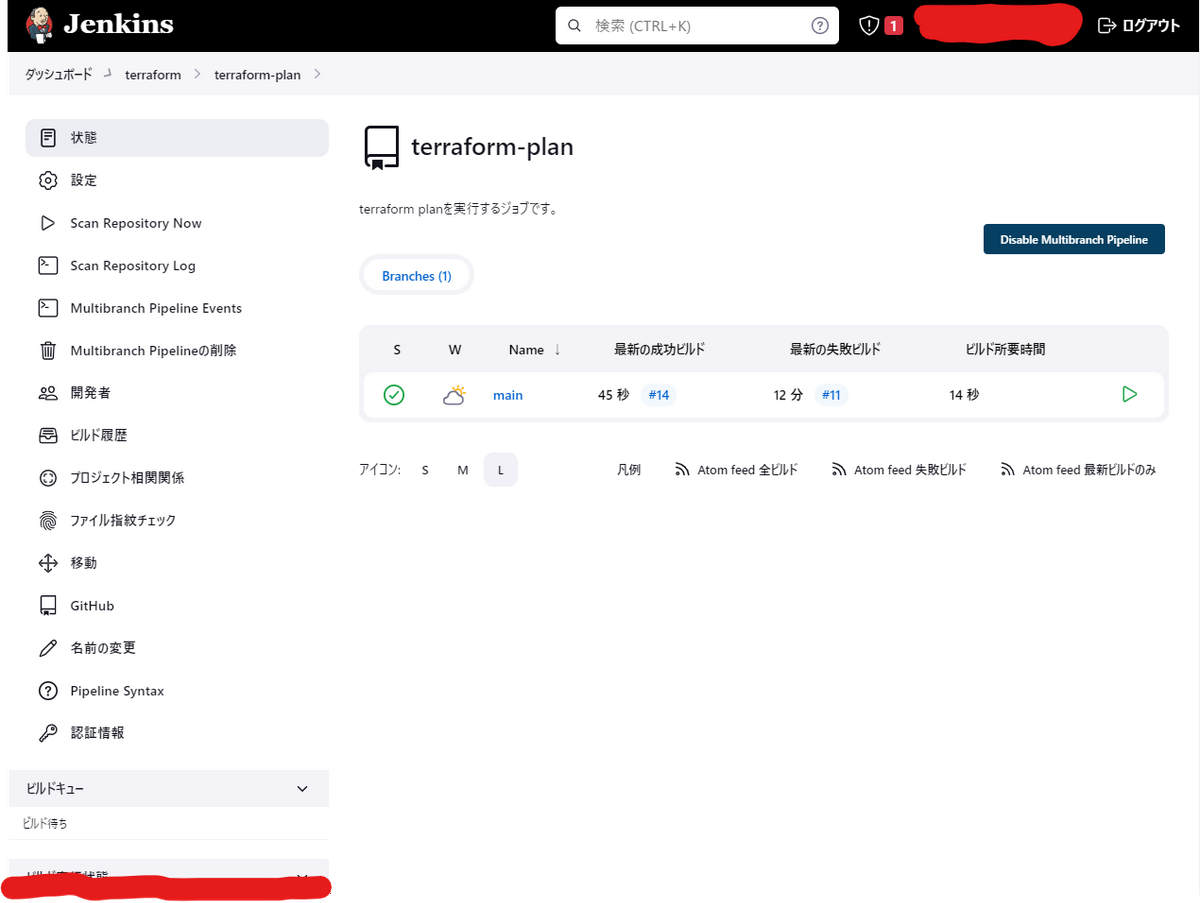
実際のJenkinsfileはこちらです。
pipeline { |
Terraform Applyジョブの作成
terraform-planジョブが作成できたので、同様の設定でterraform-applyジョブを作成していきます。
実際のJenkinsfileはこちらです。
// 変数を定義 |
terraform plan実行時に、-detailed-exitcodeオプションをつけることでexit codeで処理の分岐を実現しています。
- exit code 0 : No changesでplanが成功
- exit code 1 : planがError
- exit code 2 : 差分ありでplanが成功
Terraform Plan/Applyジョブの実行
Terraform Plan/Applyジョブが作成できたので、ジョブを実際に実行していきます。
gcsバケットを作成するtfファイルを準備して、commit、リポジトリにpushします。
resource "google_storage_bucket" "bucket" { |
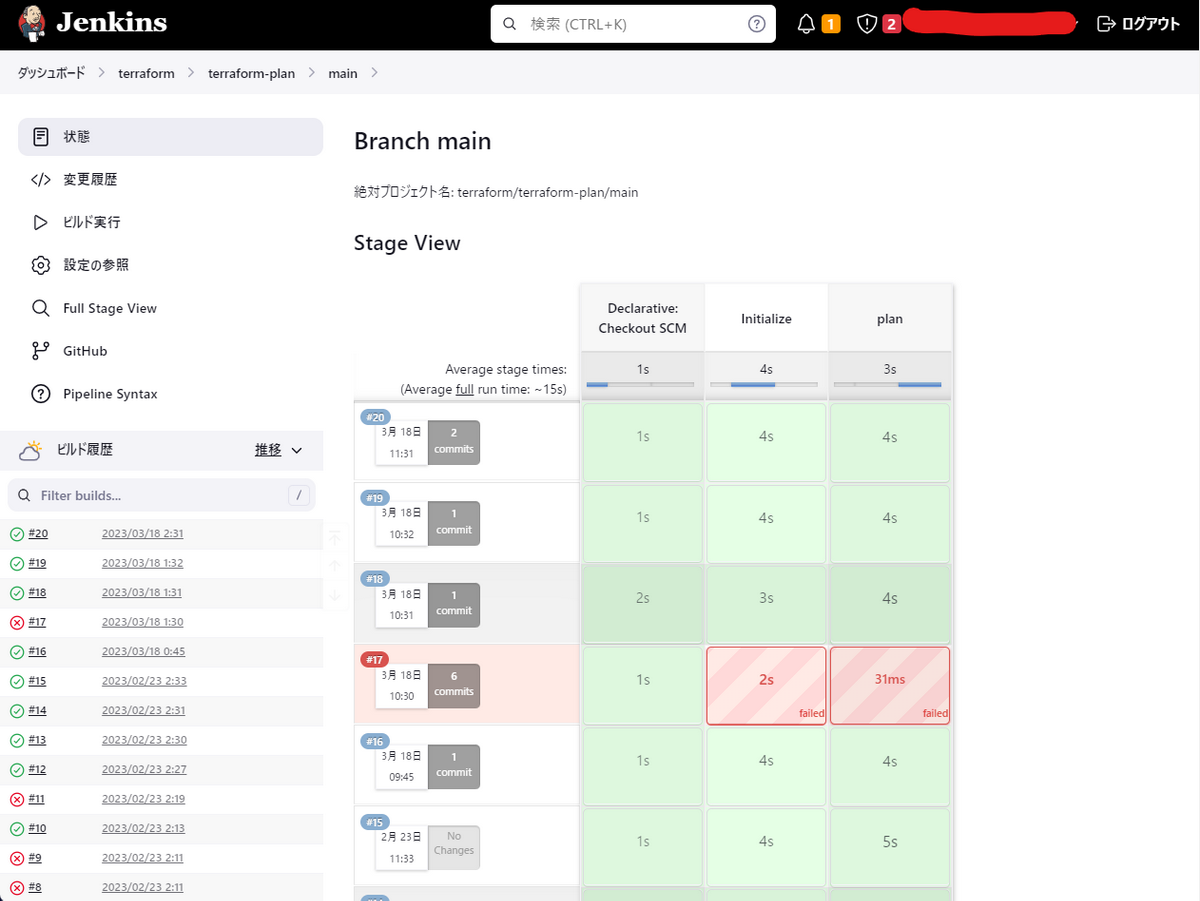
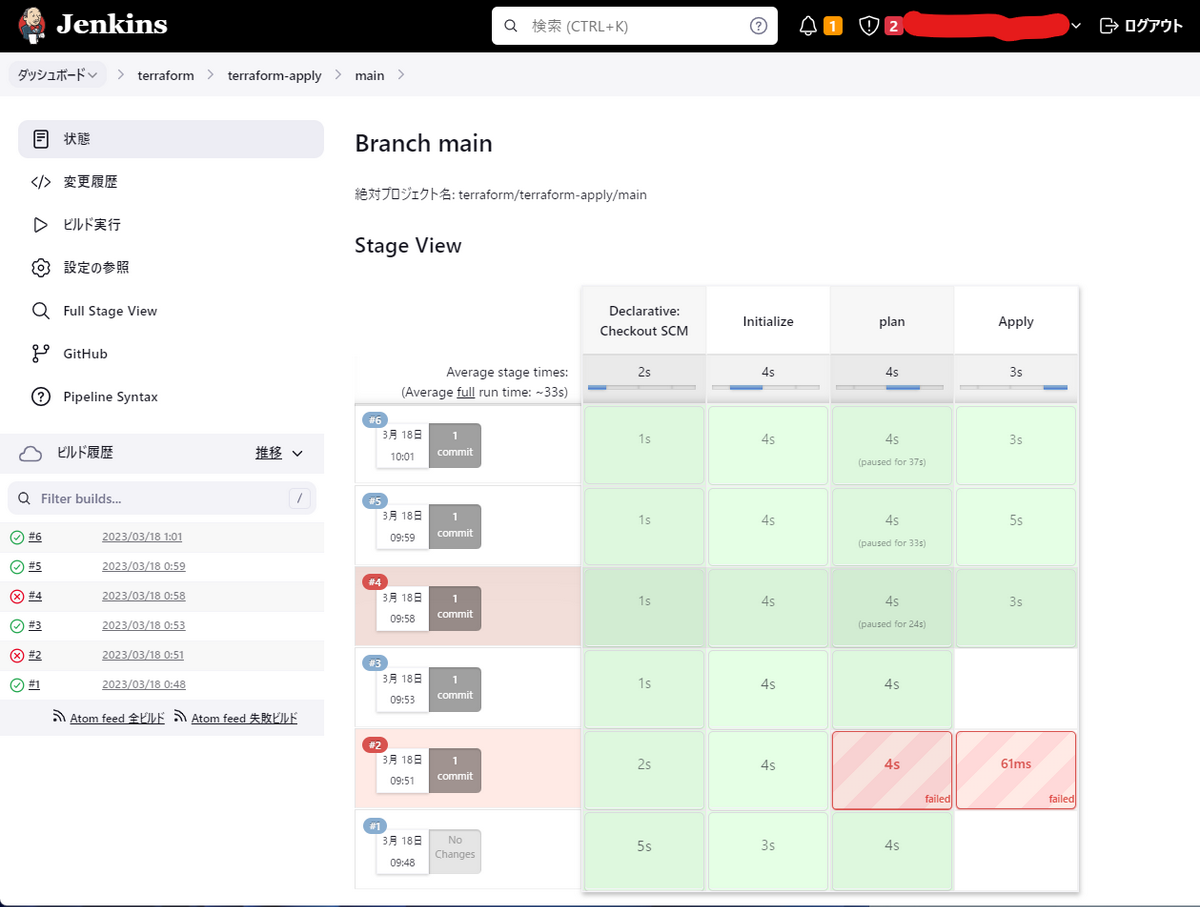
Terraform Planジョブの実行
作成したTerraform Planジョブを実行してみましょう。
「ビルド実行」をクリックします。
ジョブが実行されています。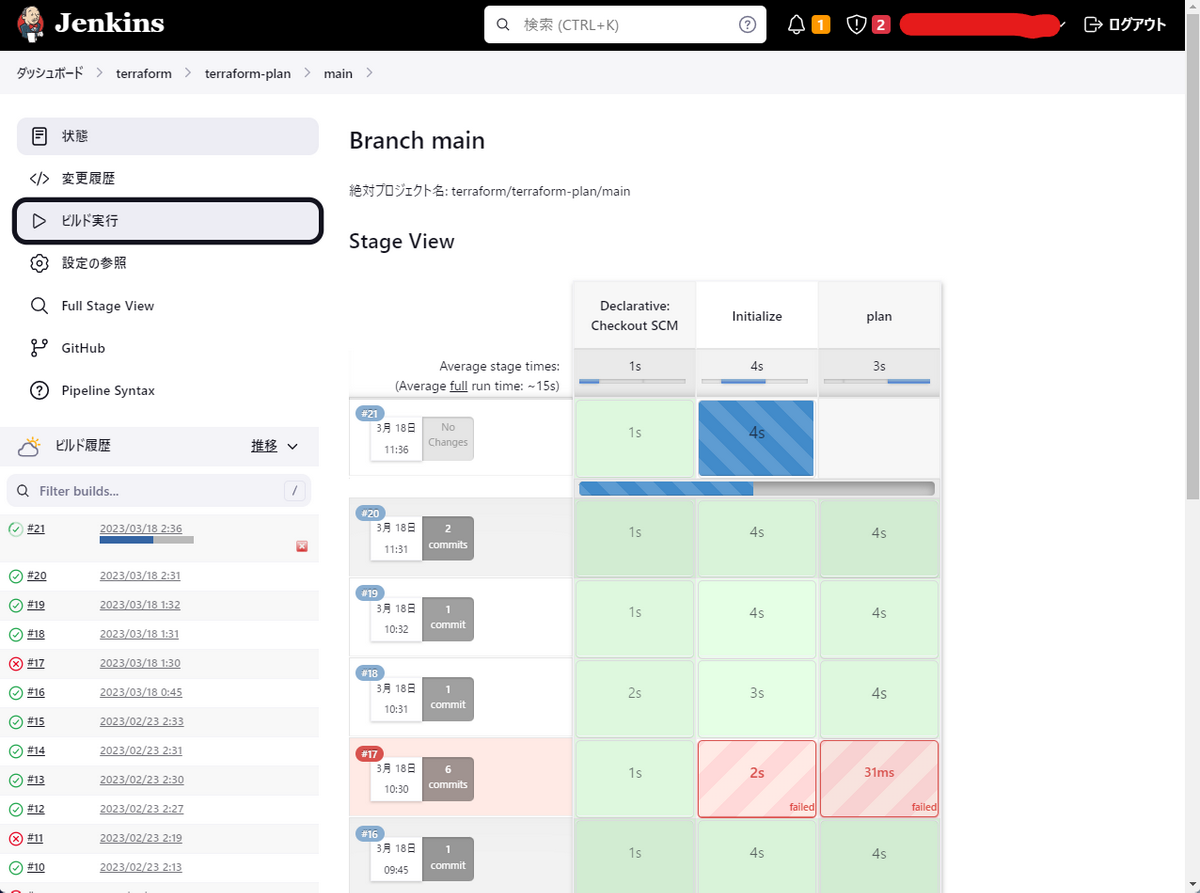
ジョブが正常終了したので、ログを確認するとplan結果が表示されています。
事前準備でgcsバケットを作成するtfファイルを準備したので、plan結果に「1 to add」と表示されました。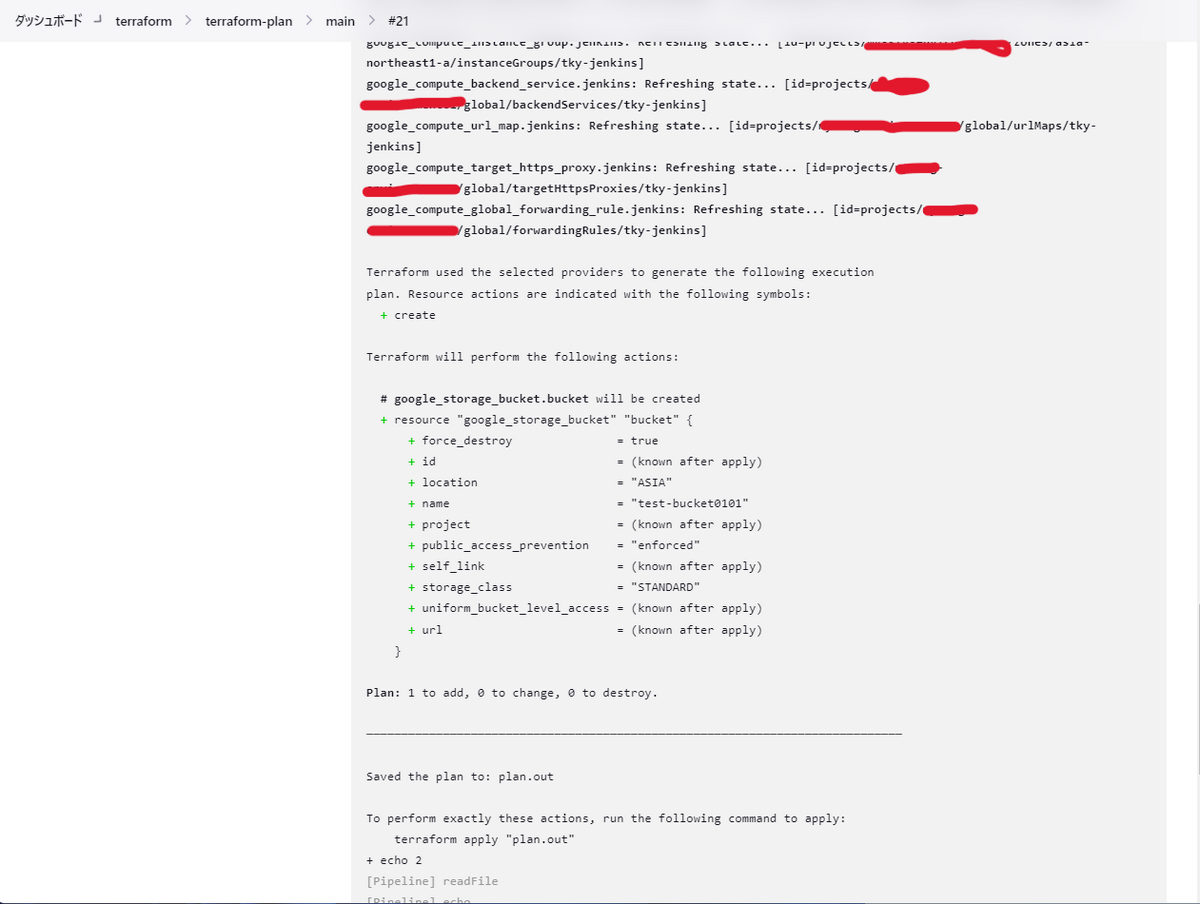
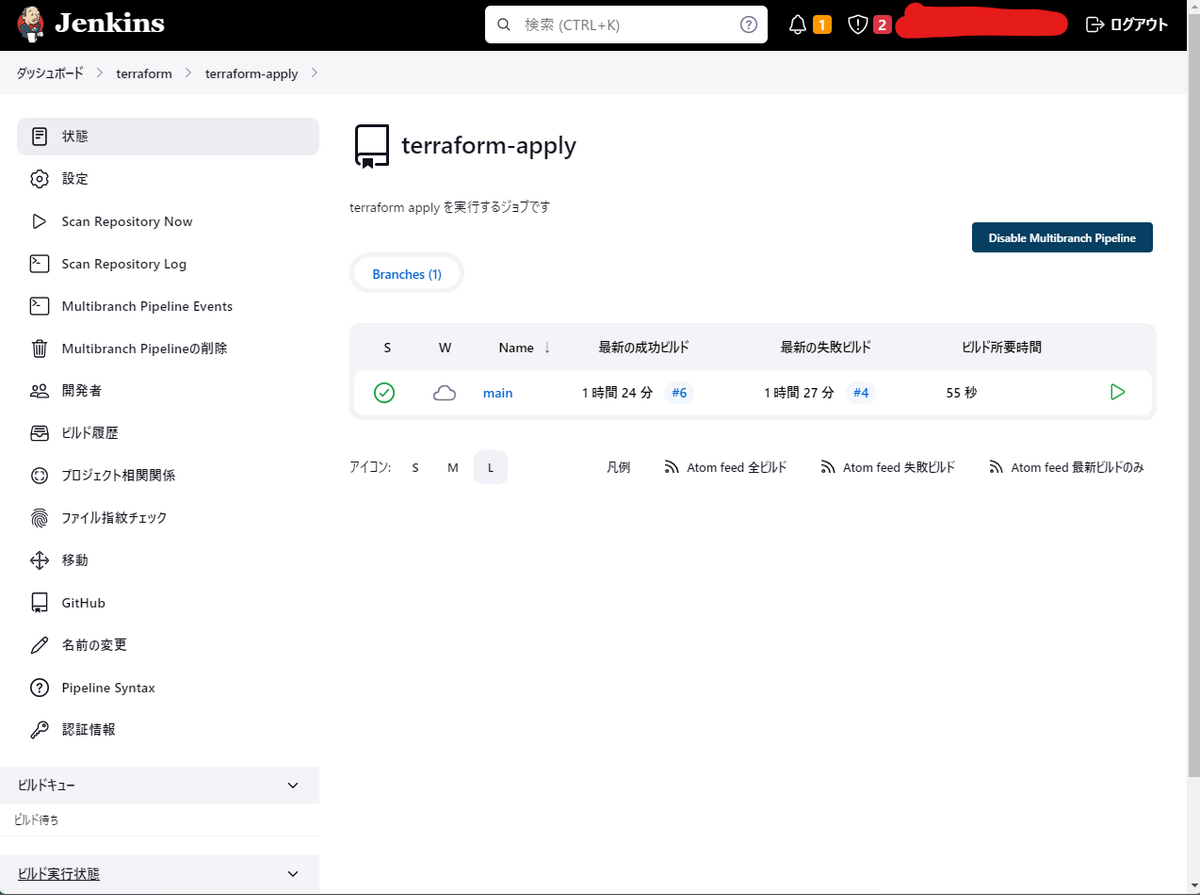
Terraform Applyジョブの実行
次に、作成したTerraform Applyジョブを実行してみましょう。
「ビルド実行」をクリックします。
ジョブが実行されています。
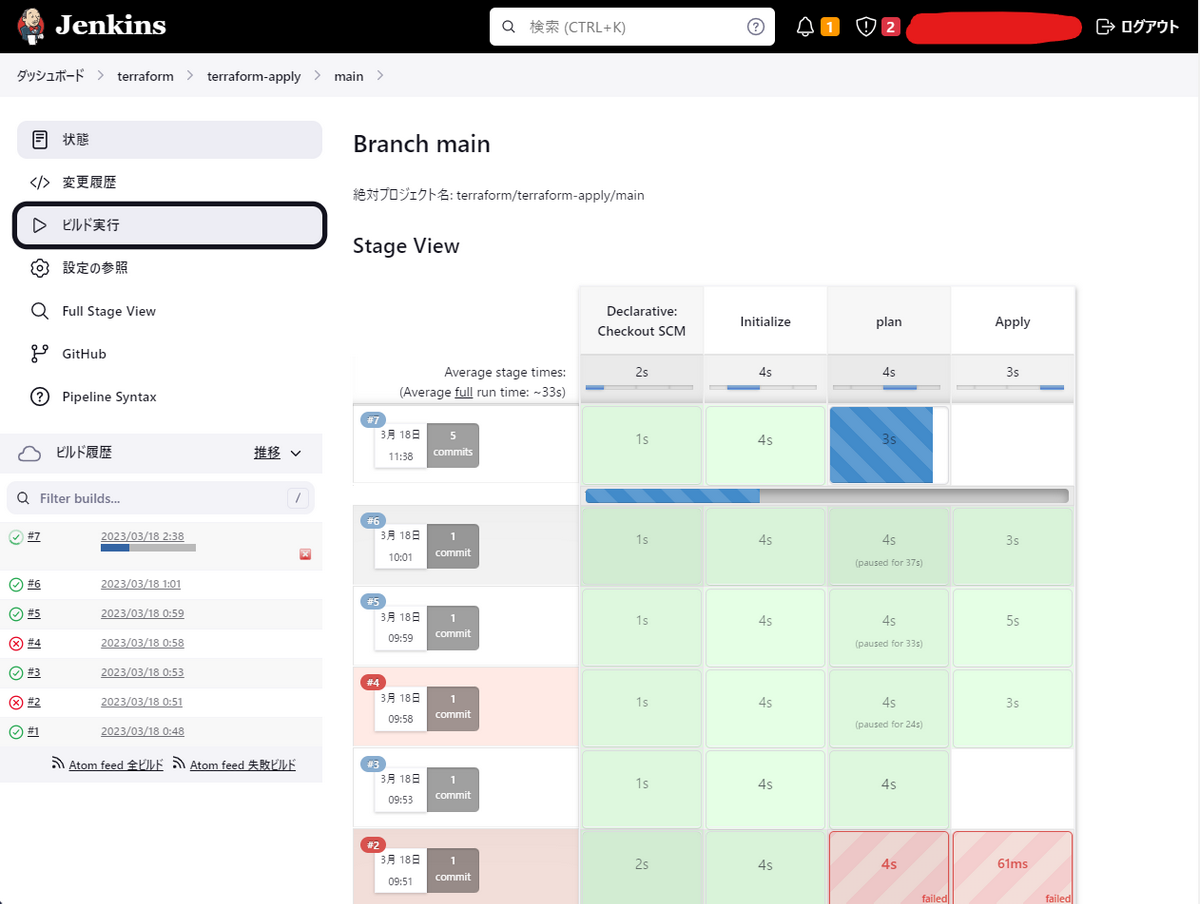
planフェーズでジョブが一時停止し、Apply Plan? と表示されます。
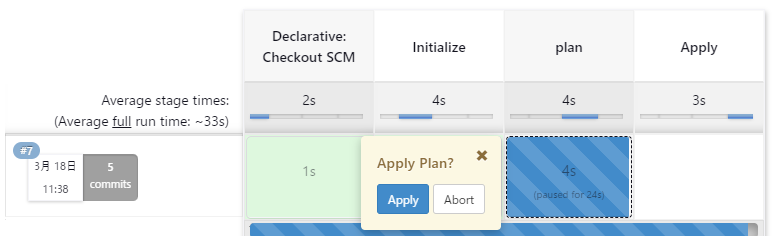
ここでジョブのログを確認しに行き、Applyする前の内容を確認し、問題ないければ「Apply」をクリックしてTerraform Applyを実行します。もし、ここで問題があれば「Abort」をクリックすればジョブはTerraform Applyを実行することなく停止します。
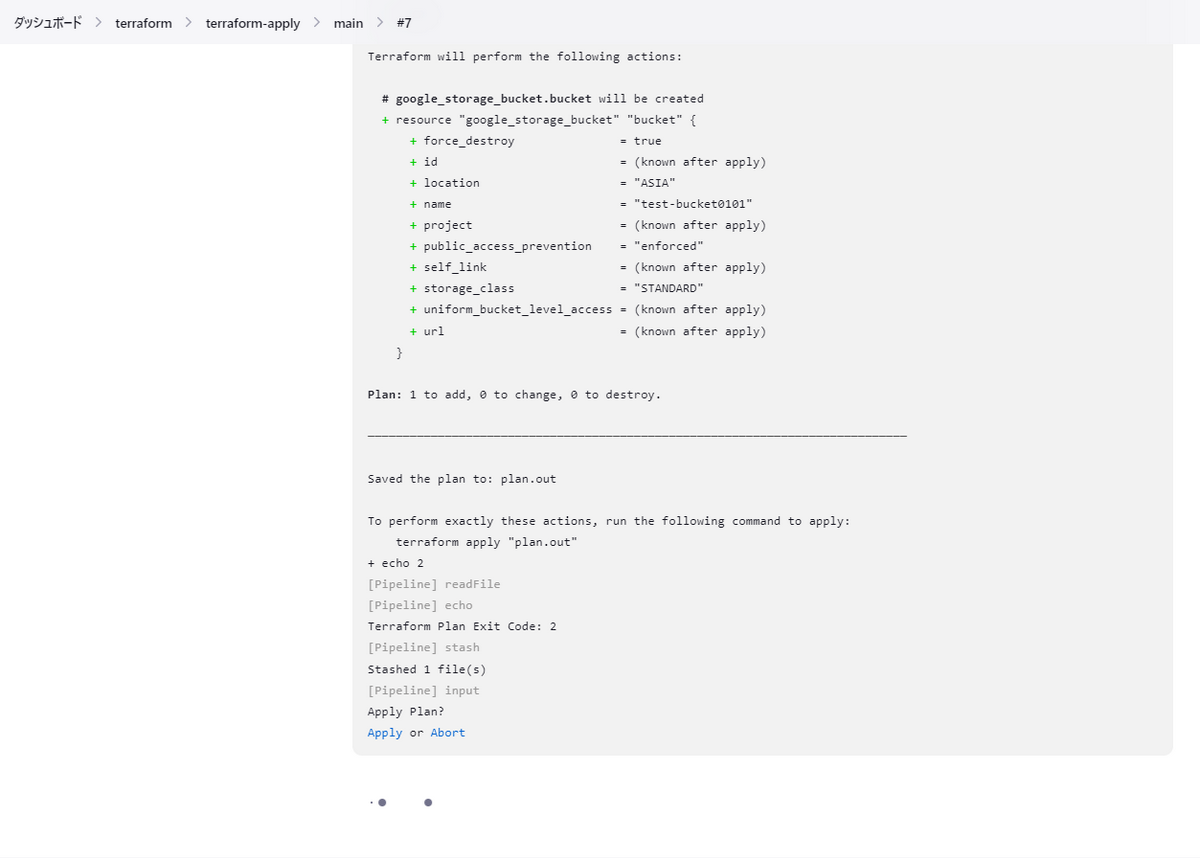
「Apply」をクリックしてジョブが正常終了しました。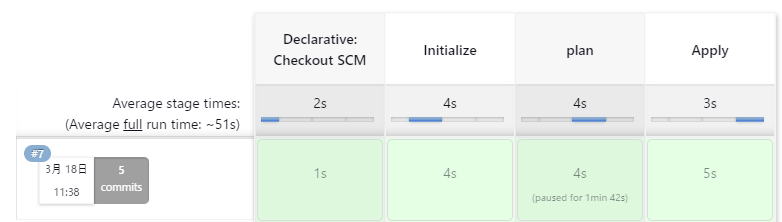
ここでジョブのログを確認しに行くと「Apply complete! Resources: 1 added, 0 changed, 0 destroyed.」と表示され、正常終了したことが確認できました。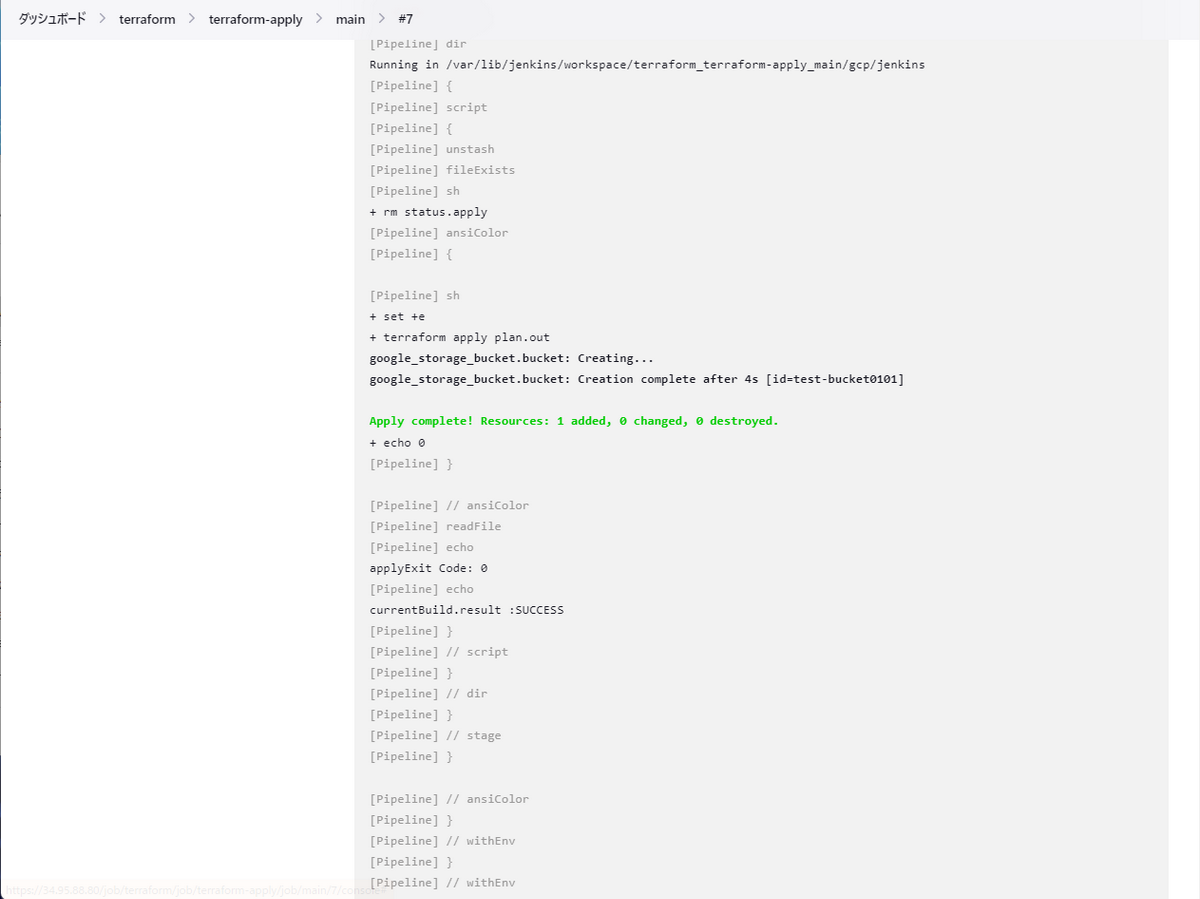
Google Cloudのコンソール画面を確認すると、Terraform Applyを実行したときに作成されたGCSバケットが確認できました。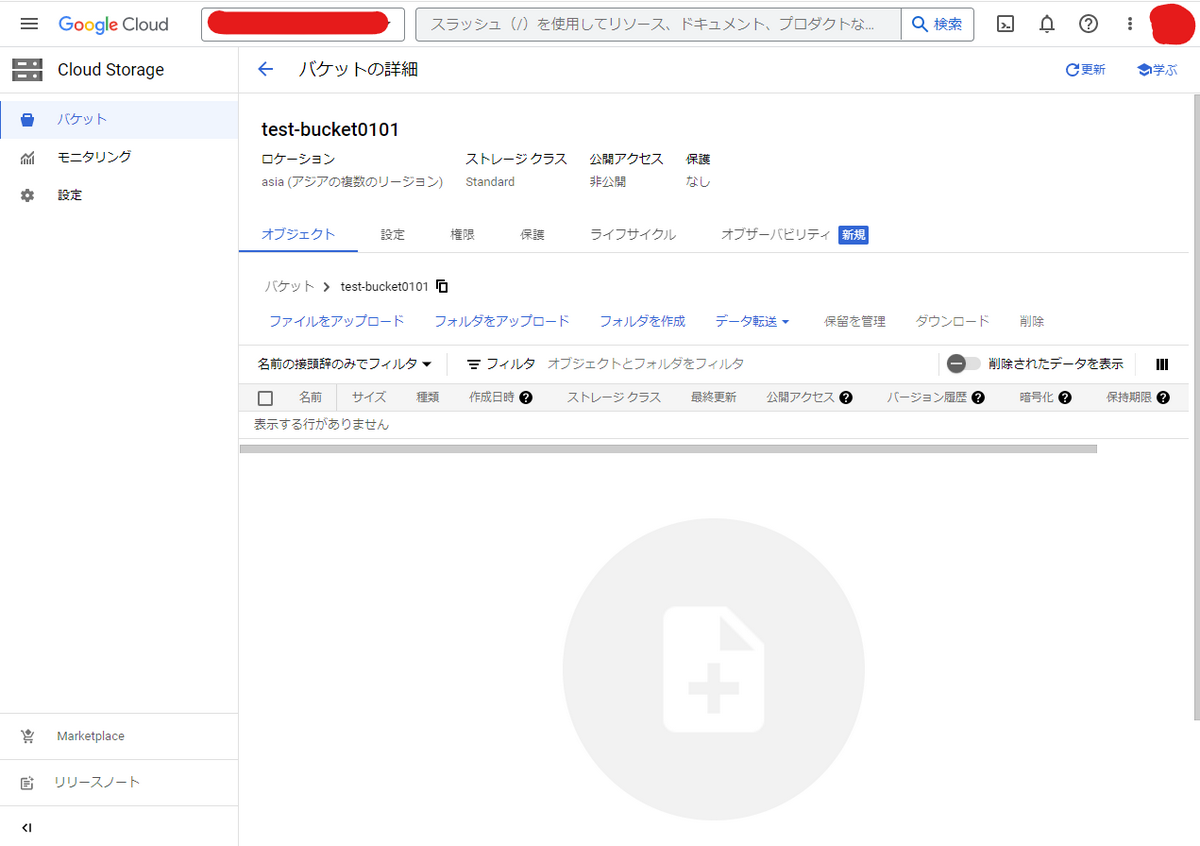
最後に
JenkinsでのTerraform CI/CDの記事を書きました。Jenkinsの設定や、Jenkinsfileを書くことも初めてだったので、Jenkins自体やJenkinsfileの文法などいろいろ勉強になりました。
各Cloud Providerのマネージドサービス(AWS CodeBuild / Google Cloud Build)にJenkinsのビルド実行環境を委譲することが主流になっていますが、まだまだJenkinsを利用することもあると思いますので参考になれば幸いです。
次は岸下さんのTerraformでの機密情報の取り扱い on Google Cloud記事です。
お楽しみを!!