こんにちは。TIG/DXユニットの伊藤です。本記事は春の入門祭りの第18弾になります。
今回はタイトルの通り、Terraformの入門記事です。Infrastructure as Code(IaC)のツールとしてはAWSからはCloudFormation、GCPからはDeployment Managerが出ています。Terraformは単一ツールで複数クラウドのリソースをコードで管理できる、ということが大きなメリットであることは世に出ている他の記事でも言われています。
本記事では以前私がこの入門記事連載で上げた「春の入門祭り 🌸 #02 Google Cloud Platform 101」の内容を扱います。なので、今回はGCP+Terraformの組み合わせでリソースを実際にコード化するところが基本編、Terraform Cloudの導入をを応用編として書いていきます。長くなるかもですが、お付き合いください。
Terraformについて
はじめはTerraformの簡単な説明をしていきます。Terraformは、HashiCorp社が開発したInfrastructure as Code(IaC)のためのツールになります。
コード化していく中で以下の働きを理解しながら進めるとどんな風にTerraformが動いているかわかると思います。
- resource
- 人が実際にリソースを作成する際に書くコード。作成後もコードを差分を適用できる。
- tfstate
- 実在するリソースの「あるべき状態」を定義しているファイル。コードの変更を適用するとtfstateもコードに即した状態になる。
- provider
- 各クラウドのAPIをTerraformが実行するために必要なプラグイン。コードで定義して作成する時に必要。
準備
Terraformを実行できる準備をしましょう。今回の記事の作成に当たっての実行環境は以下です。
- MacBook 16inch(2019)
- OS: Catalina
- Terraform version: 0.12.24
- Editor: VS Code
Terraformのインストールは、Macの方であれば、Homebrew経由でできます。なので、以下のコマンドで簡単に手に入ります。便利。
brew install terraform |
次にサービスアカウントと、キーを発行します。サービスアカウントキーは昨今こんな記事も出ていますので、気をつけましょう。
サービスアカウントの作成は、GCPのコンソール画面のハンバーガーメニューより、[IAMと管理]>[サービスアカウント]からできます。何回か入力と次に進むを繰り返しますが、以下のように入力してください。
| 項目 | 内容 |
|---|---|
| サービスアカウント名 | terraform |
| ロール | 編集者(editor) |
| サービスアカウント管理ロール | 自分の登録メールアドレス |
作成できたらこのサービスアカウントの詳細に行き、[鍵の追加]を行ってください。jsonかP12かを選択できますが、今回はjsonを選択します。自動でダウンロードされるので、今回はこのキー名をcredentials.jsonと名前を変更して今回使用するTerraformのディレクトリに配置しておきましょう。
コード側でも1つ準備しておきます。providerと呼ばれる各クラウドのAPIをTerraformが叩くためのバイナリを指定します。以下のコードをTerraformを実行するディレクトリに準備してください。
provider "google" { |
コードとサービスアカウントキーが準備できたら、以下のコマンドで、Terraformの準備をします。
terraform init |
このinitコマンドを実行することで.terraformディレクトリが生成されています。このディレクトリ内に、定義されているproviderやあとで出てくるbackendなど、Terraformのリソースではなく設定に関わる部分を初期化してくれます。なので、複数人でGit管理している時にも通常は.terraformディレクトリは管理に入れないようにしましょう。
さて、これでリソースを作成する準備ができたので、いよいよTerraformを書いていきましょう!!
基本編
入門記事からの再掲になりますが、以下の構成を基本編で行っていきます。手で組んでみてからの方が実際にTerraformが便利ということに気がつけるかもしれません。
まずは大枠のVPCやサブネットを作成してからGCEやNATなどを立てていきましょう。
ネットワーク構築
はじめにネットワークを構築しましょう。ここではVPCとサブネットを構築します。Terraformはコード化する時にはドキュメント必須なので、是非公式のドキュメントも読んでみてください。ネットワークについては、以下のコードにしました。auto_create_subnetworks = falseとしているのは不必要なサブネット作成を抑えるためです。
resource "google_compute_network" "sample_network" { name = "sample-network" auto_create_subnetworks = false } |
これでVPC部分のコードを適用してみましょう。ここでは以下のコマンドを使ってみましょう。
terraform fmt # コードの整形をしてくれる |
これらコマンドを是非使ってみてください。上で示したnetwork.tfはコードの形が崩れていますが、fmtコマンドで整形されることがわかるかと思います。applyコマンドを実行すると以下が出力され、yesの入力を求められます。
google_compute_network.sample_network will be created |
もしかしたらApplyが「APIを有効化していないのでできない」と出る方もいるかと思いますが、その時はGUIで該当のAPIを有効化してください。APIの有効化はこちらを参照してくださいApplyが完了したらGUIで確認してみてください。ここではネットワークだけできていると思います。
次にサブネットを作成しましょう。
resource "google_compute_subnetwork" "pub_subnetwork" { |
ここではsample-networkに作ることを指定して書いています。オプションとして他にも様々書けるので、必要に応じて追記できます。また、今回はサブネットを2つ作成しますが、1つは作成ぜひ実際に書いてみてください。答えはこちらにあります。コードの準備が終わったらApplyコマンドを叩いてリソースを作成してください。
ファイアウォールの作成
次にインスタンスを不正なアクセスから保護するためのファイアウォールを作成します。インスタンスなどの作成よりもこういったルール周りの方がTerraformが役立つ場面でもあります。GCPの入門記事では2つ作成したので、今回も2つ作成できるようにします。コードは以下になります。
resource "google_compute_firewall" "bastion" { name = "bastion" network = "sample-network" allow { protocol = "tcp" ports = ["22"] } source_ranges = ["0.0.0.0/0"] target_tags = ["bastion"] } resource "google_compute_firewall" "from_bastion" { name = "from-bastion" network = "sample-network" allow { protocol = "tcp" ports = ["22"] } source_tags = ["bastion"] target_tags = ["from-bastion"] } resource "google_compute_firewall" "sample_network_allow_http" { name = "sample-network-allow-http" network = "sample-network" allow { protocol = "tcp" ports = ["80"] } source_ranges = ["0.0.0.0/0"] target_tags = ["http-server"] } |
sshできるようにするファイアウォールルールは上の2つ、下のsample-network-allow-httpは、GUIであれば自動生成されますが、Terraformだとできないので、今回はコード化してApplyします。
インスタンスの作成
はじめに踏み台インスタンスから作成していきます。踏み台は、外部IPがついている必要があるので、以下の形で書きます。
resource "google_compute_instance" "bastion" { name = "bastion" machine_type = "n1-standard-1" zone = "asia-northeast1-a" tags = ["bastion"] boot_disk { initialize_params { image = "debian-cloud/debian-10" } } network_interface { subnetwork = "sample-subnet-pub" access_config { nat_ip = google_compute_address.bastion_external.address } } service_account { scopes = ["cloud-platform"] } } resource "google_compute_address" "bastion_external" { name = "bastion-external" address_type = "EXTERNAL" region = "asia-northeast1" } |
上のコードでは、インスタンス作成を行うgoogle_compute_instanceと、外部IPコードで決めて設定しているgoogle_compute_addressを記載しています。webインスタンスについては実際に書いてみましょう。外部IPは必要ないので、google_compute_instanceだけあれば作成できます。答えの例はこちらになります。
リソースに依存関係をつける
今回、GCEの作成にあたり、access_configブロックの中にnat_ip = google_compute_address.bastion_external.addressという書き方をしました。この書き方には主に2つ目的があり、
- 他で作成したリソース値を利用する書き方
- 今回は該当するリソースのアドレスを引用する書き方になっている
- リソースの依存関係をつけてくれる
- 今回は
google_compute_address.bastion_externalが作成されないとインスタンスが作成されない
- 今回は
そのため、これまで出てきたリソースだと、VPC→サブネットorファイアウォールの作成順序が好ましいので、サブネットを例にすると、
resource "google_compute_subnetwork" "pub_subnetwork" { |
と書くことができます。他にも修正できる部分があるので直してみましょう。
webインスタンスについては実際に書いてみましょう。外部IPは必要ないので、google_compute_instanceだけあれば作成できます。答えの例はこちらになります。
ロードバランサの作成
ユーザーからのリクエストを受けるロードバランサを作成しましょう。GUIでも設定が細かいロードバランサですが、Terraformにしておくとコードで設定が見えるので、あとで見返すのにもおすすめな部分です。
resource "google_compute_global_address" "web_lb" { name = "web-lb" } resource "google_compute_health_check" "web_health" { name = "web-health" timeout_sec = 1 check_interval_sec = 1 tcp_health_check { port = "80" } } resource "google_compute_backend_service" "web_backend" { name = "web-backend" port_name = "http" protocol = "HTTP" timeout_sec = 3000 backend { group = google_compute_instance_group.web_instance_group.self_link } health_checks = [google_compute_health_check.web_health.self_link] } resource "google_compute_url_map" "web_lb" { name = "web-lb" default_service = google_compute_backend_service.web_backend.self_link } resource "google_compute_target_http_proxy" "http_proxy" { name = "http-proxy" url_map = google_compute_url_map.web_lb.self_link } resource "google_compute_global_forwarding_rule" "forwarding_rule" { name = "forwarding-rule" target = google_compute_target_http_proxy.http_proxy.self_link port_range = "80" ip_address = google_compute_global_address.web_lb.address } resource "google_compute_instance_group" "web_instance_group" { name = "web-instance-group" instances = [google_compute_instance.web_instance.self_link] zone = "asia-northeast3-a" } |
ロードバランサを1つ作るために様々なリソースを作成しなければいけませんが、上のコードではLBを作る部分、最後にはインスタンスグループを作るリソースを書いています。
Cloud NAT, Routerの作成
WebサーバーのパッケージをアップデートさせるためにはNATから外に出られるようにする必要があります。ここではCloud NATとCloud Routerを作成します。またまた、コードは以下です。
resource "google_compute_router" "seoul_router" { name = "seoul-router" region = "asia-northeast3" network = google_compute_network.sample_network.id bgp { asn = 64514 } } |
resource "google_compute_router_nat" "seoul_nat" { name = "seoul-nat" router = google_compute_router.seoul_router.name region = google_compute_router.seoul_router.region nat_ip_allocate_option = "AUTO_ONLY" source_subnetwork_ip_ranges_to_nat = "ALL_SUBNETWORKS_ALL_IP_RANGES" } |
ここまで設定できたら、春の入門祭り 🌸 #02 Google Cloud Platform 101の「6.ミドルウェアの設定」を行って、nginxの画面がブラウザから見ることができれば基本編の完了です!
応用編
応用編としてTeraform Cloudの導入を行ってみましょう。Terraform Cloudが導入できると、TerraformのCI/CDができるようになるので、グッと開発スピードが上がります!
Terraform Cloudについて
Terraform CloudはHashiCorp社が提供するTerraformのCI/CD基盤になります。プランは様々あり、有料版にあげることでPolicy as Code(PaC)を実現できるSentinelを導入できたりと、インフラのデプロイ速度をあげる以外にも、Terraformの実行環境の統一や実行ログ、インフラの状態など秩序を守るためにも非常に大きなメリットをもたらします。
変数の設定
Terraform Cloudに本格的に移行する前に、変数の切り出しを行いましょう。特に今回は、サービスアカウントキーなどケアが必要な部分をsecret.tfvarsに切り出します。
variable "PROJECT_ID" {} |
PROJECT_ID = "xxxxxxxx" # プロジェクトIDを入れる |
切り出した上を元にさらにprovider.tfも書き換えましょう。
provider "google" { project = var.PROJECT_ID credentials = var.GOOGLE_CREDENTIALS } |
Terraform Cloudの設定
Terraform Cloudへの登録自体はこちらから行うことができるので、手順に沿って登録しましょう。
Workspaceの作成
登録が完了したら、Terraform Cloudにリポジトリの登録を行いましょう。サインアップ終わったあとはきっとこんな感じでできたてホヤホヤだと思います。
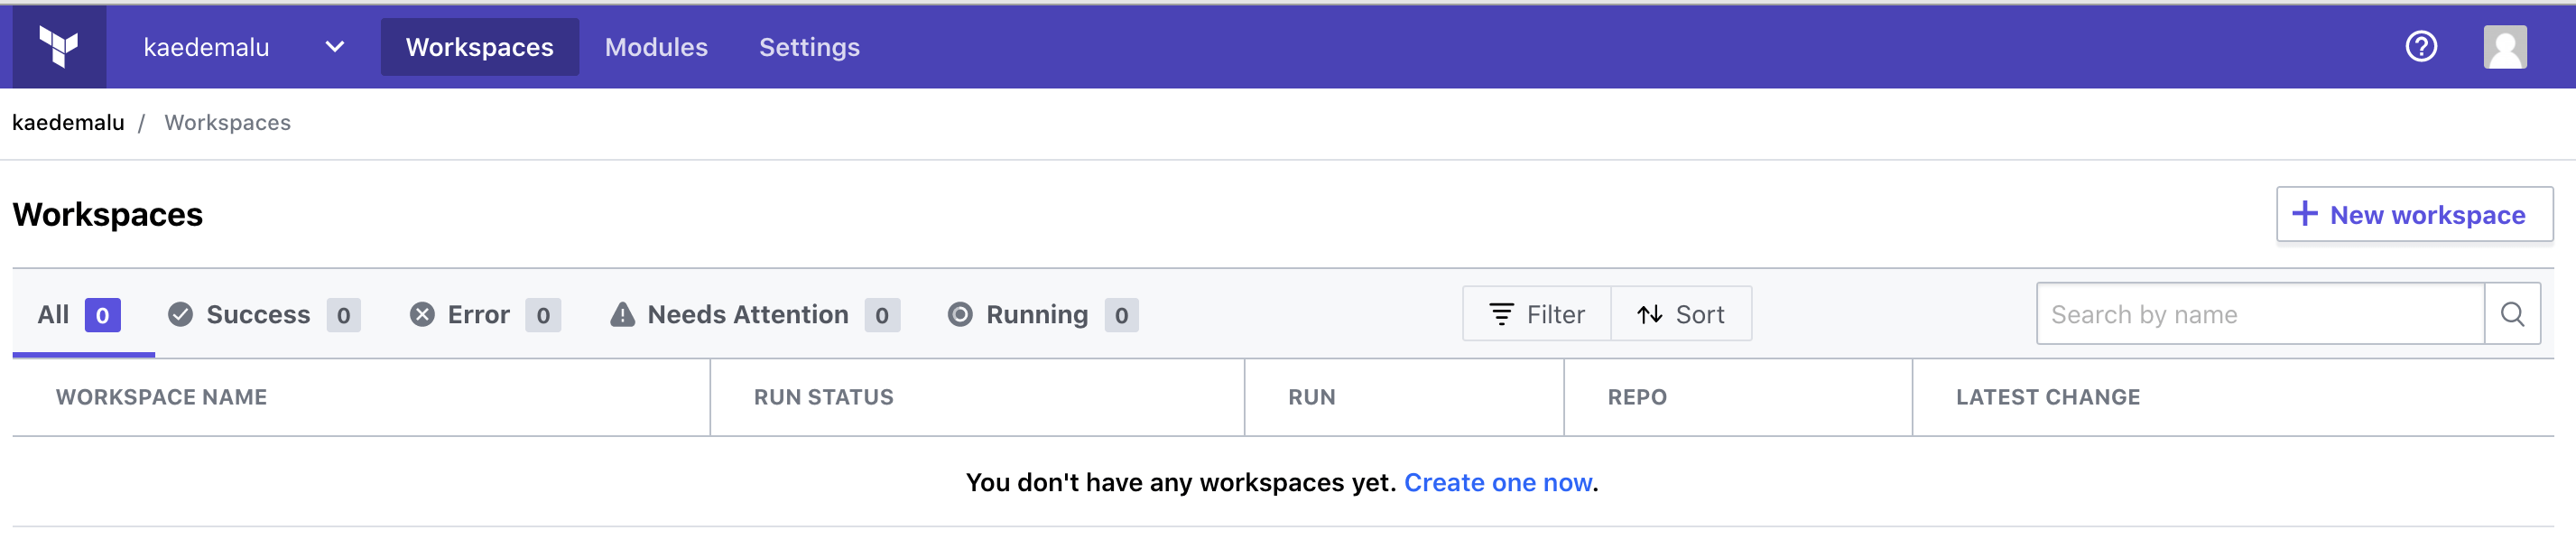
右にある[New workspace]から新しいWorkspaceを作成しましょう。
はじめにGitリポジトリを指定します。今回はGithubを使用するのでGithubを選択して次に進みます。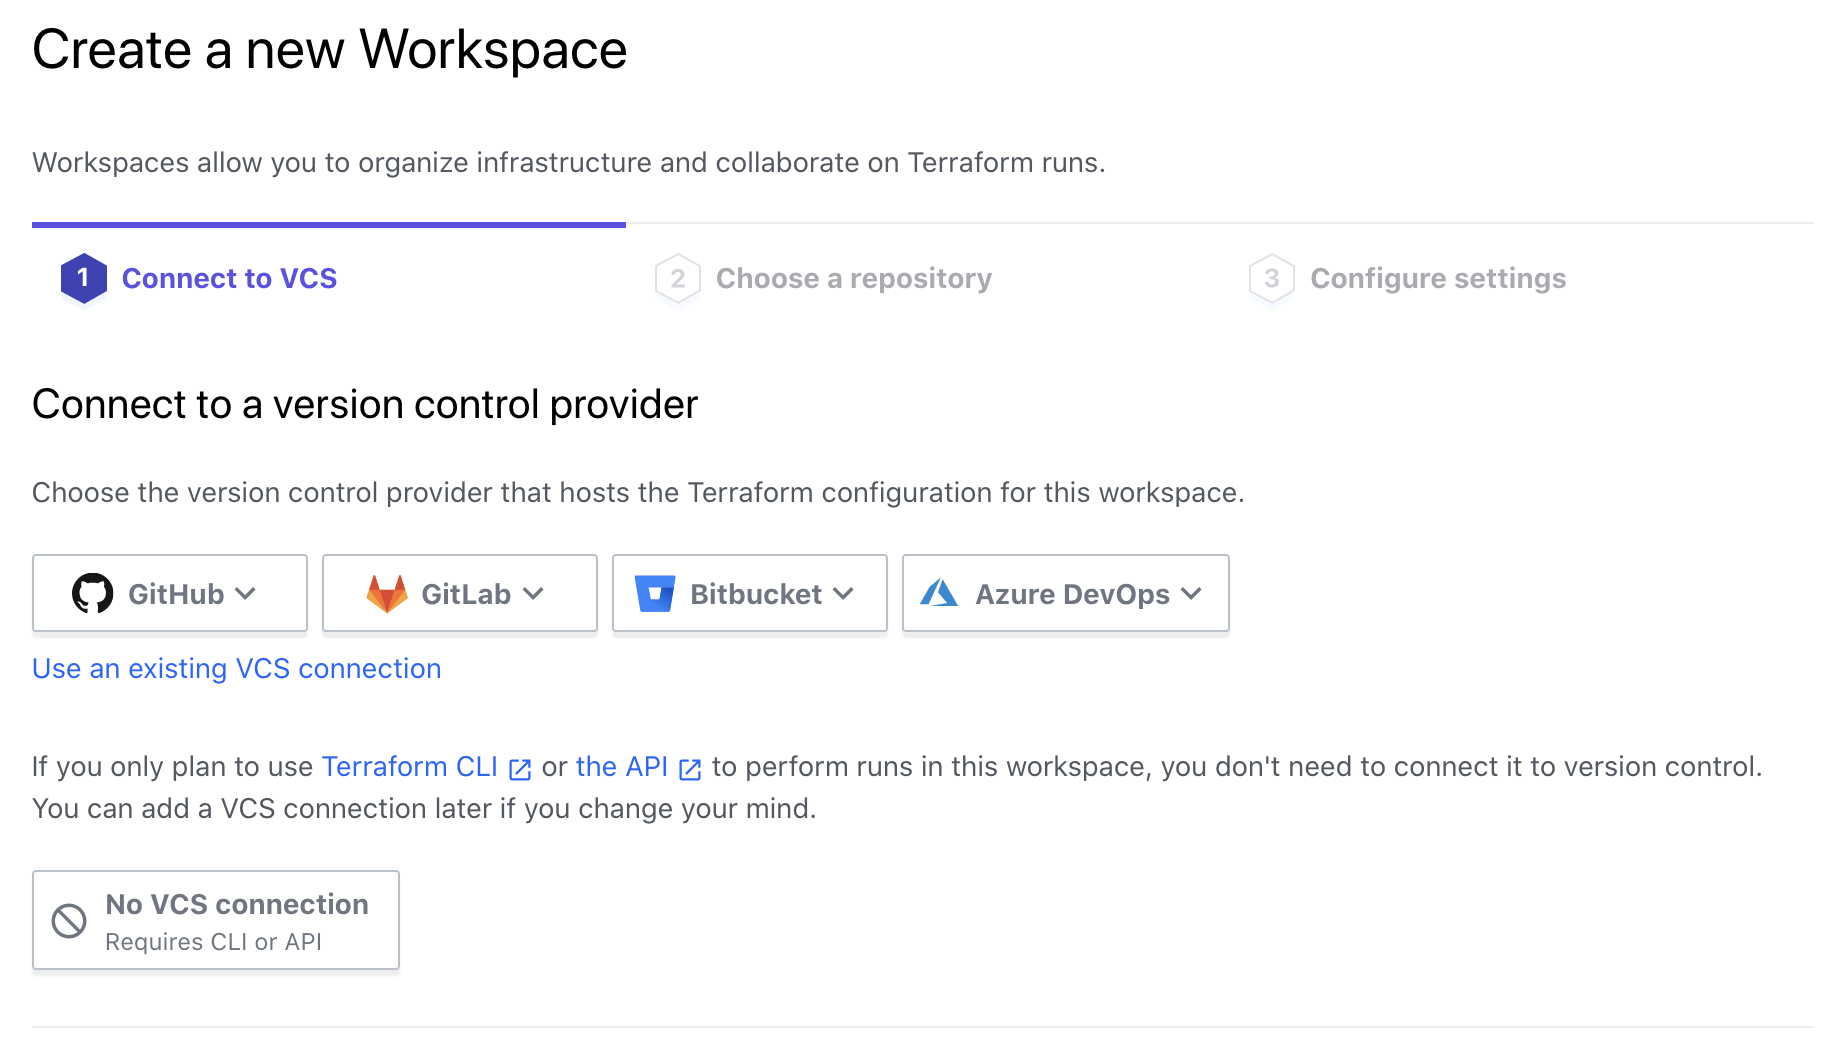
[Choose a repository]の項目では今回使うリポジトリを選択します。選択が終わると[Configure settings]に進むので、Workspaceの名前を変えられます。ここではとくに問題がないので、そのまま(リポジトリの名前のまま)で進みます。
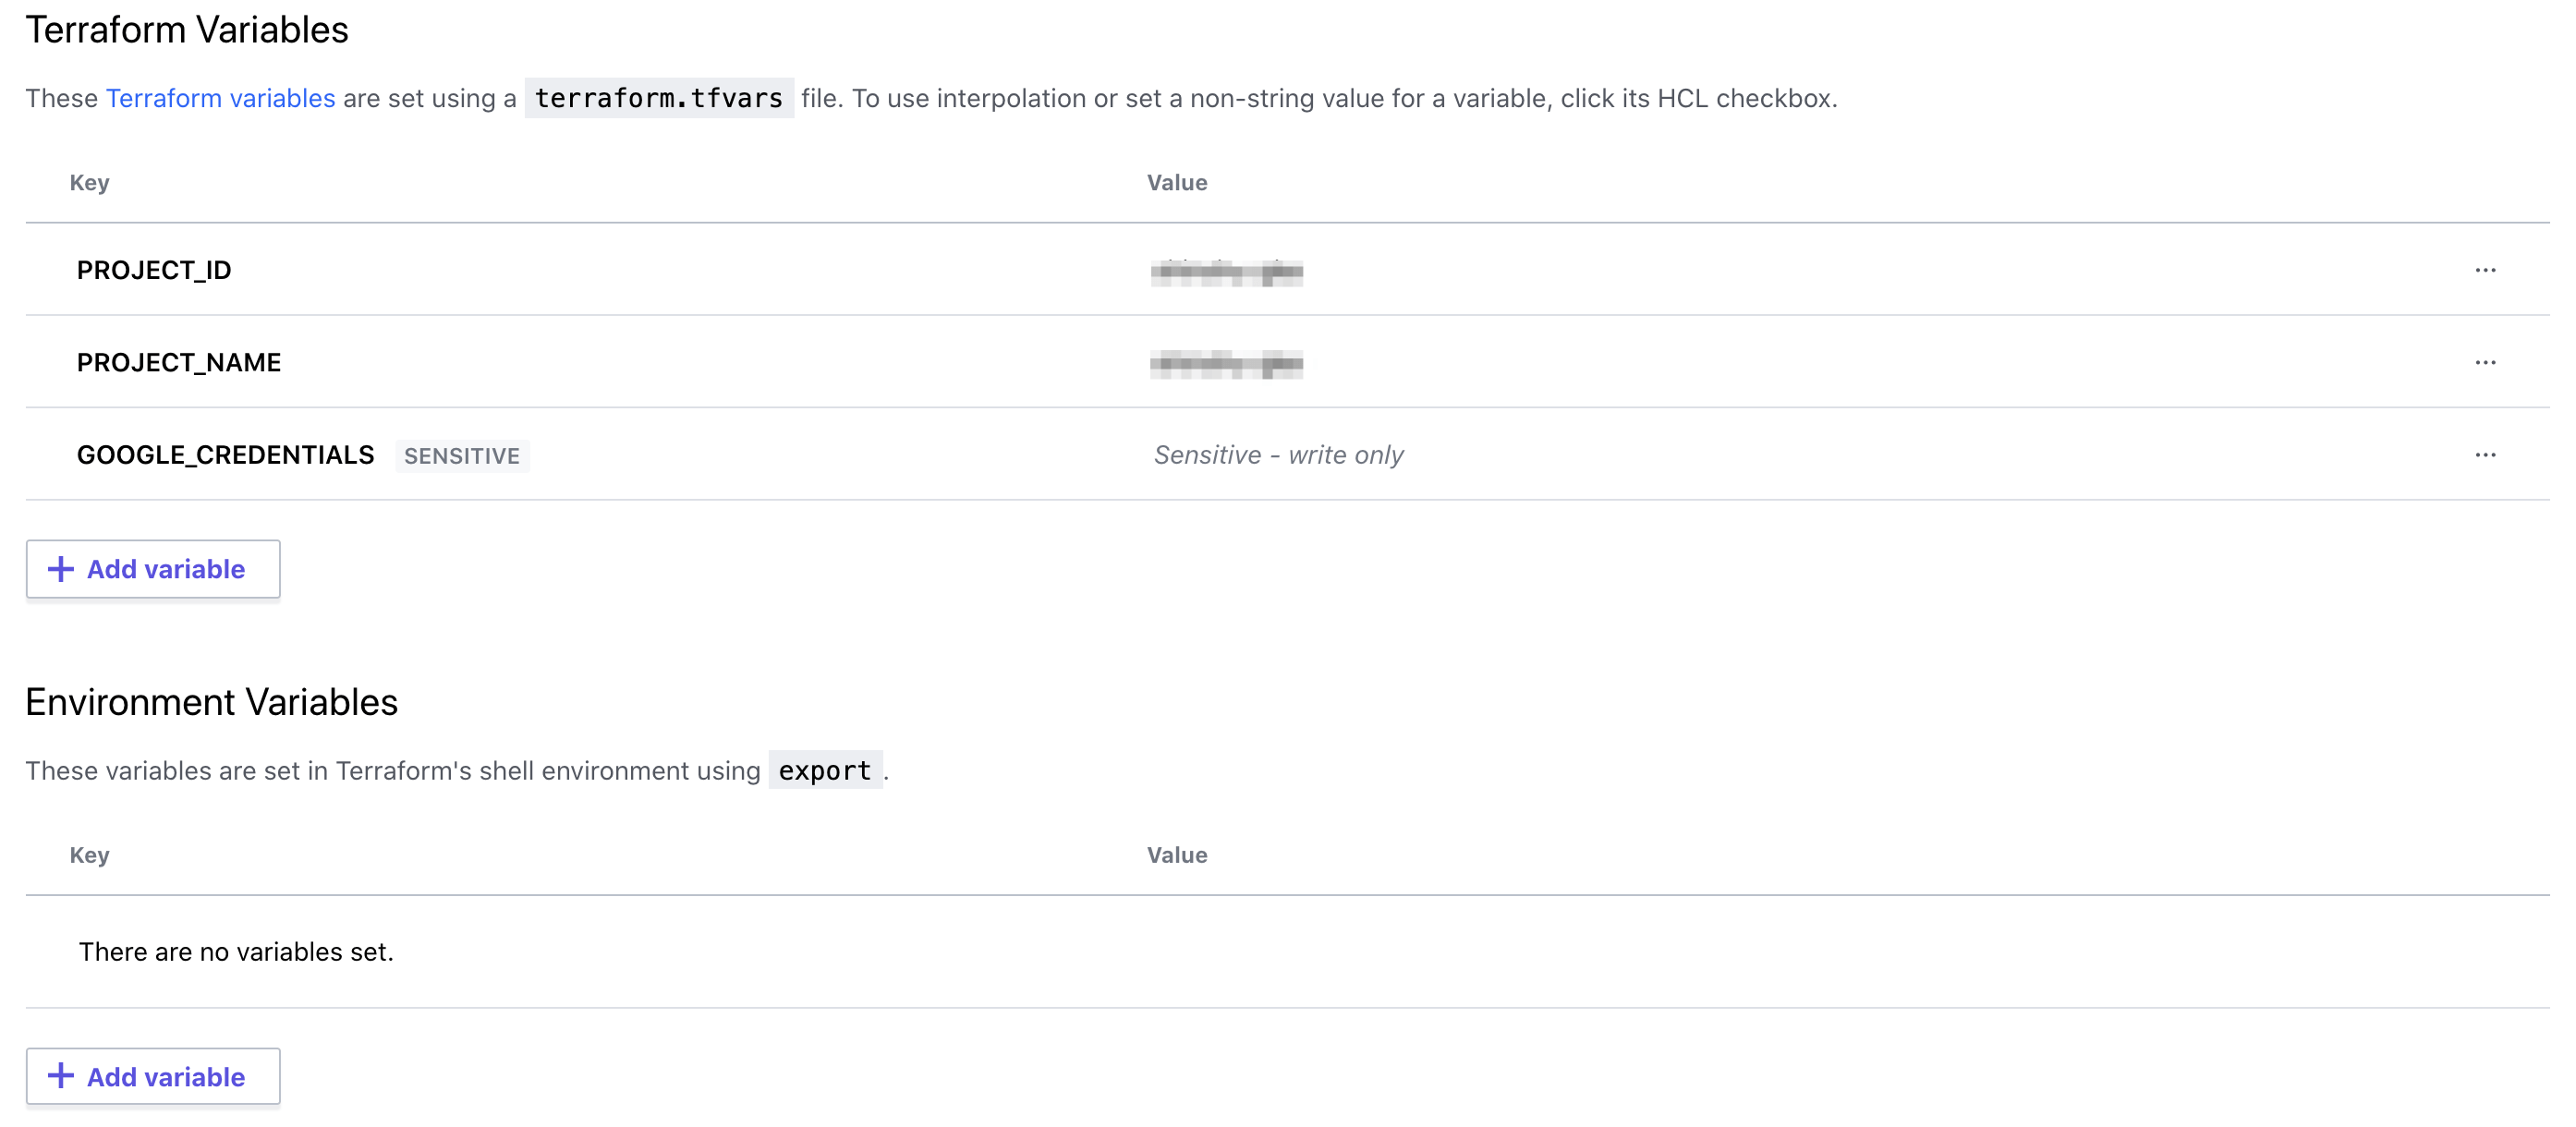
変数の設定
Workspaceの作成が完了すると、そのまま変数の設定に進むことができます。なので[Configure variables]に進みましょう。設定するのは「Terraform Variables」の方になります。今回は以下のようにPROJECT_ID、PROJECT_NAME、GOOGLE_CREDENTIALSの3つを設定しました。GOOGLE_CREDENTIALSについては鍵なので、sensitiveにチェックを入れると見えなくなります。
これで一通りの設定ができたので実際にQueueを走らせてみましょう。
Queueの実行
画面の右上に[Queue plan]の項目があるので実行してみましょう。入力項目が現れますが、特に何も入れずに実行できます。実行してみると以下の様にPlanの結果が返ってきます。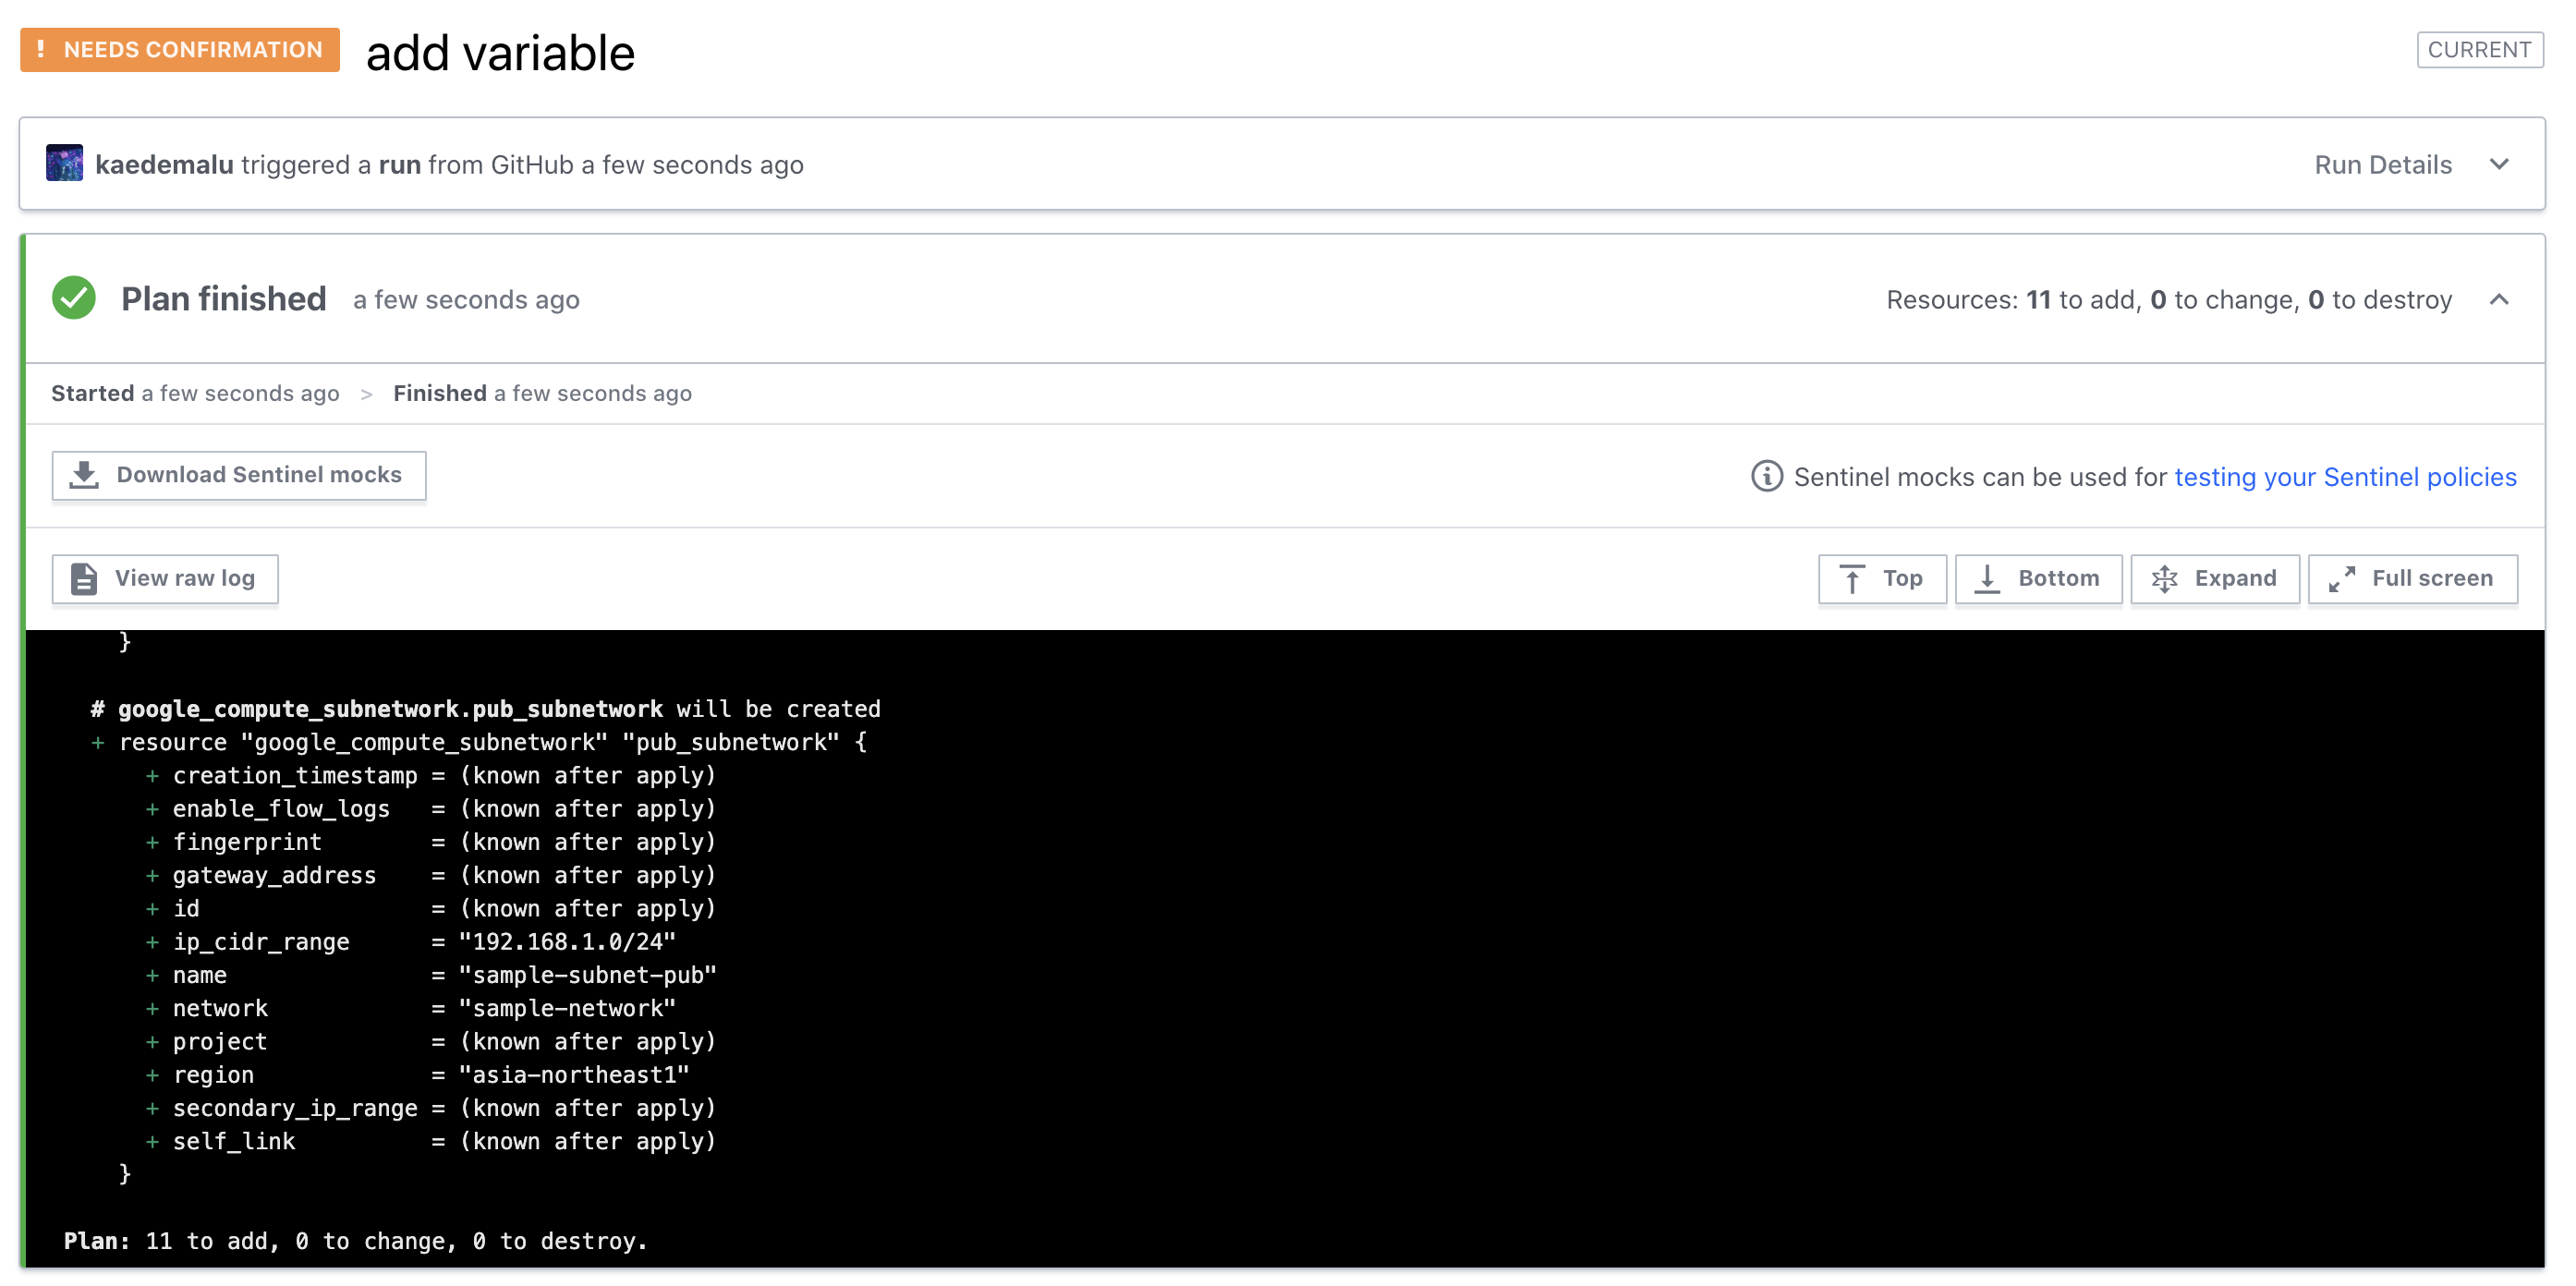
11 to addになっていますが、これはローカルのStateファイルをみていないために起こります。この後で、Stateの移行を行います。
Tokenを取得する
Terraform Cloud上のStateを見れるように前の作業として、ローカルから認証できる必要があります。そのために必要なTokenを取得するために以下の2パターンで取得します。
コマンドを使う
コマンドを使ってTokenを取得できます。しかし、バージョンがv0.12.21以降でしか使えないので、これより前のバージョンを使用している方はGUIを使ったパターンで取得してください。
terraform login |
このように出力されるので、2箇所入力が済めばこちらのコマンドは完了となるので次に進みましょう。
GUIから取得する
こちらではGUIからTokenwo取得する方法を説明します。以下の画像について順を追って説明します。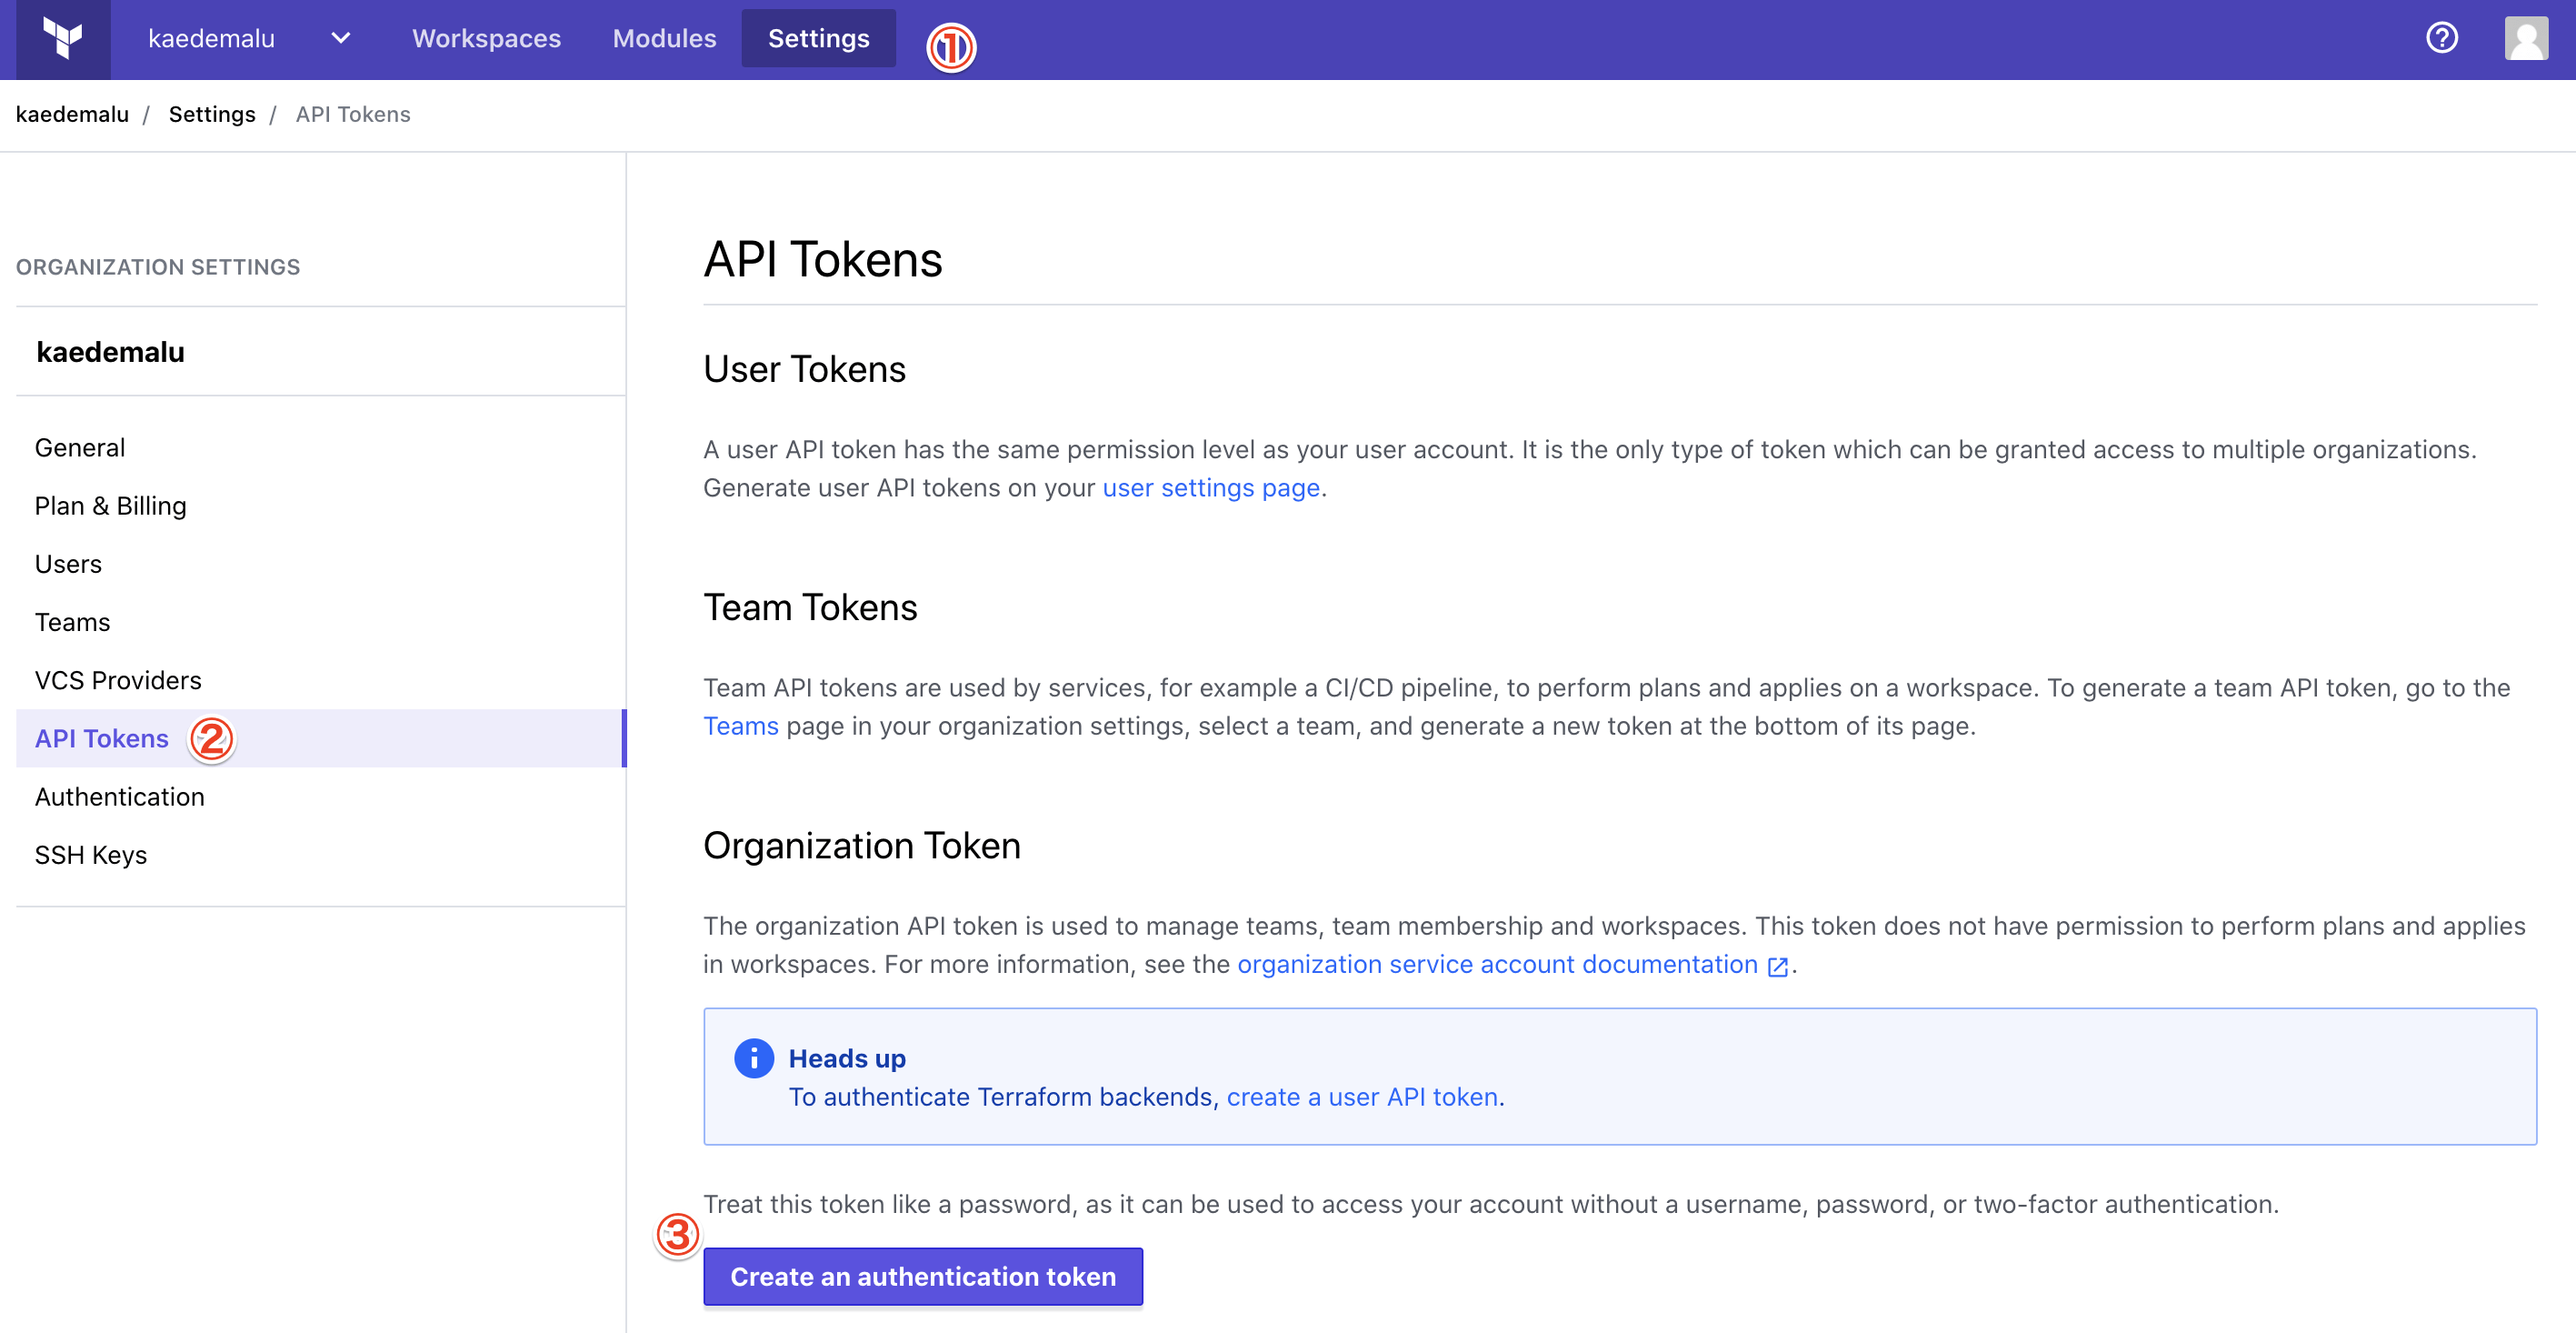
- (1) [Ortanization Setting]に遷移する
- (2) [API Token]をクリック
- (3) [Create an authentication token]をクリックする
- Token名を入力するとTokenが払い出される。
あとは以下のファイルを作成すればTokenの取得作業は完了です。
credentials "app.terraform.io" { token = "xxxxxxxxxxxxx" # Tokenを入力 } |
backendの設定を有効化する
backend.tfを以下に書き換えて、stateを見に行く場所をGCSからTerraform Cloudに変えます。
terraform { backend "remote" { hostname = "app.terraform.io" organization = "kaedemalu" # 現在のOrganizantion Name workspaces { name = "terraform_101" # 使っているWorkspaceの名前 } } } |
これで再びterraform initコマンドを実行しましょう。
terraform init |
これでローカルからTerraform Cloudにstateがコピーされたので、Queue Runの情報を確認してみましょう。Planの自動実行結果は以下になります。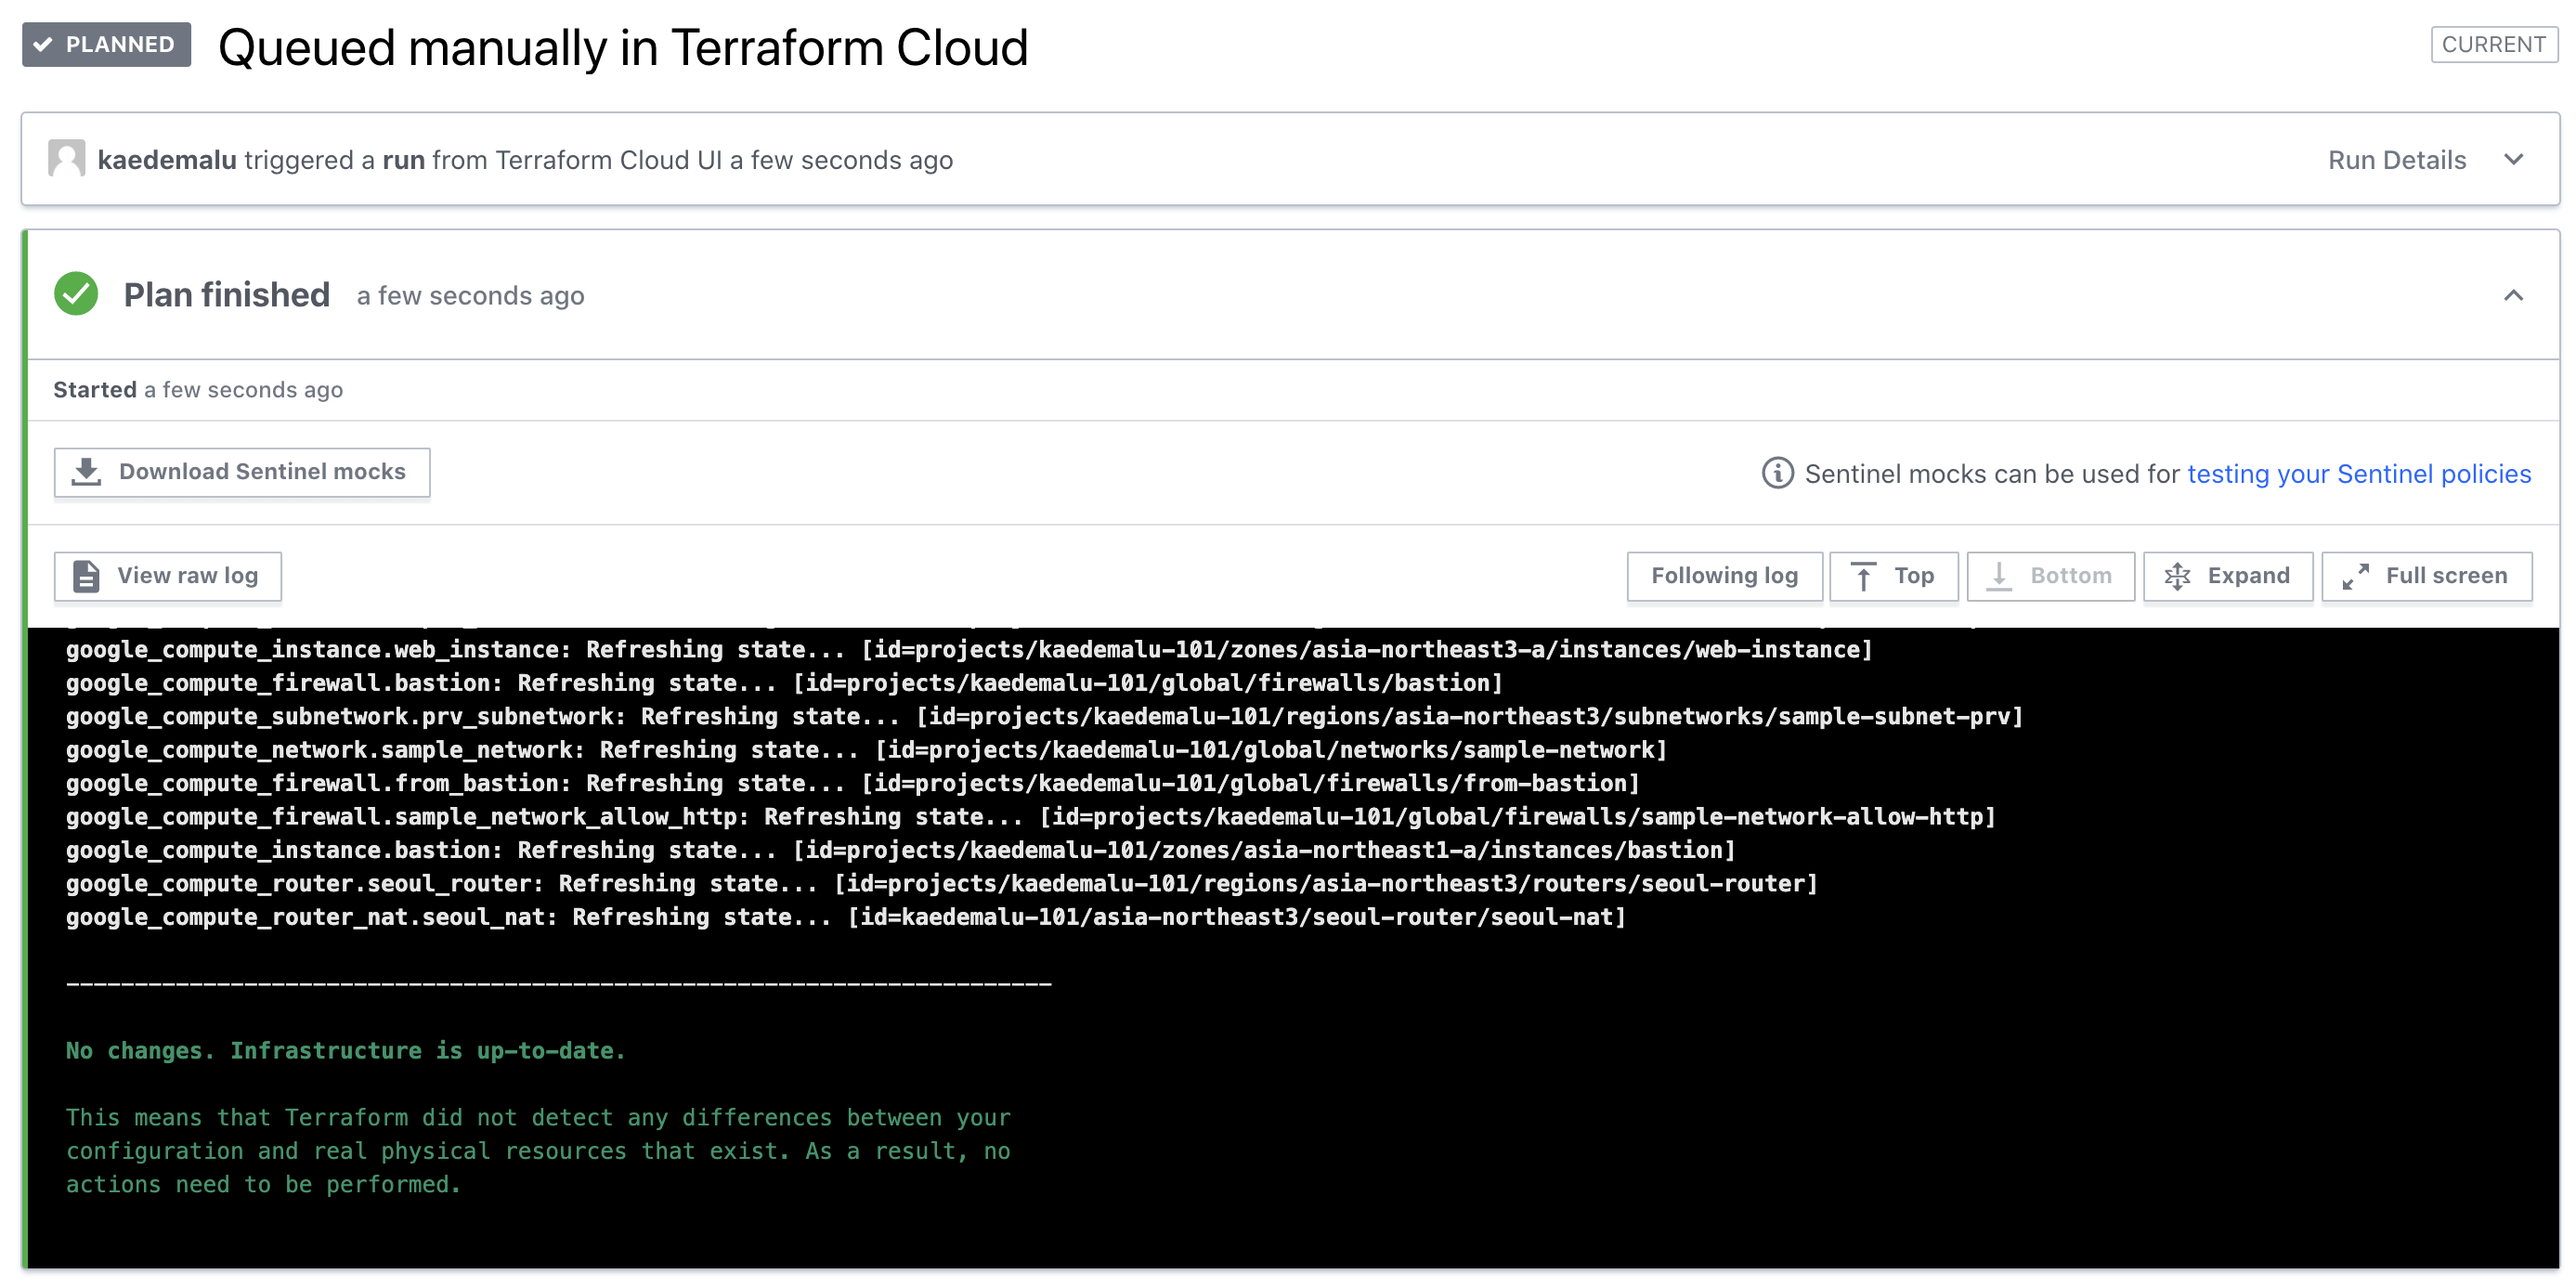
ローカルで全てApplyが済んでいるので差分がない状態になります! ちなみにこの状態になってからローカルでapplyコマンドを実行すると、
terraform apply |
と返されて実行できなくなっています。これでTerraform CloudからのみコードのApplyができるようになっているので、実行環境の統制ができるようになります。
まとめ
今回はTerraform 101ということでTerraformをつかってリソース構築を行いました。今回は取り扱いませんでしたが、コードの管理を環境ごと変えずに利用できるWorkspaceやTemplateとして使えるModuleなどもあります(参考記事はこちら。また、今回扱ったTerraformのバージョンは0.12ですが、環境構築編や実践編もありますのでそちらもぜひ読んでみてください。
Terraformを使うことで俗にいう手順書を無くして、インフラをコードで管理することで冪等性を保つことができます。うっかり手順を飛ばして、どこでミスを起こしたか調べることにもかなりの労力と時間を使うと思うので、是非Terraformを日々の(インフラの)お供に取り入れてみてはいかがでしょうか?
今回使用しているコードは以下のGithubに上がっているので、ぜひ参照してください。
https://github.com/kaedemalu/terraform_101_handon