はじめに こんにちは、TIGの辻です。
業務アプリケーションのビジネスロジックをサーバーレスで実装することも増えてきました。AWSサービストリガによるLambda関数起動 の記事にもあるようにAPI GatewayとLambda関数を組み合わせてHTTPサーバを提供することも容易にできます。バックエンドのWeb APIをLambda関数で動かすユースケースがよくあるパターンです。Lambda関数とアプリケーションロジックの実装は密結合になりやすいですが、HTTPサーバで動作するように実装して、Lambda関数として組み込むと、従来のHTTPサーバを実装するノウハウを活かしつつ、サーバレスで動作するバックエンドのWeb APIを構築できます。
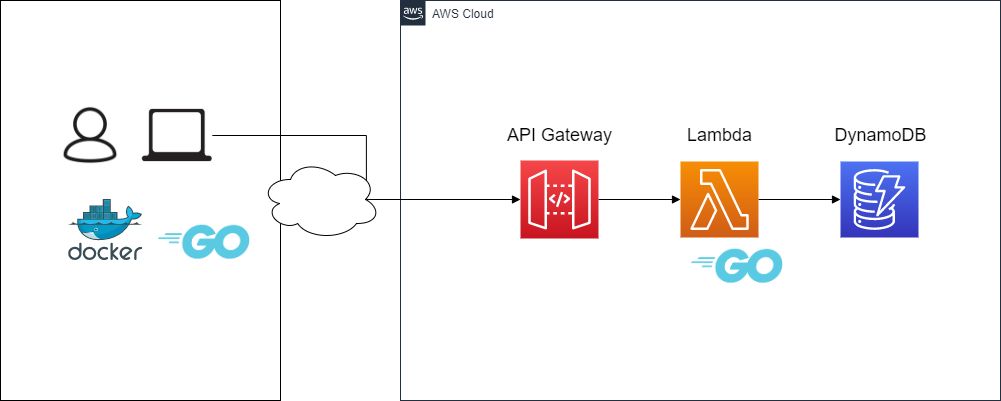
本記事ではGoを用いてサーバレスなWeb APIサーバをAWS上に1から構築するチュートリアルです。
go-swaggerに閉じた入門記事として、以下もおすすめです。
概要 AWS上に構築するインフラはこんな感じです。シンプル。
最初に本チュートリアルで使用しているバージョンを記載します。以下のとおりです。
ローカル開発にはDockerを使ってLocalStackを動かしていきます。LocalStackはバージョン 0.11.0 からすべてのサービスに 4566 ポートを使います。0.10.x 以下のバージョンと使用するポートが異なるため、古いバージョンを利用している方は注意してください。
docker run -it -p 4566:4566 -e SERVICES=dynamodb -e DEFAULT_REGION=ap-northeast-1 localstack/localstack:0.11.5
また、Lambda関数のデプロイなどに aws コマンドを使いますので、AWS CLI バージョン 2 のインストール を参考にAWS CLIをインストールしましょう。使っているOSのインストール手順に従ってインストールしてください。
以下のように出力されれば成功です。(以下はWindowsの例)
$ aws --version
aws-cli/2.0.48 Python/3.7.7 Windows/10 exe/AMD64
CLIでAWSのリソースにアクセスできるように設定しておきましょう。デフォルトのプロファイルとして設定しています。必要に応じてプロファイル名を指定できます。
$ aws configure
AWS Access Key ID [None]: access-key-ID
AWS Secret Access Key [None]: secret-access-key
Default region name [None]: ap-notrheast-1
Default output format [None]: json
テスト用にダミー用の local プロファイルも設定しておきましょう。
$ aws configure --profile local
AWS Access Key ID [None]: dummy
AWS Secret Access Key [None]: dummy
Default region name [None]: ap-notrheast-1
Default output format [None]: json
インフラ構築 AWS上に構築するインフラはTerraformで使います。一時的な動作確認で使うリソースの場合GUIでポチポチリソースを作成しても問題ないですが、業務でインフラを構築する場合はAWS CloudFormationやTerraformを使うことが一般的です。GUIでポチポチする際に暗黙的に作成されるリソースもしっかり把握していきましょう。
Terraformに関しては
の記事もあわせて見てみてください。その他にも技術ブログにTerraform に関する記事がたくさんあります。
またHashiCorp Learnのドキュメントも参考になります。
TerraformはInstall Terraform を参考に2020年9月にリリースしたv0.13.2をインストールしておきます。v0.12.xでも問題ないです。
$ terraform -v
Terraform v0.13.2
今回はローカルPCから terraform コマンドを実行してAWSにリソースを作っていきます。
最終的なファイル構成は以下のようになります。
.
├── api_gateway_deployment.tf
├── api_gateway_integration.tf
├── api_gateway_method.tf
├── api_gateway_resource.tf
├── api_gateway_rest_api.tf
├── assume_role
│   └── Lambda.json
├── dummy_function.zip
├── dynamodb_table.tf
├── iam_policy.tf
├── iam_policy_document.tf
├── iam_role.tf
├── iam_role_policy_attachment.tf
├── Lambda_function.tf
├── Lambda_permission.tf
└── provider.tf
まずはプロバイダの設定をしておきます。
provider.tf provider "aws" {
region = "ap-northeast-1"
alias = "ap-northeast-1"
version = ">= 3.7.0"
}
provider.tf を記述したら terraform init をしましょう。
$ terraform init
Initializing the backend...

Initializing provider plugins...
- Finding hashicorp/aws versions matching ">= 3.7.0"...
- Installing hashicorp/aws v3.7.0...
- Installed hashicorp/aws v3.7.0 (signed by HashiCorp)

Terraform has been successfully initialized!

You may now begin working with Terraform. Try running "terraform plan" to see
any changes that are required for your infrastructure. All Terraform commands
should now work.

If you ever set or change modules or backend configuration for Terraform,
rerun this command to reinitialize your working directory. If you forget, other
commands will detect it and remind you to do so if necessary.
続いてAPI GatewayとLambda関数を実装します。まずはLambda関数とAPI Gatewayで必要なIAMを記述します。API GatewayはLambda関数を呼び出す操作、Lambda関数ではCloudWatch Logsにログを書き込む操作、DynamoDBを操作するIAMを定義します。
iam_policy_document.tf data "aws_iam_policy_document" "example_api_policy" {
statement {
effect = "Allow"
principals {
type = "*"
identifiers = [
"*" ]
}
actions = [
"execute-api:Invoke"
]
resources = [
"arn:aws:execute-api:ap-northeast-1:*:*/*/*"
]
}
}
data "aws_iam_policy_document" "example_lambda" {
statement {
effect = "Allow"
actions = [
"logs:CreateLogGroup" ,
"logs:CreateLogStream" ,
"logs:PutLogEvents"
]
resources = [
"arn:aws:logs:*:*:*" ]
}
}
上記のポリシードキュメントをIAMポリシーとして定義します。
iam_policy.tf resource "aws_iam_policy" "example_lambda" {
name = "example-lambda"
policy = data .aws_iam_policy_document.example_lambda.json
}
IAMロールを定義します。
iam_role.tf resource "aws_iam_role" "example_lambda" {
name = "example-lambda"
assume_role_policy = file("assume_role/lambda.json" )
}
信頼ポリシーは以下のようになります。
assume_role/lambda.json { "Version" : "2012-10-17" , "Statement" : [ { "Action" : "sts:AssumeRole" , "Principal" : { "Service" : "lambda.amazonaws.com" } , "Effect" : "Allow" , "Sid" : "" } ] }
先程記述したIAMロールにIAMポリシーをアタッチします。
iam_role_policy_attachment.tf resource "aws_iam_role_policy_attachment" "example_api" {
role = aws_iam_role.example_lambda.name
policy_arn = aws_iam_policy.example_lambda.arn
}
IAMの設定は以上で完了です。
続いてAPI GatewayのRESTのリソースを作っていきましょう。先程作成したIAMポリシードキュメントを使います。
api_gateway_rest_api.tf resource "aws_api_gateway_rest_api" "example_api" {
name = "example-api"
description = "example serverless api"
policy = data .aws_iam_policy_document.example_api_policy.json
}
api_gateway_resource.tf resource "aws_api_gateway_resource" "example_api" {
rest_api_id = aws_api_gateway_rest_api.example_api.id
parent_id = aws_api_gateway_rest_api.example_api.root_resource_id
path_part = "{proxy+}"
}
APIリクエストに対する認可はなしにします。必要な場合は authorization パラメータを用いて設定します。
api_gateway_method.tf resource "aws_api_gateway_method" "example_api_get" {
authorization = "NONE"
http_method = "GET"
resource_id = aws_api_gateway_resource.example_api.id
rest_api_id = aws_api_gateway_rest_api.example_api.id
}
resource "aws_api_gateway_method" "example_api_post" {
authorization = "NONE"
http_method = "POST"
resource_id = aws_api_gateway_resource.example_api.id
rest_api_id = aws_api_gateway_rest_api.example_api.id
}
Lambdaプロキシ統合のGETリクエストを実装する場合においても integration_http_method パラメータは POST と設定する必要があります。
api_gateway_integration.tf resource "aws_api_gateway_integration" "example_api_get" {
rest_api_id = aws_api_gateway_rest_api.example_api.id
resource_id = aws_api_gateway_method.example_api_get.resource_id
http_method = aws_api_gateway_method.example_api_get.http_method
integration_http_method = "POST"
type = "AWS_PROXY"
uri = aws_lambda_function.example_api.invoke_arn
}
resource "aws_api_gateway_integration" "example_api_post" {
rest_api_id = aws_api_gateway_rest_api.example_api.id
resource_id = aws_api_gateway_method.example_api_post.resource_id
http_method = aws_api_gateway_method.example_api_post.http_method
integration_http_method = "POST"
type = "AWS_PROXY"
uri = aws_lambda_function.example_api.invoke_arn
}
api_gateway_deployment.tf resource "aws_api_gateway_deployment" "example_api" {
depends_on = [
aws_api_gateway_integration.example_api_get,
aws_api_gateway_integration.example_api_post,
]
rest_api_id = aws_api_gateway_rest_api.example_api.id
stage_name = "test"
stage_description = "test stage"
}
GETリクエストやPOSTリクエストを呼び出したときに起動するLambda関数のリソースを定義していないため、上記のtfファイルはエラーになります。Lambda関数のリソースを作ります。
Lambda関数はアプリケーション側からデプロイできるようにTerraform側ではLambda関数の初期構築時のみ使用するダミーのzipファイルを使って構築するのがおすすめです。
Lambdaの handler パラメータは、ビルドして生成した実行可能なファイル名と同じである必要があります。
lambda_function.tf resource "aws_lambda_function" "example_api" {
filename = "dummy_function.zip"
function_name = "example-api"
role = aws_iam_role.example_lambda.arn
handler = "lambda"
runtime = "go1.x"
128
timeout = 900
}
Lambda関数をAPI Gatewayから呼び出せるように明示的に許可します。
lambda_permission.tf resource "aws_lambda_permission" "example_apigateway_lambda" {
action = "lambda:InvokeFunction"
function_name = aws_lambda_function.example_api.function_name
principal = "apigateway.amazonaws.com"
"${aws_api_gateway_rest_api.example_api.execution_arn} /*/*/*"
}
dummy_function.zip はビルド可能な適当な main.go を dummy_function に格納してzip化しておきます。ファイルが存在しないとエラーになります。
dummy_function/main.go package mainimport ( "fmt" ) func main () fmt.Println("Hello world!" ) }
API GatewayとLambda関数のリソースを作成する準備が整いました。terraform plan terraform apply をしてリソースを作成します。
$ terraform apply
...
(省略)
...
Goのアプリケーション開発 Web API開発です。今回はサンプルアプリケーションなのでGETとPOSTだけ対応している以下の2つのパスを用意します。
それでは go mod init として開発を始めていきましょう。
API定義 GoのWebアプリケーションフレームワークはEchoやGinやchiやgo-swaggerなどいろいろありますが、今回はgo-swaggerを用いることにします。どのWebアプリケーションフレームワークを使うかはGopherの間でも意見が分かれるところなので、使い慣れたWebアプリケーションフレームがあれば、それを使うのもよしです。上記のメソッドとパスをSwaggerで記述していきます。swagger.yaml にすると以下のようになります。ちなみにSwaggerの書き方・規約はスキーマファースト開発のためのOpenAPI(Swagger)設計規約 の記事がオススメです。
swagger.yaml
swagger: "2.0"
info:
  version: "1.0.0"
  title: "Example app"
  description: "A Example app for serverless api"
host: "localhost:18888"
basePath: "/v1"
schemes:
  - "http"
consumes:
  - "application/json"
produces:
  - "application/json"
postid: ""
tag:
  - name: user
    description: ユーザAPI
paths:
  /users:
    get:
      summary: ユーザ一覧取得
      operationId: getUsers
      responses:
        '200':
          description: Success
          schema:
            $ref: '#/definitions/users'
        '400':
          description: Bad Request
          schema:
            $ref: '#/definitions/Error'
        '500':
          description: Internal Server Error
          schema:
            $ref: '#/definitions/Error'
    post:
      summary: ユーザ登録
      operationId: postUsers
      parameters:
        - in: body
          name: postUsers
          required: true
          schema:
            $ref: '#/definitions/user'
          description: 登録するユーザ情報
      responses:
        '200':
          description: Success
          schema:
            $ref: '#/definitions/user'
        '400':
          description: Bad Request
          schema:
            $ref: '#/definitions/Error'
        '500':
          description: Internal Server Error
          schema:
            $ref: '#/definitions/Error'
definitions:
  users:
    title: users
    type: array
    description: ユーザ一覧
    items:
      $ref: '#/definitions/user'
  user:
    title: User
    type: object
    description: ユーザ
    properties:
      user_id:
        type: string
        x-omitempty: false
        description: ユーザID
      name:
        type: string
        x-omitempty: false
        description: ユーザ名
    required:
      - user_id
      - name
  Error:
    title: Error
    type: object
    description: エラー
    properties:
      message:
        type: string
        description: エラーメッセージ
go-swagger はInstalling を参考にインストールします。今回は2020/09/23現在の最新バージョンである 0.25.0 をインストールします。以下のように出力されていればOKです。
$ swagger version
version: v0.25.0
commit: f032690aab0634d97e2861a708d8fd9365ba77d2
データストア ユーザの情報を格納するDynamoDBのテーブル名は users としておきます。スキーマは以下です。
ついでにTerraformを用いてAWS上にリソースを作成しましょう。キャパシティはオンデマンドモードにしておきます。
dynamodb_table.tf resource "aws_dynamodb_table" "example_users" {
name = "example-users"
billing_mode = "PAY_PER_REQUEST"
"user_id"
"user_id"
type = "S"
}
}
Lambda関数の環境変数からDynamoDBのテーブル名を取得できるようにLambda関数の環境変数に追加しておきます。環境変数でDynamoDBのテーブル名を設定できるようにしておくと、ローカルでのテストする際にAWS上に構築するテーブル名と別の名前を指定でき、便利です。
lambda_function.tf resource "aws_lambda_function" "example_api" { filename = "dummy_function.zip" function_name = "example-api" role = aws_iam_role.example_lambda.arn handler = "lambda" runtime = "go1.x" memory_size = 128 timeout = 900 + environment { + variables = { + DYNAMO_TABLE_USERS: aws_dynamodb_table.example_users.name + } + } }
data "aws_iam_policy_document" "example_lambda_policy" {
+  statement {
+    effect = "Allow"
+    actions = [
+      "dynamodb:*"
+    ]
+    resources = [
+      "*"]
+  }
  statement {
    effect = "Allow"
    actions = [
      "logs:CreateLogGroup",
      "logs:CreateLogStream",
      "logs:PutLogEvents"
    ]
    resources = [
      "arn:aws:logs:*:*:*"]
  }
}
新しいリソースを定義したら terraform apply しておきます。
パッケージ構成 ちょっとしたLambda関数であれば main.go の1ファイルで良い場合もありますが、バックエンドのWeb APIを提供するとなるとそうはいかないでしょう。Goのパッケージ構成は悩みポイントの1つです。プロジェクトの規模や開発メンバーのスキルセットなどにもよると思いますが、個人的にはフラットなパッケージ構成を導入することが多い気がします。あなたのGoアプリ/ライブラリのパッケージ構成もっとシンプルでよくない? やgo-swaggerを用いたWebアプリケーション開発Tips19選 の記事を参考にしてみてください。今回は以下のようなフラットパッケージとします。
. ├── Makefile ├── README.md ├── cmd/lambda/main.go ├── db.go ├── gen ├── go.mod ├── go.sum ├── swagger.yaml ├── testdata ├── user_handler.go ├── user_handler_db.go └── user_handler_test.go
以下のようにディレクトリを作っておきます。
mkdir -p %GOPATH%\src\github.com\d-tsuji\examplecd examplemkdir cmd\lambda gen testdata
ビルド ビルドなどのタスクはMakefileに記述しておきます。
Makefile .PHONY: deps deps: go mod download go mod tidy .PHONY: build build: deps GOOS=linux GOARCH=amd64 go build -ldflags="-s -w" -trimpath -o bin/lambda cmd/lambda/main.go .PHONY: test test : export DYNAMO_TABLE_USERS=local_users;\ go test -race -v -count=1 ./ .PHONY: generate-server generate-server: rm -rf ./gen/models ./gen/restapi/operations swagger generate server --exclude-main -f ./swagger.yaml -t gen .PHONY: zip zip: build zip -j bin/lambda.zip bin/lambda .PHONY: deploy deploy: zip aws lambda update-function-code --region ap-northeast-1 --function-name example-api --zip-file fileb://bin/lambda.zip
先程作成した swagger.yml のAPI定義を元に make generate-server で go-swagger でコードを生成します。
$ make generate-server
swagger generate server --exclude-main -f ./swagger.yaml -t gen
2020/09/15 22:17:26 validating spec C:\Users\dramt\go\src\github.com\d-tsuji\example\swagger.yaml

...

2020/09/15 22:17:27 executed template asset:serverDoc
2020/09/15 22:17:27 Generation completed!

For this generation to compile you need to have some packages in your GOPATH:

        * github.com/go-openapi/runtime
        * github.com/jessevdk/go-flags

You can get these now with: go get -u -f gen/...
go-swagger で生成したファイルでビルドに必要なモジュールを go.mod に追加します。
go get github.com/go-openapi/runtime
go get github.com/jessevdk/go-flags
ハンドラ実装 準備が整ったので、ハンドラの実装をしていきましょう。
まずは db.go を実装してDynamoDBに接続します。ローカルでの開発の場合は 4566 ポートで起動しているLocalStackに接続します。DynamoDBのGoのクライアントライブラリは
などがあります。個人的なおすすめは guregu/dynamo です。本チュートリアルでは guregu/dynamo を利用することにします。guregu/dynamo の使い方については「DynamoDB×Go連載#1 GoでDynamoDBでおなじみのguregu/dynamoを利用する 」の記事も見てみてください。
go get github.com/guregu/dynamo
db.go package exampleimport ( "log" "os" "github.com/aws/aws-sdk-go/aws" "github.com/aws/aws-sdk-go/aws/session" "github.com/guregu/dynamo" ) var ( gdb *dynamo.DB region string usersTable string ) func init () region = os.Getenv("AWS_REGION" ) usersTable = os.Getenv("DYNAMO_TABLE_USERS" ) if usersTable == "" { log.Fatal("missing env variable: DYNAMO_TABLE_USERS" ) } gdb = dynamo.New(session.Must(session.NewSession(&aws.Config{ Region: aws.String(region), }))) }
続いてハンドラの実装します。まずは以下の GET を扱うハンドラから実装していきます。
DynamoDBから登録されているすべてのユーザを取得する処理を実装します。
DynamoDBとマッピングするモデルは以下です。
dynamo_model.go package exampletype User struct { UserID string `dynamo:"user_id,hash"` UserName string `dynamo:"user_name"` }
テーブルから全アイテム取得するためにScanを行います。
user_handler_db.go package exampleimport ( "context" "errors" "github.com/guregu/dynamo" ) func scanUsers (ctx context.Context) error ) { var resp []User table := gdb.Table(usersTable) if err := table.Scan().AllWithContext(ctx, &resp); err != nil { if errors.Is(err, dynamo.ErrNotFound) { return nil , nil } return resp, err } return resp, nil }
続いて上記を使ったハンドラを実装します。
user_handler.go package exampleimport ( "fmt" "github.com/d-tsuji/example/gen/models" "github.com/d-tsuji/example/gen/restapi/operations" "github.com/go-openapi/runtime/middleware" ) func GetUsers (p operations.GetUsersParams) ctx := p.HTTPRequest.Context() users, err := scanUsers(ctx) if err != nil { return operations.NewGetUsersInternalServerError().WithPayload(&models.Error{ Message: fmt.Sprintf("scan users error: %v" , err), }) } var resp models.Users for _, u := range users { u := u resp = append (resp, &models.User{ UserID: &u.UserID, Name: &u.UserName, }) } return operations.NewGetUsersOK().WithPayload(resp) }
ハンドラのテストも実装しましょう。テスト時はDynamoDBの接続先をLocalStackに上書きして、テスト用の設定にします。パッケージ構成によっては接続先の値は関数の引数で渡す、などが必要になるでしょう。
単体テストは実装の詳細をテストしないように、粒度を粗めにしておきます。ハンドラのリクエストに対して想定するJSONのレスポンスが取得できているかどうか確認します。テストファイルは want_get_users_1.json want_get_users_2.json としておきます。
user_handler_test.go package exampleimport ( "context" "io/ioutil" "net/http/httptest" "testing" "github.com/aws/aws-sdk-go/aws" "github.com/aws/aws-sdk-go/aws/session" "github.com/d-tsuji/example/gen/models" "github.com/d-tsuji/example/gen/restapi/operations" "github.com/go-openapi/runtime" "github.com/guregu/dynamo" "github.com/nsf/jsondiff" ) func init () dbEndpoint := "http://localhost:4566" sess := session.Must(session.NewSessionWithOptions(session.Options{ Profile: "local" , SharedConfigState: session.SharedConfigEnable, Config: aws.Config{ Endpoint: aws.String(dbEndpoint), DisableSSL: aws.Bool(true ), }, })) gdb = dynamo.New(sess) } func TestGetUsers (t *testing.T) tests := []struct { name string input func (t *testing.T) wantStatusCode int want string }{ { name: "複数件のユーザの取得" , input: func (t *testing.T) err := gdb.CreateTable(usersTable, User{}).Provision(1 , 1 ).RunWithContext(context.TODO()) if err != nil { t.Errorf("dynamo create table %s: %v" , usersTable, err) } inputUsers := []User{{UserID: "001" , UserName: "gopher" }, {UserID: "002" , UserName: "rubyist" }} for _, u := range inputUsers { if err := gdb.Table(usersTable).Put(u).RunWithContext(context.TODO()); err != nil { t.Errorf("dynamo input user %v: %v" , u, err) } } }, wantStatusCode: 200 , want: "./testdata/want_get_users_1.json" , }, { name: "ユーザ0件" , input: func (t *testing.T) err := gdb.CreateTable(usersTable, User{}).Provision(1 , 1 ).RunWithContext(context.TODO()) if err != nil { t.Errorf("dynamo create table %s: %v" , usersTable, err) } }, wantStatusCode: 200 , want: "./testdata/want_get_users_2.json" , }, } for _, tt := range tests { t.Run(tt.name, func (t *testing.T) tt.input(t) t.Cleanup(func () if err := gdb.Table(usersTable).DeleteTable().RunWithContext(context.TODO()); err != nil { t.Fatalf("dynamo delete table %s: %v" , usersTable, err) } }) p := operations.NewGetUsersParams() p.HTTPRequest = httptest.NewRequest("GET" , "/v1/users" , nil ) resp := GetUsers(p) w := httptest.NewRecorder() resp.WriteResponse(w, runtime.JSONProducer()) want, err := ioutil.ReadFile(tt.want) if err != nil { t.Fatalf("want file read: %v" , err) } if w.Result().StatusCode != tt.wantStatusCode { t.Errorf("status got %v, but want %v" , w.Result().StatusCode, tt.wantStatusCode) } opt := jsondiff.DefaultConsoleOptions() if d, s := jsondiff.Compare(w.Body.Bytes(), want, &opt); d != jsondiff.FullMatch { t.Errorf("unmatch, got=%s, want=%s, diff=%s" , string (w.Body.Bytes()), string (want), s) } }) } }
testdata/want_get_users_1.json [ { "user_id" : "001" , "name" : "gopher" } , { "user_id" : "002" , "name" : "rubyist" } ]
testdata/want_get_users_2.json
Goのテストを実行するとPASSすることがわかります。ハンドラの実装ができました。
$ make test
export DYNAMO_TABLE_USERS=local_users;\
        go test -race -v -count=1 ./
=== RUN   TestGetUsers
=== RUN   TestGetUsers/複数件のユーザの取得
=== RUN   TestGetUsers/ユーザ0件
--- PASS: TestGetUsers (0.39s)
    --- PASS: TestGetUsers/複数件のユーザの取得 (0.30s)
    --- PASS: TestGetUsers/ユーザ0件 (0.09s)
PASS
ok      github.com/d-tsuji/example      0.428s
POSTのハンドラも同様に実装・テストできますが、本チュートリアルでは省略します。本チュートリアルの内容はGitHubにコミットしてあるので、そちらを参照ください。
go-swagger はハンドラの実装とHTTPリクエストのパスのマッピングを自動生成したファイルの中に記述します。今回の場合は configure_example_app.go です。
package restapifunc configureAPI (api *operations.ExampleAppAPI) api.ServeError = errors.ServeError api.JSONConsumer = runtime.JSONConsumer() api.JSONProducer = runtime.JSONProducer() api.GetUsersHandler = operations.GetUsersHandlerFunc(example.GetUsers) api.PostUsersHandler = operations.PostUsersHandlerFunc(example.PostUsers) api.PreServerShutdown = func () api.ServerShutdown = func () return setupGlobalMiddleware(api.Serve(setupMiddlewares)) }
Lambda関数インテグレーション go-swaggerで実装したWebアプリケーションサーバをLambda関数として動かすようにします。GoのLambda関数として有効なシグネチャは以下の通りです。
- func ()
- func () error
- func (TIn), error
- func () (TOut, error)
- func (context.Context) error
- func (context.Context, TIn) error
- func (context.Context) (TOut, error)
- func (context.Context, TIn) (TOut, error)
TIn や TOut は encoding/json でエンコード・デコードできる型を指定できます。
Lambda関数はAPI Gatewayのリクエストをトリガーに起動します。Lambda関数のAPI Gatewayのリクエスト events.APIGatewayProxyResponse をGoのHTTPサーバで扱えるような *http.Request に変換する必要があります。
を用いると簡単に変換できます。もちろん go-swagger だけでなく主要なGoのWebアプリケーションフレームに対応しています。
cmd/lambda/main.go package mainimport ( "context" "log" "github.com/aws/aws-lambda-go/events" "github.com/aws/aws-lambda-go/lambda" "github.com/awslabs/aws-lambda-go-api-proxy/httpadapter" "github.com/d-tsuji/example/gen/restapi" "github.com/d-tsuji/example/gen/restapi/operations" "github.com/go-openapi/loads" ) var httpAdapter *httpadapter.HandlerAdapterfunc Handler (ctx context.Context, req events.APIGatewayProxyRequest) error ) { if httpAdapter == nil { swaggerSpec, err := loads.Embedded(restapi.SwaggerJSON, restapi.FlatSwaggerJSON) if err != nil { log.Fatalln(err) } api := operations.NewExampleAppAPI(swaggerSpec) server := restapi.NewServer(api) server.ConfigureAPI() httpAdapter = httpadapter.New(server.GetHandler()) } return httpAdapter.ProxyWithContext(ctx, req) } func main () lambda.Start(Handler) }
ビルド/デプロイ 準備は整いました! Goのファイルをビルドしzip化してAWS Lambda関数にデプロイしましょう。デプロイのコマンドはMakefileにタスクとして記述していました。
deploy: zip
	aws lambda update-function-code --region ap-northeast-1 --function-name example-api --zip-file fileb://bin/lambda.zip
それではビルドしてデプロイします。
$ make deploy go mod download go mod tidy GOOS=linux GOARCH=amd64 CGO_ENABLED=0 go build -ldflags="-s -w" -trimpath -o bin/lambda cmd/lambda/main.go zip -j bin/lambda.zip bin/lambda updating: lambda (deflated 67%) aws lambda update-function-code --region ap-northeast-1 --function-name example-api --zip-file fileb://bin/lambda.zip { "FunctionName" : "example-api" , "FunctionArn" : "arn:aws:lambda:ap-northeast-1:123456789012:function:example-api" , "Runtime" : "go1.x" , "Role" : "arn:aws:iam::123456789012:role/example-lambda" , "Handler" : "lambda" , "CodeSize" : 5517317, "Description" : "" , "Timeout" : 900, "MemorySize" : 128, "LastModified" : "2020-09-22T08:56:19.019+0000" , "CodeSha256" : "bV+3mzysyD5226diZpvjfpE+Qz6o5ZHT8y35fAB3I/M=" , "Version" : "$LATEST " , "Environment" : { "Variables" : { "DYNAMO_TABLE_USERS" : "example-users" } }, "TracingConfig" : { "Mode" : "PassThrough" }, "RevisionId" : "26888c1b-bfa2-4e67-960e-3fd8212e29f2" }
上記のように出力されていればデプロイは完了です。継続的なデプロイを実施したい場合はdevelopブランチなどにPRがマージされたタイミングで開発環境にLambda関数をデプロイするといった内容をGitHub ActionsやCircleCIの設定に組み込むとよいでしょう。
さてCLIでDynamoDBにデータをPutして、APIのレスポンスを確認してみましょう。
aws dynamodb put-item --table-name example-users --item '{"user_id": {"S": "001"}, "user_name": {"S": "Gopher"}}'
今回はお手軽にcurlでAPIにリクエストしてレスポンスを確認します。
$ curl -i https://${rest-api-id} .execute-api.ap-northeast-1.amazonaws.com/test/v1/users HTTP/1.1 200 OK Content-Type: application/json Content-Length: 36 Connection: keep-alive Date: Mon, 21 Sep 2020 10:58:25 GMT x-amzn-RequestId: 89f88ada-ea48-4a60-a8ef-2b58df4309d1 x-amz-apigw-id: TNoUxEJlNjMFdxg= X-Amzn-Trace-Id: Root=1-5f688751-c31c0c580cbe0f64d179578a;Sampled=0 X-Cache: Miss from cloudfront Via: 1.1 48bf5adc2925386f020a8608d1c7edbe.cloudfront.net (CloudFront) X-Amz-Cf-Pop: NRT20-C3 X-Amz-Cf-Id: GfDUO8SfL5POKkIVFVs5L-hJ8KkjwLCLf22xZmNWFiVkIQaHR2H4oA== [{"name" :"Gopher" ,"user_id" :"001" }]
API Gatewayから想定通りのレスポンスが返ってきました! 本チュートリアルでは /v1/users へのGETリクエストのサンプルだけでしたが、新しいAPI定義が必要な場合 swagger.yaml に追加して本チュートリアルのようにすすめていけば容易に拡張できます。
チュートリアルのすべてのサンプルはGitHubの以下のリポジトリにおいてあります。